Posey's Tips & Tricks
How To Use Microsoft Office for Asset Management, Part 2
Now that you know how to use Microsoft Word to make barcodes, the next step is to keep track of your barcoded items in Excel. Here's how.
In Part 1 of this three-part series, I showed you how to use Microsoft Word as a tool for creating barcode labels. Now, I want to show you how to use Excel to keep track of the barcoded items that you scan.
Normally, when you attach a barcode reader to a laptop and open Excel, the barcodes that you scan are converted into readable text and inserted into the current cell. This behavior might be good enough if you have created your own barcodes and are familiar with the codes, but if you are dealing with commercial products that have their own barcodes, you will probably want to do some additional work. After all, the UPC barcodes typically found on commercial products generally consist of long strings of meaningless numbers. You will need a way to convert those numbers into a product name.
The easiest way to make this happen is to create an Excel document consisting of two sheets. One sheet will be a product catalog. This sheet will list the product names and their associated barcode values.
The second sheet will be your own inventory. The idea is that when you scan an item, Excel will insert the barcode value into this sheet, then look up the value on the next sheet and convert the barcode into an item name. Once that's in place, we can do other things such as create a tally of individual items.
Creating the catalog sheet is simple. For this column, I assigned some imaginary barcode numbers to the items on my desk. As you can see in Figure 1, the sheet contains two columns, one for the barcode value and another for the corresponding item name. If this were a real-world situation, I would scan an item to get its barcode number, then type in the item name beside it.
 Figure 1: This is the catalog portion of the spreadsheet.
The inventory sheet is a bit more complex. In the interest of keeping things simple, let's not worry about tallying items (at least not yet) and focus instead on a single task. Let's assume that the goal is to scan barcodes and have the scanned item and its name show up on the sheet.
The first step in accomplishing this is to create two columns. I will call these columns Item and Description. The Item column will hold the scanned barcode number and the Description column will list what the scanned item is. We don't really have to do anything to the Item column. After all, this column will be automatically populated upon scanning a barcode. The real trick is getting Excel to display the corresponding product description.
To accomplish this, I will be using two different Excel functions -- Index and Match. The Index function returns a value from a table or from a range of cells. The Match function looks for a particular item within a range of cells and returns its relative position.
There is an old saying that you have to walk before you can run. That being the case, I want to show you the basic usage for these formulas before I show you how to query a catalog found on a different sheet.
If you look at Figure 2, you can see that I have created a simple spreadsheet listing fruits and their colors. If you look at the bottom of the sheet, you can see that I am using a formula to retrieve the word "Purple."
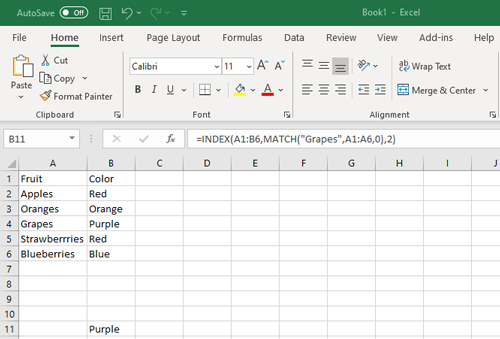 Figure 2: You can use a formula to find a value within a sheet.
Here, I am indexing a range of cells from A1 to B6 and then using the Match function to look for the word "Grapes." The reference to A1:A6 just after the word "Grapes" in the formula means that I am searching for "Grapes" in the A column. The 2 that appears at the end of my formula indicates that when I find the word "Grapes," I want to retrieve the value from the second column (column B). In this case, that column contains the word "Purple."
Now let's take things a step further. In the previous example, I searched for the word "Grapes" by including the word "Grapes" directly in my formula. This time, let's use a cell's contents as the query item. Remember, the ultimate goal is to scan a barcode into a cell, then use that value to find the item description. We don't want to have to type barcode values directly into formulas.
In this case, I created a second area in the lower-right corner of the spreadsheet. Like the spreadsheet I just showed you, this section has two columns -- Fruits and Colors. In this case, I am providing the names of the fruits, but the fruit colors are being dynamically populated by retrieving them from the portion of the spreadsheet shown earlier in Figure 2. You can see this new section, as well as the formula that I am using, in Figure 3.
 [Click on image for larger view.] Figure 3: The fruit colors are being dynamically populated.
In this case, the Index is pointing to the range of B1 to B6. That's the section of my "catalog" containing colors. I am then using the Match command to look for a match to the contents of cell H13 (which contains the word "Apples"). The Match function looks for a match between cells A1 and A6. When a match is found, the result is pulled from the B column (hence indexing B1 to B6). The end result is that "Apples" is listed as Red and "Grapes" is listed as Purple.
As you can see, this type of look-up works pretty well but it isn't perfect (yet). You will notice that the bottom two cells contain errors. This is because I was using absolute cell references instead of relative cell references. I will show you how to fix this and incorporate the second sheet in the third and final part of this series.
About the Author
Brien Posey is a 22-time Microsoft MVP with decades of IT experience. As a freelance writer, Posey has written thousands of articles and contributed to several dozen books on a wide variety of IT topics. Prior to going freelance, Posey was a CIO for a national chain of hospitals and health care facilities. He has also served as a network administrator for some of the country's largest insurance companies and for the Department of Defense at Fort Knox. In addition to his continued work in IT, Posey has spent the last several years actively training as a commercial scientist-astronaut candidate in preparation to fly on a mission to study polar mesospheric clouds from space. You can follow his spaceflight training on his Web site.