Posey's Tips & Tricks
Reading a 5.25 Inch Floppy Disk on Modern Hardware
A GreaseWeazle adapter and specialized software make it possible to recover files from decades-old 5.25-inch floppy disks.
After recently rediscovering numerous floppy disks in my attic, I decided to see if there was a way to read their contents on a modern system. The problem of course, is that modern systems do not contain floppy disk controllers and nobody makes a USB-based 5.25-inch floppy disk (although USB based 3.5-inch drives are readily available).
My solution was to acquire a device called a Grease Weazle, which allows both 3.5 inch and 5.25 inch floppy drives to be connected to a USB interface. However, there is a catch. The Grease Weazle will not provide you with direct access to the disk. You can only use it to read the disk's flux.
While there are several videos and tutorials online that walk you through the process, I found that most were far more complex than they needed to be, or they left out key details. As such, I wanted to show you what the process looks like, step by step.
For the purposes of this article, I decided to convert a disk containing a game called Mean 18. The reason why I chose this particular game is because it was released in 1986, making it 40 years old. I wanted to show that it is possible to read even an extremely old disk, assuming that the disk has not been damaged.
In order to read and convert a floppy disk on modern hardware, there are three programs that you are going to need to download and install. The first of these programs is simply called GreaseWeazel. The second program that you will need is GreaseWeazel GUI. Technically, you don't have to have this program, but it will make your life easier. When you download GreaseWeazel GUI, you will need to extract its contents and copy them to the same folder as the GreaseWeazel code. The third thing that you will need is the HxC Floppy Emulator (just the software, not the hardware). You can download it here.
To get started, connect the hardware, boot your machine, and then launch GreaseWeazel GUI. When you do, you will see a screen similar to the one shown in Figure 1. Make sure that the Read From Disk option is selected and then click Select.
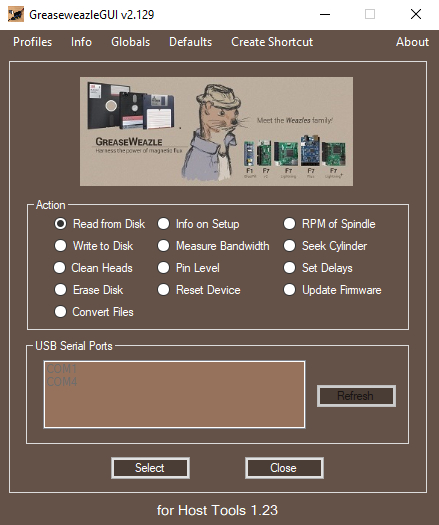 Figure 1. Select the Read From Disk option and click Select.
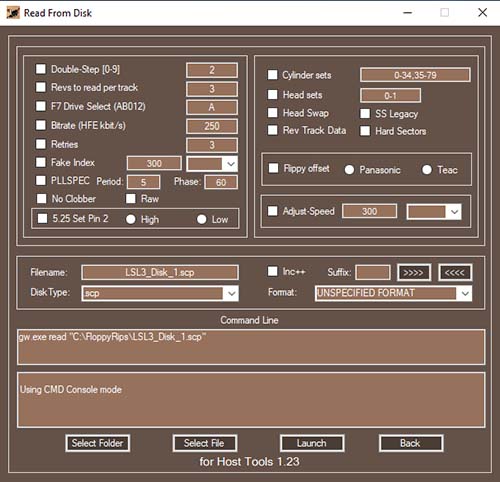
At this point, you will be taken to the screen shown in Figure 2. Admittedly, this screen can be a bit overwhelming and this is where I got lost trying to follow a lot of the tutorials. However, my experience has been that you don't have to worry about most of the options shown on the screen.
 [Click on image for larger view.]
Figure 2. This is the screen that controls the disk read process.
[Click on image for larger view.]
Figure 2. This is the screen that controls the disk read process.
The Read From Disk screen is designed to create a disk image file. Therefore, you will need to enter a filename into the Filename box. Don't forget to provide an extension. You will need to set the extension to .SCP. Likewise, you will need to set the Disk Type option to SCP. You will also need to click on the Select Folder button and then specify the path where the SCP file should be written to.
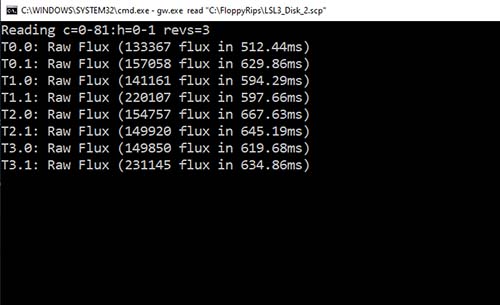
At this point, you will need to make sure that the Format option is set to UNSPECIFIED FORMAT and then click the Launch button. This will cause the software to open a console window and begin reading the disk, one track at a time. You can see what this process looks like in Figure 3.
 [Click on image for larger view.]
Figure 3. The software begins reading the raw flux from the disk, one track at a time.
[Click on image for larger view.]
Figure 3. The software begins reading the raw flux from the disk, one track at a time.
It's worth pointing out that the disk image file is comparatively large. For this particular project, I am working with 5.25-inch floppy disks, which range in capacity from 360 KB to 1.2 MB. In contrast, a disk image file can be over 40 MB in size, as shown in Figure 4. The reason why this happens is because the file is essentially a record of all of the flux changes, not just a copy of the disk's file system.
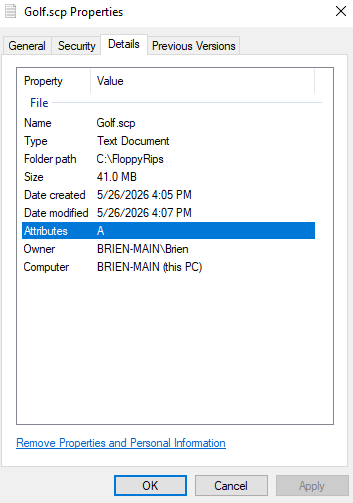 Figure 4. The image file is more than 40 times larger than the disk it came from.
OK, so far we have created a disk image, but the image is unreadable using conventional means. To extract the actual files from the image, you will need to open the HxC Floppy Emulator and then click the Load button, shown in Figure 5.
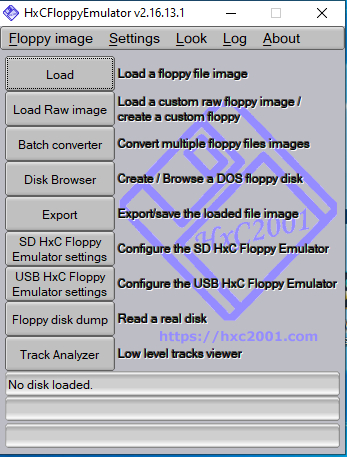 Figure 5. Open the HxC Floppy Emulator software and click the Load button.
When prompted, select the file that you want to import and then click OK. On my system, the import process takes about a minute to complete.
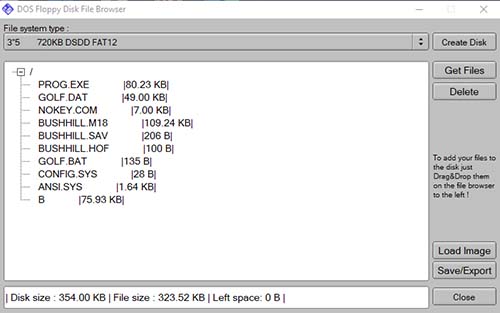
Once the load process finishes, click the Disk Browser button. This takes you to a screen like the one shown in Figure 6. This is where you can see what is on the disk. You might notice that the software identifies this disk as a 3.5-inch floppy, but the file extraction process seems to work fine in spite of that.
 [Click on image for larger view.]
Figure 6. You can finally see the files on the disk.
[Click on image for larger view.]
Figure 6. You can finally see the files on the disk.
The last thing that you will have to do is to select the files and then click the Get Files button. Now, you will be prompted as to where to copy the files. Choose a location and click OK.
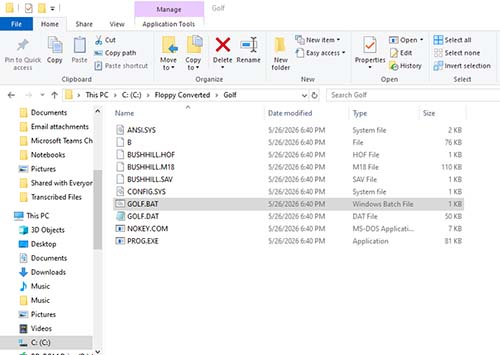
As you can see in Figure 7, the files have been extracted from the disk. In doing so however, metadata is lost. The date stamp indicates that the files were created in 2026, not 1986.
 [Click on image for larger view.]
Figure 7. I have copied the files from the floppy disk.
[Click on image for larger view.]
Figure 7. I have copied the files from the floppy disk.
About the Author
Brien Posey is a 22-time Microsoft MVP with decades of IT experience. As a freelance writer, Posey has written thousands of articles and contributed to several dozen books on a wide variety of IT topics. Prior to going freelance, Posey was a CIO for a national chain of hospitals and health care facilities. He has also served as a network administrator for some of the country's largest insurance companies and for the Department of Defense at Fort Knox. In addition to his continued work in IT, Posey has spent the last several years actively training as a commercial scientist-astronaut candidate in preparation to fly on a mission to study polar mesospheric clouds from space. You can follow his spaceflight training on his Web site.