Posey's Tips & Tricks
Deploying Windows Server RemoteApp, Part 1
Here's the step-by-step process for installing and configuring Remote Desktop Services to publish Windows applications as RemoteApp programs, enabling domain-joined servers to deliver apps to Linux and other non-domain clients through RDP.
In a recent column, I talked about how I decided to use Windows Server's application virtualization capabilities as a tool for making Windows applications available on Linux desktops. Now, I want to walk you through the process of getting everything set up.
Application virtualization is based on the Remote Desktop Services, which are more commonly used for hosting virtual desktops. However, these services, which I will refer to as RDS, can also host individual applications, making those applications available through an RDP client. This capability is sometimes referred to as Windows RemoteApp.
Before I get started, there are two things that you need to know. First, in order for the technique that I will be showing you to work, your RDS server must be domain joined. However, the clients who will be accessing the virtualized applications do not have to be domain jointed (which is important if you need to access applications from non-Windows clients).
The other thing that you need to know is that in order to use this technique, you will need to purchase RDS licenses in addition to the usual Windows Server licenses. In fact, Microsoft even goes so far as to make you deploy a license server. In my case, since my environment is so small, I am hosting the license server directly on my RDS server.
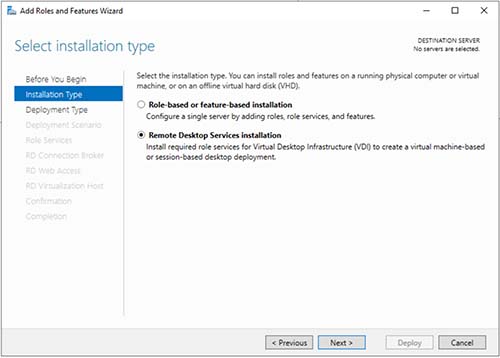
So let's go ahead and get started. The first thing that you will need to do is to install RDS. This is done through Server Manager, but the technique is a little bit different from what you might be used to. Select the Add Roles and Features command from the Manage menu. However, rather than choosing the Role-based or Feature-based installation option like you normally would, select the Remote Desktop Services Installation option instead. You can see this option shown in Figure 1.
 [Click on image for larger view.]
Figure 1. Choose the Remote Desktop Services Installation option.
[Click on image for larger view.]
Figure 1. Choose the Remote Desktop Services Installation option.
Click Next and you will be asked if you want to perform a standard installation or if you want to do a quick start. Choose the Standard Deployment option and click Next.
The next screen asks you to choose your deployment scenario. Choose the Session Based Desktop Deployment option and click Next.
At this point, you will see a message telling you that three Remote Desktop Service role services are going to be installed. You don't actually have to do anything on this screen, so just click Next.
Now you are going to be prompted to specify the RD connection broker server. Since there aren't any other RDS servers in the environment, select your current server, click the arrow icon to add it to the Selected column, as shown in Figure 2, and then click Next.
 [Click on image for larger view.]
Figure 2. You will need to designate the current server as a connection broker.
[Click on image for larger view.]
Figure 2. You will need to designate the current server as a connection broker.
Next, you will be prompted to specify a server to act as an RD Web access server. Once again, select your current server, click the arrow icon, and click Next. Repeat this process once again on the Session Host screen and click Next.
At this point, you should arrive at the confirmation screen. Select the Restart checkbox and then click the Deploy button. The Remote Desktop Services will now be installed. The server will reboot at the end of this process. When the reboot completes, open Server Manager and allow the installation process to complete. When the process finishes, click Close.
Now, click on Server Manager's Remote Desktop Services tab and then click on the Create Session Collection link. This will cause RDS to launch the Create Collection wizard.
Click Next to bypass the wizard's Welcome screen. When prompted, enter a name for your session collection. For the purposes of this blog post, I am going to call my session collection RemoteApp.
Click Next, and you will be taken to the RD Session Host screen. As before, select your current server, click on the arrow icon, and then click Next.
You will now be prompted to choose a group of users who should have access to the applications that will eventually be made available through the collection. Keep in mind that there are licensing requirements to consider, so it's important not to choose a group that is overly broad.
Click Next and you will be taken to the User Profile Disks screen. Deselect the option to create user profile disks and then click Next. This will cause the wizard to display the confirmation screen. Take a moment to make sure that all of the various settings are correct and then click the Create button. When the collection creation process finishes, click Complete.
Now that we have created a collection, it's time to begin configuring the collection. I will walk you through the process in Part 2.
About the Author
Brien Posey is a 22-time Microsoft MVP with decades of IT experience. As a freelance writer, Posey has written thousands of articles and contributed to several dozen books on a wide variety of IT topics. Prior to going freelance, Posey was a CIO for a national chain of hospitals and health care facilities. He has also served as a network administrator for some of the country's largest insurance companies and for the Department of Defense at Fort Knox. In addition to his continued work in IT, Posey has spent the last several years actively training as a commercial scientist-astronaut candidate in preparation to fly on a mission to study polar mesospheric clouds from space. You can follow his spaceflight training on his Web site.