Posey's Tips & Tricks
Restoring a Database to an Older Version of SQL Server
Migrating a database to an older version of SQL Server requires exporting it as a data-tier application and importing it on the target instance, providing a practical workaround when native backup restores are blocked by version compatibility limits.
Although it probably sounds strange, I recently found myself in a situation where I had to "upgrade" to a slightly older version of SQL Server. I have a mission critical application that, until recently, ran locally on my primary desktop. This application was built around a SQL Server Express database. Unfortunately, SQL Server Express databases have a 10 GB size limit. Even though I haven't hit the 10 GB limit yet, it won't be long until I do. As such, I knew that I was going to have to migrate to a "real" SQL Server edition. Since I had to migrate the database anyway, I also decided to move the database to a server operating system instead of trying to host it on my desktop.
Unfortunately, there was one big problem with my SQL Server migration plan. That problem stems from the fact that SQL Server licenses are pricey. According to Microsoft, a SQL Server Standard license sells for $,3942 per core. I really didn't want to have to spend that much, but fortunately a reseller sold me some leftover SQL Server 2019 licenses at a good price. Even though the licenses were for an older version of SQL Server, it didn't matter because I didn't need access to any of the new SQL Server 2022 features.
Initially, my plan was to install SQL Server 2019 onto my server and then restore a backup of my database to the new SQL Server. Unfortunately, this approach did not work. As it turns out, Microsoft will not let you restore a backup to an older SQL Server version. Thankfully, I found an easy workaround.
Before I show you what I did, I need to point out that this method probably isn't the best option if you have a huge database, because it can be a little bit slow. It's also worth noting that there are some types of objects that cannot be migrated using this method. These object types include things like SQL Agent jobs, logins, and certain CLR objects.
To get started, open the SQL Server Management Studio on the machine that is hosting the database that you want to migrate and connect to the database. Now, right click on the database and select the Tasks > Export Data Tier Application commands from the shortcut menus. This causes SQL Server to launch the Extract Data Tier Application. Click Next to bypass the wizard's Welcome screen.
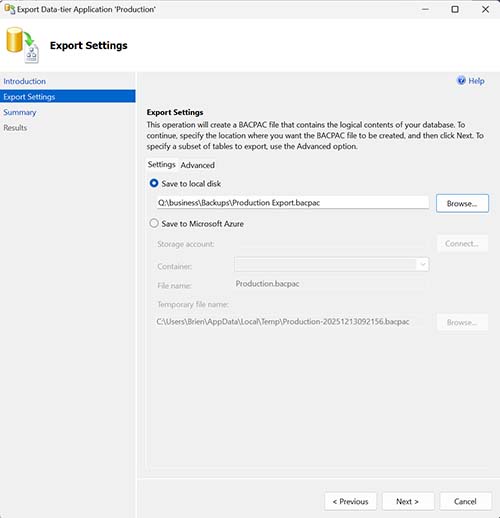
At this point, you will see a screen like the one that is shown in Figure 1. Your application name and version number will be populated automatically. However, you will need to click the Browse button and choose a path at which to save the export file that you are going to be creating.
 [Click on image for larger view.]
Figure 1. Specify the path where the export file should be created.
[Click on image for larger view.]
Figure 1. Specify the path where the export file should be created.
Click Next and you will be taken to a confirmation screen. Take a second to make sure that all of the information appears to be correct and then click Next again. At this point the export file will be created. When you see confirmation that the job was successfully completed, click Close.
Now that you have created the export file, it's time to import it into the new database server. To do so, open SQL Server Management Studio and connect to the new SQL Server. Now, right click on the Databases container (do not create the database ahead of time) and select the Import Data Tier Application command from the shortcut menu. This will cause SQL Server to launch a wizard similar to the one that you used a moment ago.
Click Next to bypass the wizard's Welcome screen and you will be taken to a screen asking you to specify the package that you want to deploy. Click the Browse button and then select the file that you created a moment ago.
Click Next and you will be asked to specify the name of the database that is to be created and the path where the database will be stored. These options should be filled in for you automatically, so just click Next. Take a moment to review the summary screen and then click Next one more time and the import process will begin. Once again, this process can take some time to complete if you have a large database. You can see what the import process looks like in Figure 2. When the process completes, click Finish to close the wizard.
 [Click on image for larger view.]
Figure 2. My data has been imported.
[Click on image for larger view.]
Figure 2. My data has been imported.
With the process complete, all that remains is to configure any necessary database permissions and to then change the application's database connection string to point to the new database.
About the Author
Brien Posey is a 22-time Microsoft MVP with decades of IT experience. As a freelance writer, Posey has written thousands of articles and contributed to several dozen books on a wide variety of IT topics. Prior to going freelance, Posey was a CIO for a national chain of hospitals and health care facilities. He has also served as a network administrator for some of the country's largest insurance companies and for the Department of Defense at Fort Knox. In addition to his continued work in IT, Posey has spent the last several years actively training as a commercial scientist-astronaut candidate in preparation to fly on a mission to study polar mesospheric clouds from space. You can follow his spaceflight training on his Web site.