Posey's Tips & Tricks
Using PowerShell for DIY AI Image Creation. Part 1
Build a cloud-free AI image generation workflow by wiring Stable Diffusion into Windows PowerShell, using open source tools and local hardware to create images directly from scripts.
By now, we have probably all seen cloud-based tools that allow you to create an AI generated image based on a text prompt. Although I use such tools on a regular basis, I have been having some problems with them lately. Some of the problems include the service being too busy to create an image, exceeding the number of images that are allowed to be created or asking for an image that in some way violates the provider's terms of service.
Given all of the problems that I have been having, I began to wonder if it was possible to build my own AI image generation tool using Windows PowerShell, and have that tool run on my own hardware, without any sort of cloud dependency. As it turns out, it was absolutely possible! In this series, I will show you how it works.
As I am sure you can imagine, PowerShell doesn't do all of the heavy lifting by itself. In order to make this particular project work, I leveraged some open source utilities. So with that being said, my plan for this series is to spend this column explaining how to put all of the required components into place. Once that's done, I will show you how to create AI generated images from PowerShell in Part 2. So let's get started.
In order to make my project work, I needed a collection of AI models and a way to make those models accessible to PowerShell. I ended up using something called Stable Diffusion. I also made use of a Web interface called AUTOMATIC1111. It is also worth noting that my instructions are designed to work with Windows 11.
So with that said, the first thing that you will need to do is to download the Git utility. You can download this tool here. Git features a GUI installer and you can use the default options.
Once you have installed Git, you will need to install Python. The important thing to know is that this project is extremely version specific. The only version of Python that will work properly (as far as I can tell) is 3.10.6. Other Python versions will cause an error to be triggered later on in the installation process. Incidentally, when you install Python, be sure to select the option to add Python to the system path. Otherwise, you will run into problems later on.
The next step in the process is to download the Web interface. To do so, open PowerShell and enter these commands:
cd $HOME

  git clone https://github.com/AUTOMATIC1111/stable-diffusion-webui.git
Collectively, these commands will create a folder called /stable-diffusion-webui/ beneath your Home folder.
The next step in the process is probably the trickiest of all. You are going to need to download the Stable Diffusion models that you want to use. Stable Diffusion is free (except for enterprise use), but you are going to have to register with the site in order to gain access to the files. The thing that makes the download process so tricky is that the download link is well hidden. To download the models, go to the Stable Diffusion site and log in. Browse the list of models until you find one that you like (my PowerShell script supports multiple models). Next, click on Files and Versions. This will take you to a list of the files that are included in the model. You only need the file that ends in .safetensors. Click the download link associated with this one specific file.
Once you have downloaded a few models to play around with, copy the .safetensors files that you downloaded to the /stable-diffusion-webui/models/Stable-diffusion/ folder beneath your Home folder.
Now, navigate to your Home folder and then go to the \stable-diffusion-webui folder and then edit the webui-user.bat file. All you need to do here is to locate the line that says set COMMANDLINE_ARGS= and replace it with:
set COMMANDLINE_ARGS=--api
This change will give you API access to the Stable Diffusion model. Once you have saved your changes, close the editor, go back to PowerShell, and enter the following command:
./webui-user.bat
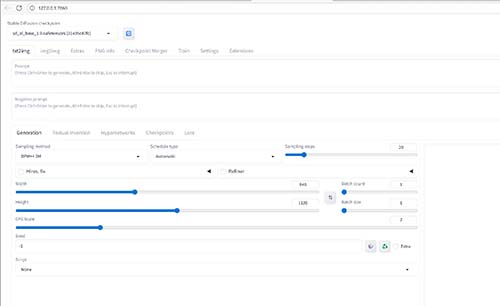
This batch file downloads and installs all of the dependencies that allow the Web interface to function. On my computer, this process took roughly 10 minutes to complete. When the process finishes, you should see Stable Diffusion running in your browser, as shown in Figure 1.
 [Click on image for larger view.]
Figure 1. Stable Diffusion is up and running.
[Click on image for larger view.]
Figure 1. Stable Diffusion is up and running.
So now that all of the backend components are up and running, it's time to build our PowerShell script. I will show you how in Part 2.
About the Author
Brien Posey is a 22-time Microsoft MVP with decades of IT experience. As a freelance writer, Posey has written thousands of articles and contributed to several dozen books on a wide variety of IT topics. Prior to going freelance, Posey was a CIO for a national chain of hospitals and health care facilities. He has also served as a network administrator for some of the country's largest insurance companies and for the Department of Defense at Fort Knox. In addition to his continued work in IT, Posey has spent the last several years actively training as a commercial scientist-astronaut candidate in preparation to fly on a mission to study polar mesospheric clouds from space. You can follow his spaceflight training on his Web site.