Posey's Tips & Tricks
Preventing Microsoft 365 Phishing Attacks, Part 2: ID Check
Microsoft 365 administrators can use built-in Defender for Office 365 tools to enable impersonation and domain protection, reducing phishing risks by identifying spoofed senders and untrusted domains.
In my previous article, I explained the basics of user impersonation and domain impersonation. Now, I want to show you how to enable impersonation protection. Remember that in order to do so, you will need a Microsoft Defender for Office 365 Plan 2 license.
To get started, sign into the Microsoft 365 Admin Center using an account that has the appropriate permissions. Click on the Security option to open the Microsoft Defender portal. Now, expand the Email & Collaboration section and click on the Policies & Rules option. This will take you to the Policies & Rules screen. Here you will need to click on Threat Policies, followed by Anti-Phishing. The resulting screen displays any existing anti-phishing policies. You can either modify an existing policy or create a new policy.
Assuming that you are creating a new policy, you will need to begin by assigning a name and an optional description to the policy. As always, I recommend using a descriptive name and a detailed description of what the policy is designed to do. This can help with troubleshooting later on if you being to accumulate a lot of policies.
The next screen that you will see asks you to choose the users, groups and domains for whom the policy will apply. As a best practice, you should apply policies to groups and / or domains as opposed to applying policies to individual users. Policies that are assigned to users can be difficult to manage. Incidentally, the Users, Groups and Domains screen also contains an Exclude option that you can use if you need to prevent the policy from being applied to someone.
Click Next, and you will be taken to the Phishing Threshold and Protection screen, which you can see in Figure 1.
 [Click on image for larger view.]
Figure 1. Protections can be enabled on the Phishing Threshold and Protection screen.<>
[Click on image for larger view.]
Figure 1. Protections can be enabled on the Phishing Threshold and Protection screen.<>
As you can see in the figure, the first option that is shown on this screen is the Phishing Email Threshold slider. This slider controls how aggressively Microsoft Defender will be when classifying messages as phishing messages. The default option will probably be fine for most organizations, but you can increase the threshold value if you like. As you raise the threshold, fewer phishing messages will slip through the cracks, but you will also increase the chances of false positives occurring.
If you want to enable user impersonation protection, select the Enable Users to Protect checkbox, shown in the figure above and then click the Manage 0 Senders link. This will cause Microsoft 365 to open the Manage Senders for Impersonation Protection pop-up. Click Add User, enter an email address and then click the Add button. When you are finished, click Done.
Enabling Domain Impression Protection works in a very similar way. To do so, select the Enable Domains to Protect checkbox. At the very least, I recommend selecting the Include Domains I Own checkbox. This will protect any of your domains that you have registered with Microsoft 365. You can easily figure out which domains Microsoft 365 knows about by clicking on the View My Domains link.
Microsoft Defender also gives you the option of including custom domains. These can be domains that you own, but that have not been registered with Microsoft 365. They can also be domain names belonging to others, such as partners or vendors. To add a custom domain, select the Include Custom Domain checkbox and then click on Manage 0 Custom Domains. From there, click Add Domains, enter the custom domain name and click the Add Domains button, followed by Done.
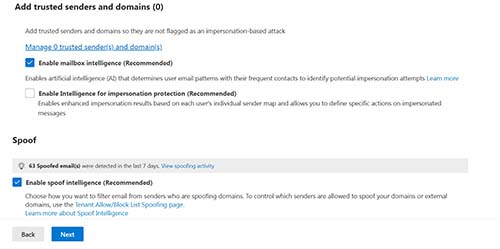
Another thing that you can do while on the Phishing Threshold and Protection screen is to add trusted senders or domains. This can be useful if you have someone outside of your organization who is unable to send an email to recipients within your organization, because Defender thinks that the sender is attempting to spoof a user within your own organization. As you can see in Figure 2, you need only to click on the Manage 0 Trusted Senders and Domains links and then follow the prompts to add the trusted sender or domain.
 [Click on image for larger view.]
Figure 2. You can define trusted senders or domains.<>
[Click on image for larger view.]
Figure 2. You can define trusted senders or domains.<>
There are three more settings found on the Phishing Threshold and Protection screen, and these settings can be enabled by simply selecting the corresponding checkboxes.
The first of these settings allows you to enable mailbox intelligence. This feature, when enabled, uses AI to determine email usage patterns for your users, making it less likely that a phishing attempt will succeed or that a legitimate message will be flagged as impersonated or spoofed.
The second checkbox lets you enable intelligence specifically for impersonation protection. Enabling this option causes Defender to personalize the impersonation controls on a user by user basis based on each user’s email usage patterns.
Finally, the third setting enables spoof intelligence. This option allows Defender to detect spoofed messages and there is also an allow / block list that you can use to allow certain senders to spoof your domain (though such an option should rarely be used in the real world).
So far, I have talked all about enabling protection against spoofed and impersonated messages. In Part 3 of this series, I will show you how to control what happens when a spoofed or impersonated message is received.
About the Author
Brien Posey is a 22-time Microsoft MVP with decades of IT experience. As a freelance writer, Posey has written thousands of articles and contributed to several dozen books on a wide variety of IT topics. Prior to going freelance, Posey was a CIO for a national chain of hospitals and health care facilities. He has also served as a network administrator for some of the country's largest insurance companies and for the Department of Defense at Fort Knox. In addition to his continued work in IT, Posey has spent the last several years actively training as a commercial scientist-astronaut candidate in preparation to fly on a mission to study polar mesospheric clouds from space. You can follow his spaceflight training on his Web site.