Posey's Tips & Tricks
Configuring a Shared Virtual Hard Disk in Hyper-V
Creating a shared virtual hard disk is a relatively easy process. Brien walks you through it.
| HIGHLIGHTS |
• Clusters of Hyper-V virtual machines (VMs) are usefulto achieve application-level high availability. Clustering involves using shared storage, which provides fault tolerance and accessibility to multiple Hyper-V hosts.
• In the case of a guest cluster, shared storage can be provided by a shared virtual hard disk. However, the shared virtual hard disk still requires a physical cluster-shared volume for proper functioning.
• eating a shared virtual hard disk involves opening the Hyper-V Manager, selecting a VM, opening its Settings page, configuring the SCSI Controller to add a Shared Drive, and creating a new virtual hard disk using the New Virtual Hard Disk wizard. |
|
Although Hyper-V virtual machines (VMs) can be made to be fault-tolerant, many organizations create clusters of VMs as a way to provide application-level high availability.
When Windows servers are clustered, the cluster is usually based around a cluster-shared volume. The cluster-shared volume typically consists of a logical unit number (LUN) on a physical storage device that is configured to act as shared storage.
In the case of a guest cluster, shared storage can be provided by a shared virtual hard disk. Keep in mind, though, that a shared virtual hard disk does not normally mitigate the need for a physical cluster-shared volume. The shared virtual hard disk is usually placed on a cluster-shared volume that is accessible to multiple Hyper-V hosts. That way, the VM will be able to access its shared virtual hard disk regardless of which of your Hyper-V hosts it is running on.
Creating a shared virtual hard disk is a relatively easy process. Begin by opening the Hyper-V Manager. Next, locate one of the VMs to which you want to provision shared storage. Right-click on the VM and choose the Settings command from the shortcut menu. This will open the VM's Settings page.
Now, locate the VM's SCSI Controller, select the Shared Drive option and click the Add button shown in Figure 1. Then click the New button. This will cause Windows to launch the New Virtual Hard Disk wizard.
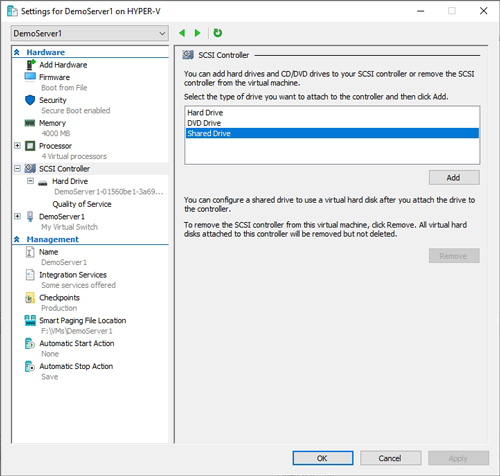 [Click on image for larger view.] Figure 1: Choose the Shared Drive option and click the Add button.
Click Next to bypass the wizard's Welcome screen. You will now be taken to a screen that asks what type of virtual hard disk you want to create. You can choose to use a VHDX-based disk or you can create a VHD set. It's best to choose the VHD Set option, which you can see in Figure 2, but VHD sets were not supported prior to Windows 10.
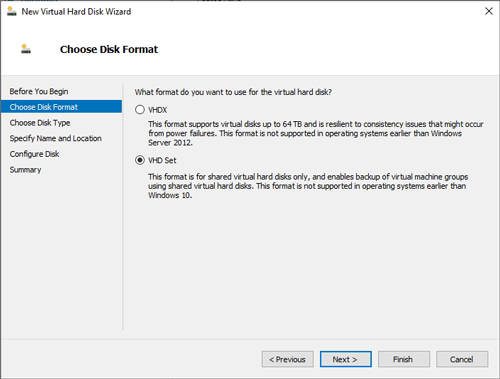 [Click on image for larger view.] Figure 2: Choose the type of virtual hard disk that you want to create.
Click Next, and you will be asked if you want to create a virtual hard disk of a fixed size, or if you want to create a dynamically expanding virtual hard disk. Make your selection and click Next.
You will now be prompted to enter a name and a location for the new virtual hard disk. Make sure to choose a storage path that will be accessible to any Hyper-V host that could potentially end up hosting one of the VMs that uses the shared virtual hard disk (the Failover Clustering feature will need to be installed on the Hyper-V host). The disk will need to reside on either a cluster-shared volume or on an SMB share that is supported for use by the host cluster.
Click Next, and you will be asked how large the virtual hard disk should be. Enter the virtual disk size and click Next. The Hyper-V Manager will now display a summary of the virtual hard disk configuration. Take a moment to make sure that the summary information is correct and then click Finish.
Now, take a look at the console tree within the VM's Settings page. There should be a listing for the newly created shared virtual hard disk, as shown in Figure 3.
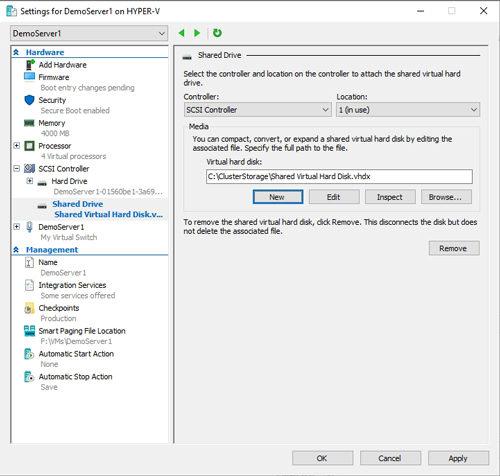 [Click on image for larger view.] Figure 3: Make sure that the console tree displays a shared virtual hard disk.
Now it's time to connect your other guest cluster nodes to the virtual hard disk. To do so, right-click on a node within the Hyper-V Manager, then select the Settings command from the shortcut menu. This will bring up the VM's Settings window.
Click on SCSI Controller within the console tree, then click the Shared Drive option, then click Add, just as you did on the other server. This time, however, don't click on the New button. Since a shared virtual disk already exists, click on the Browse button and then browse to the location of the previously created virtual hard disk. Click OK, and the VHD set will be attached to the guest cluster node. Now, repeat the process for any remaining guest cluster nodes.
About the Author
Brien Posey is a 22-time Microsoft MVP with decades of IT experience. As a freelance writer, Posey has written thousands of articles and contributed to several dozen books on a wide variety of IT topics. Prior to going freelance, Posey was a CIO for a national chain of hospitals and health care facilities. He has also served as a network administrator for some of the country's largest insurance companies and for the Department of Defense at Fort Knox. In addition to his continued work in IT, Posey has spent the last several years actively training as a commercial scientist-astronaut candidate in preparation to fly on a mission to study polar mesospheric clouds from space. You can follow his spaceflight training on his Web site.