Posey's Tips & Tricks
Creating Custom Workflows in Office 365
Brien walks you through how to make completely custom workflows to suit out-of-the-ordinary situations.
A little over a year ago, I wrote a column in which I talked about how you can use Office 365's Flow app to create workflows within Office 365. For example, it is possible to make Office send you a push notification if you receive an e-mail message from your boss.
I focused that particular column around the use of templates. Microsoft has created numerous templates that make it really simple to create flows to handle common tasks.
But what if you need to do something a bit out of the ordinary? Well, one of the things that I didn't talk about in that previous column is that you can create made-from-scratch flows that are completely custom.
To get started creating a custom flow, open the Flows app and click on the New icon found at the top of the screen. When the New menu appears, choose the Create From Blank option. This takes you to the screen shown in Figure 1.
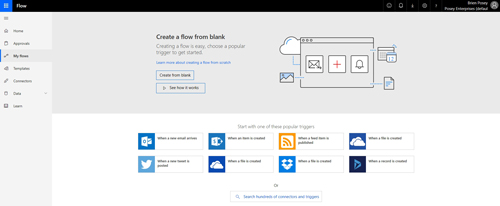 [Click on image for larger view.] Figure 1: Click on Create From Blank.
As you can see, this screen lets you pick a common event trigger, see a demo on how Flow works or move forward with your creation. Go ahead and click on Create From Blank.
At this point, you will be taken to a screen that lists various connectors and triggers. If you look at Figure 2, you will notice that the triggers are grouped by Office 365 application, and that the connectors also correspond to applications. The easiest way to get started is to pick the application that you want to work with from the list of connectors. When you do, the Triggers list will be updated to list only triggers that correspond to that application. Go ahead and click on a trigger that meets your needs.
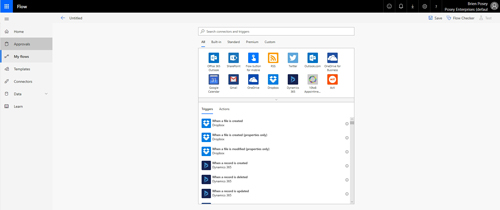 [Click on image for larger view.] Figure 2: This screen provides a collection of connectors and triggers.
Unfortunately, I can't give you the exact steps required to build a custom flow beyond this point, because the steps will vary depending on which trigger you have chosen. Generally speaking, however, the next step is to provide query details for the trigger that you have chosen. This helps you narrow down the circumstances under which the flow is triggered.
Let me give you an example. One of the triggers that is available for Office 365 Outlook is called When a New E-Mail Arrives. As the name implies, this trigger causes the flow to take action whenever a new message arrives.
With that in mind, however, it is unlikely that you would want a flow to take action on every single e-mail message. After all, there is a big difference between a spam message and a message from your boss.
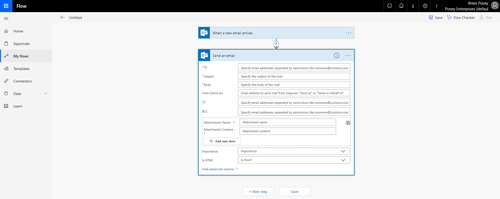
Filling in the details gives you the ability to narrow things down. In the case of the When a New E-Mail Arrives trigger, for example, you can specify the folder, who the message is from, the importance and several other pieces of information, as shown in Figure 3. Hence, you could make the flow so that it only responds to messages marked as important or to messages from specific people.
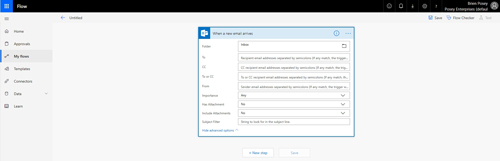 [Click on image for larger view.] Figure 3: You can map a flow to specific trigger attributes.
When you are done specifying the trigger, the next step is to click on New Step. This takes you to a screen that allows you to specify an action. Like triggers, actions are based around the use of connectors. All you have to do is choose a connector and a corresponding action, as shown in Figure 4.
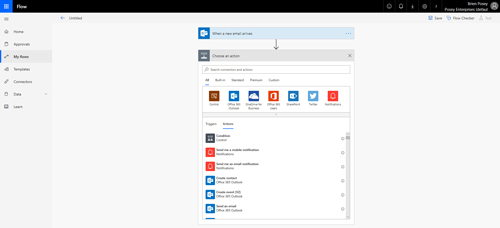 [Click on image for larger view.] Figure 4: Pick a connector and an action.
The last step in the process is to specify any required attributes for the action that you have chosen. You can see an example of this in Figure 5.
 [Click on image for larger view.] Figure 5: You will need to specify attributes for the action that you have selected.
The last step in the process is to click the Save button. However, if you look at the previous figure, you will notice that there is a New Step button at the bottom of the screen. You can use this button to associate multiple actions with a trigger. You can even create compound, conditional actions if you want to.
Although most of the template flows are relatively simple, Microsoft gives you the tools to build much more complex flows should you have the need.
About the Author
Brien Posey is a 22-time Microsoft MVP with decades of IT experience. As a freelance writer, Posey has written thousands of articles and contributed to several dozen books on a wide variety of IT topics. Prior to going freelance, Posey was a CIO for a national chain of hospitals and health care facilities. He has also served as a network administrator for some of the country's largest insurance companies and for the Department of Defense at Fort Knox. In addition to his continued work in IT, Posey has spent the last several years actively training as a commercial scientist-astronaut candidate in preparation to fly on a mission to study polar mesospheric clouds from space. You can follow his spaceflight training on his Web site.