Posey's Tips & Tricks
How To Use Storage Spaces in Windows Server 2016, Part 2
As Brien explains, creating a virtual disk in Windows Storage Spaces is akin to creating a map to the underlying raw storage that will be used by the volumes on the virtual disk.
In Part 1, I showed you how to create a storage space and a virtual disk. In this installment, I want to wrap things up by talking about volumes.
If you look at the first figure below, you can see that I have created a single storage pool (called My Storage Pool) and a virtual disk (called My Virtual Disk). Before we can use this virtual disk, however, we have to create one or more volumes on it.
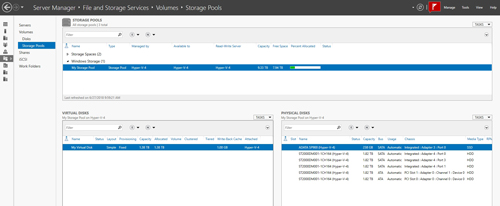 [Click on image for larger view.] Figure 1: This is the virtual disk that I created in the previous blog post.
Before I walk you through the volume-creation process, I want to show you where things stand. In Part 1, I mentioned that creating a virtual disk at the storage level is different than creating a Hyper-V virtual disk. When you create a virtual disk in Hyper-V, what you are really creating is either a VHD or a VHDX file. This virtual hard disk file resides somewhere on the Windows file system.
When you create a virtual disk in Windows Storage Spaces, however, you aren't creating a virtual hard disk file (or at least, not in the traditional sense). What you are really creating is a map to the underlying raw storage that will be used by the volumes on the virtual disk.
To put this concept into further perspective, take a look at the Disk Management Console in Figure 2. The Disk Management Console is Windows Server's legacy tool for storage management. The Disk Management Console, which you can access by entering the Diskmgmt.msc command at the Run prompt, only shows physical storage. It will not show Hyper-V virtual hard disks.
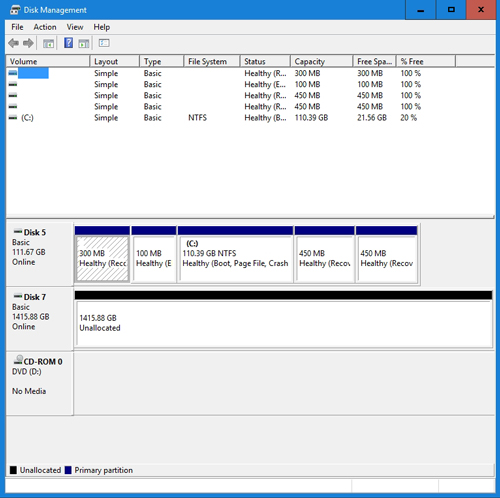 [Click on image for larger view.] Figure 2: This is the Disk Management Console.
This server contains seven physical disks. It has a boot disk and the six hard drives that reside inside of the storage pool. Even so, you will notice that the Disk Management Console only shows us two physical disks -- the boot drive and the virtual disk that we created in Part 1. As such, we can infer that Storage Spaces virtual disks are created at a low level within the operating system, and are essentially recognized as physical disks.
Now, earlier I mentioned that the Disk Management Console does not recognize Hyper-V virtual hard disks. That isn't actually entirely true. The Disk Management Console can recognize a Hyper-V virtual hard disk, but it doesn't do it by default.
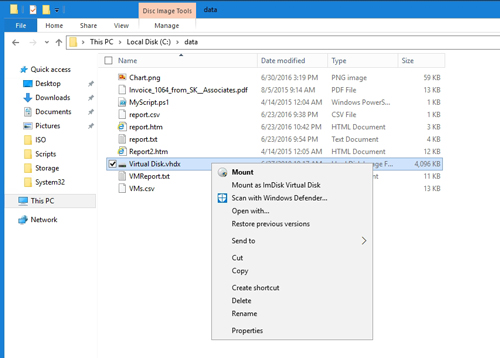
Before I created the previous screen captures, I created a 127GB Hyper-V virtual hard disk and placed it on the boot drive. You will notice that this Hyper-V virtual hard disk is not shown in either Figure 1 or Figure 2. What I can do, however, is to right-click on the virtual hard disk and choose the Mount command from the shortcut menu, as shown in Figure 3. This will cause Windows Server to mount the virtual hard disk as though it were a local drive.
 [Click on image for larger view.] Figure 3: You can mount a Hyper-V virtual hard disk.
If you look at Figure 4, you can see that this virtual hard disk now shows up in the Disk Management Console as local storage.
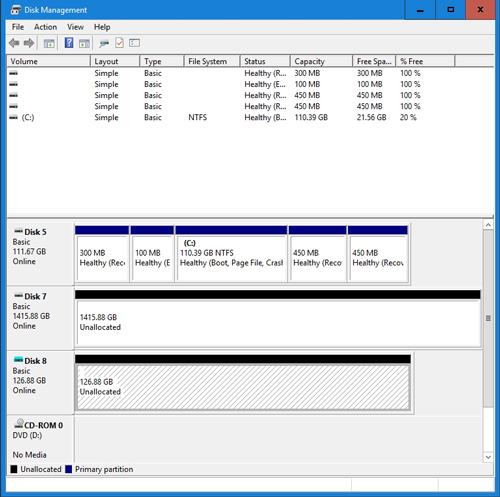 [Click on image for larger view.] Figure 4: Once mounted, the virtual hard disk shows up as a local disk.
OK, so let's get back to the task at hand and create a volume on our new virtual disk that we created using Storage Spaces. You can create a volume using either Storage Spaces or the Disk Management Console, but let's use Storage Spaces.
From within the Storage Spaces interface, go to the Disks tab. Now, select your newly created virtual disk from the list of disks. There could be a lot of disks listed, but remember that you gave your virtual disk a name and that will make it easy to identify the disk. With the virtual disk selected, choose the New Volume option from the Tasks drop-down, as shown in Figure 5. This will launch the New Volume Wizard.
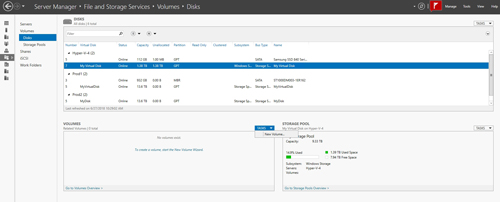 [Click on image for larger view.] Figure 5: Select the newly created virtual disk, and then choose the New Volume command from the Tasks drop-down that is located in the Volumes section.
Click Next to bypass the wizard's Welcome screen. You will now see a screen asking you to select the server and disk on which you want to create the new volume. Make your selection and click Next. The next thing that you will need to do is to select the size of the volume that you want to create.
Click Next, and you will be prompted to assign a drive letter to the volume. Make your selection and click Next. From there, you will simply be prompted to select a file system, confirm your choices and create the volume.
About the Author
Brien Posey is a 22-time Microsoft MVP with decades of IT experience. As a freelance writer, Posey has written thousands of articles and contributed to several dozen books on a wide variety of IT topics. Prior to going freelance, Posey was a CIO for a national chain of hospitals and health care facilities. He has also served as a network administrator for some of the country's largest insurance companies and for the Department of Defense at Fort Knox. In addition to his continued work in IT, Posey has spent the last several years actively training as a commercial scientist-astronaut candidate in preparation to fly on a mission to study polar mesospheric clouds from space. You can follow his spaceflight training on his Web site.