Posey's Tips & Tricks
How To Use Storage Spaces in Windows Server 2016, Part 1
In this introduction to Microsoft's Storage Spaces technology, Brien walks you through the steps of creating a storage space and a virtual disk.
Storage Spaces (not to be confused with Storage Spaces Direct) has been a part of Windows Server since the days of Windows Server 2012, and provides an easy way for you to create software-defined storage using a server's local storage resources.
To set up Windows Storage Spaces, open Server Manager and click on the File and Storage Services tab, and then click on Storage Pools.
As you can see in Figure 1, Windows Server is initially equipped with a primordial pool. The primordial pool is created by default, and is essentially a repository for disks that are available for use in a storage pool that you create. A disk can only belong to a single storage pool.
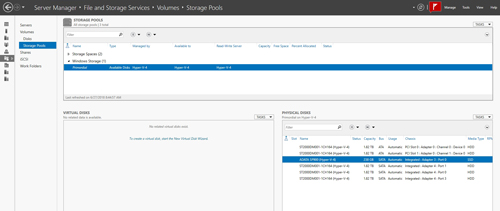 [Click on image for larger view.] Figure 1: The primordial pool exists by default.
Incidentally, if a disk is missing from the primordial pool, you can add it by choosing the Add Physical Disk option from the Task drop-down.
To create a storage pool, choose the New Storage Pool option from the Task drop-down. This will cause Windows to launch the New Storage Pool Wizard. Click Next to bypass the wizard's Welcome screen, and you will be asked to enter a name for the storage pool that you are creating. You will also be prompted to select the primordial pool that you want to use. In most cases, though, there will only be one primordial pool available for your use.
Click Next, and you will be taken to a screen that asks you to select the physical disks that you want to include in the storage pool. For each disk, there is a drop-down that you can use to configure the disk allocation. You can choose to automatically allocate a disk, use it as a hot spare or manually allocate the disk, as shown in Figure 2.
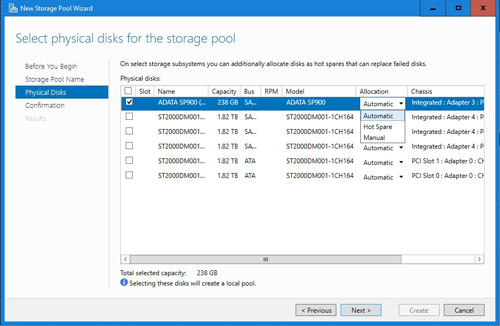 [Click on image for larger view.] Figure 2: Choose the disks and allocation methods that you want to use.
Click Next, and you will see a confirmation of the choices that you have made. Assuming that everything appears to be correct, go ahead and click the Create button to create the new storage pool.
When you finish creating the storage pool, you should see the storage pool listed in the window's upper pane. If you select your storage pool, you should see the lower-right pane display the disks that make up the storage pool, as shown in Figure 3.
 [Click on image for larger view.] Figure 3: The storage pool has been successfully created.
Now that the storage pool has been created, the next step in the process is to create one or more virtual disks. A virtual disk is really just a logical storage structure, and is not the same thing as a Hyper-V virtual disk. To create a virtual disk, choose the New Virtual Disk command from the Task drop-down that is located in the Virtual Disks section.
At this point, you will be prompted to choose the storage pool on which you wish to create the virtual disk. Make your selection and click OK. Now, Windows will launch the Virtual Disk Wizard.
Click Next to bypass the wizard's Welcome screen. You will now be taken to a screen that asks you to provide a name for the virtual disk. This screen also contains a checkbox that you can select if you wish to create tiered storage. You would select this checkbox if your storage pool contains a mixture of SSDs and HDDs, and you want to create a high-speed tier and a standard tier.
Click Next, and you will be taken to a screen that asks if you want to use enclosure resiliency. Make your selection, and click Next.
Now, you will see a screen asking you to select the storage layout. The choices that are presented here depend on the number and type of disks in the storage pool, and whether or not you have opted to use tiered storage. You will typically be able to choose between simple, mirrored and parity storage. Make your selection and click Next.
The next screen that you will see asks if you want to use thin or fixed provisioning. One thing to keep in mind is that if you opted to use tiered storage, then you will have to use fixed provisioning.
Click Next, and you will be taken to a screen that asks you to choose the size for the virtual disk that you want to create. If you look at Figure 4, you will notice that I am able to specify the size of both the fast tier and the standard tier. It is also possible to specify the size manually, or to select the Maximum Size option.
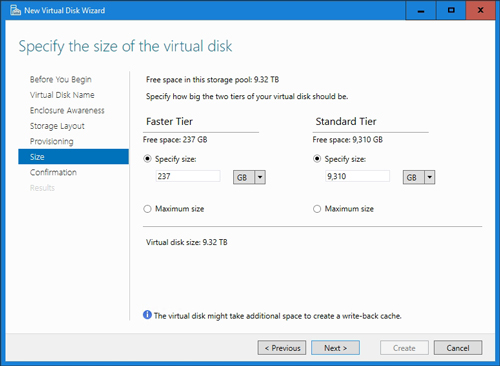 [Click on image for larger view.] Figure 4: Specify the size for the virtual disk.
Click Next, and you will be taken to a summary screen that you can use to review the choices that you have made. Assuming that everything on this screen looks good, click the Create button to create the virtual disk.
Even though we have created a virtual disk, it is not quite ready to use yet. I will show you the rest of the setup process in Part 2 here.
About the Author
Brien Posey is a 22-time Microsoft MVP with decades of IT experience. As a freelance writer, Posey has written thousands of articles and contributed to several dozen books on a wide variety of IT topics. Prior to going freelance, Posey was a CIO for a national chain of hospitals and health care facilities. He has also served as a network administrator for some of the country's largest insurance companies and for the Department of Defense at Fort Knox. In addition to his continued work in IT, Posey has spent the last several years actively training as a commercial scientist-astronaut candidate in preparation to fly on a mission to study polar mesospheric clouds from space. You can follow his spaceflight training on his Web site.