Posey's Tips & Tricks
Exploring CPU Groups in Windows Server 2016 Hyper-V, Part 2
Microsoft's CPU Groups tool lets you group CPU resources, cap resource consumption, and bind individual VMs to the group. Here's how.
In the first part of this series, I introduced you to the CPU Groups tool and explained how you could use it to get topology information pertaining to your server's physical and logical processors.
As helpful as this information might be, however, the CPU Groups tool can do a lot more. In this article, I want to show you some of the GPU Groups tool's Hyper-V-specific functionality.
Before I get started, though, I want to provide a quick reminder that this tool is only designed to work with Windows Server 2016 Hyper-V.
From a Hyper-V perspective, the essence of the CPU Groups tool is that it allows you to group together CPU resources, place a cap on resource consumption, and then bind individual Hyper-V virtual machines (VMs) to the group. So let's take a look at how this works.
No CPU groups exist by default, so the first thing that you will need to do is to create a group. The syntax used for doing so is simple, but the devil is in the details. If you look at Microsoft's documentation, you will see that the example command that it uses for creating a new CPU group is:
CpuGroups.exe CreateGroup /GroupId:36AB08CB-3A76-4B38-992E-000000000001 /GroupAffinity:0,1,16,17
This command simply appends the CreateGroup parameter to the CPUGroups command, and requires you to provide a group ID and group affinity preferences. The group affinity is nothing more than a series of logical processor numbers. The GroupID, however, is a bit more challenging.
As you can see, Microsoft used a huge hexadecimal number as the group ID number. Unfortunately, the documentation does not explain where this number came from. Furthermore, you cannot get away with duplicating Microsoft's numbering scheme, or you will get an error message. So here is what you have to do:
Open the Device Manager, Expand the Computer container, right-click on the listing for your computer and select the Properties command from the shortcut menu. When the resulting properties sheet appears, go to the sheet's Details tab, and then use the drop-down list to locate the property that looks like a huge hexadecimal number. That number is what you will have to base your group ID on. You can see what this looks like in Figure 1.
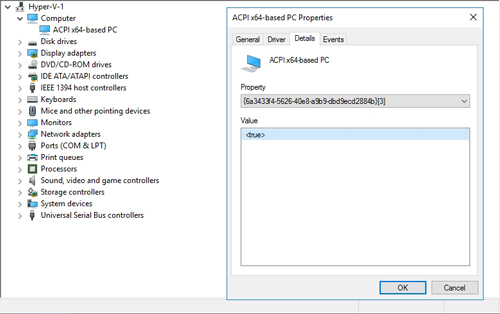 [Click on image for larger view.] Figure 1: This is where you get the basis for the group ID.
Notice in the figure above that the property consists of an eight-digit number, three four-digit numbers and a 12-digit number. The group ID that you specify must include the eight-digit number and the four-digit numbers, but you will need to provide your own 12-digit number. You can see how I created and then confirmed a CPU group in Figure 2.
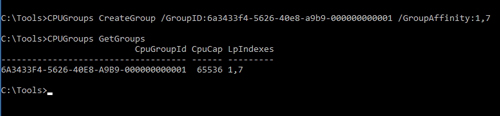 [Click on image for larger view.] Figure 2: This is how you create a CPU group.
So now that we have a CPU group, let's pretend that we wanted to cap the group's CPU usage at 25 percent of the capacity of the logical processors that have been bound to the group. The command for doing so (at least in my case) would be:
CPUGroups SetGroupProperty /GroupID:6A3433F4-5626-40E8-A9B9-000000000001 /CPUCap:16384
I have already shown you where the group ID comes from, but what about the CPU cap? The CPU cap can be set anywhere from zero (0 percent) to 65,536 (100 percent). Since my goal was to set the CPU cap at 25 percent, I multiplied 65,536 by .25.
Now that we have created a CPU group and set a resource threshold, the only thing left to do is to associate a VM with the group. Thankfully, this is easy to do. Let's suppose that we want to add a VM named VM1 to the group that we created. The command for doing so would be:
CPUGroups SetVMGroup /VMName:VM1 /GroupID: 6A3433F4-5626-40E8-A9B9-000000000001
It is worth noting that a VM can only be bound to a single group.
In this blog post, I have shown you the basics of using CPU groups for Hyper-V, but I strongly recommend taking the time to read Microsoft's documentation here before you try this in a production environment. My goal in writing this series was to call your attention to the tool's existence and to fill in some of the details that were not clear in the documentation -- not to rewrite the documentation. Hence, there is a lot that I didn't cover.
About the Author
Brien Posey is a 22-time Microsoft MVP with decades of IT experience. As a freelance writer, Posey has written thousands of articles and contributed to several dozen books on a wide variety of IT topics. Prior to going freelance, Posey was a CIO for a national chain of hospitals and health care facilities. He has also served as a network administrator for some of the country's largest insurance companies and for the Department of Defense at Fort Knox. In addition to his continued work in IT, Posey has spent the last several years actively training as a commercial scientist-astronaut candidate in preparation to fly on a mission to study polar mesospheric clouds from space. You can follow his spaceflight training on his Web site.