Posey's Tips & Tricks
How To Use the Windows SSH Client
Microsoft has finally included a baked-in method for remotely controlling systems not running on Windows. Here's how to get up and running.
| HIGHLIGHTS |
• Microsoft has included an SSH client in Windows 10 and 11 for managing remote Linux systems. However, it is not installed by default.
• To install the SSH client, go to Settings > Apps > Optional Features and select the OpenSSH client.
|
|
For many years, Microsoft has included a native Remote Desktop Protocol (RDP) client with its Windows operating system. This RDP client can be used to remotely manage and interact with other Windows systems. At the time when RDP was first introduced, Windows was the dominant operating system (with other operating systems such as Linux accounting for only a tiny fraction of licensed servers). Today, this is no longer the case. Most organizations use a combination of Windows, Linux and possibly even other operating systems.
Herein lies the problem. The RDP client is great for remotely connecting to Windows systems, but it was never designed for use with Linux. Remote Linux management is usually performed by way of the Secure Shell protocol, which is better known as SSH. In other words, if you want to remotely manage a Linux system from a Windows desktop then you are going to need an SSH client.
There is no shortage of free SSH clients available for downloading from various sources. I personally like PuTTY, but there are plenty of other options. One such option is the native SSH client that is built into Windows.
Microsoft knows that many organizations use Linux, so they have built an SSH client into Windows 10 and 11. However, this client is not installed by default.
To install the SSH client, which Microsoft calls the OpenSSH Client, open Settings and then click on Apps. Next, make sure that the Apps and Features tab is selected and then click on the Optional Features link, shown in Figure 1.
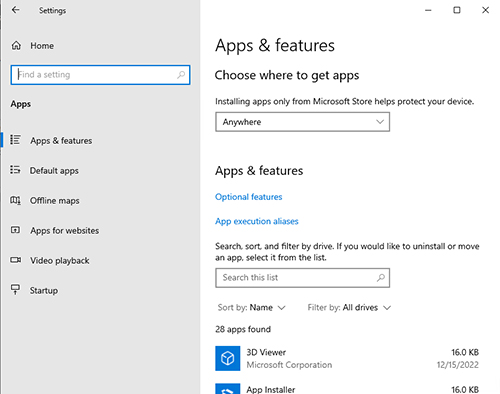 [Click on image for larger view.] Figure 1. Click on the Optional Features link.
At this point, you will be taken to a list of optional features. Click the Add a Feature button. When you do, Windows will display a list of the available optional features. Scroll down until you locate the OpenSSH client. If you have difficulty finding the OpenSSH client, then be sure to check the Installed Features list to make sure that it is not already installed.
Once you locate the SSH client, select the corresponding checkbox and then click on the Install button, shown in Figure 2. Incidentally, Microsoft also provides an OpenSSH server that you can install, but the OpenSSH server is not required for managing remote Linux systems.
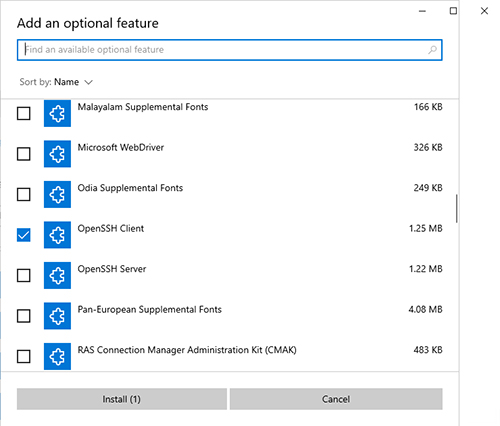 [Click on image for larger view.] Figure 2. Select the OpenSSH Client and click Install.
When the installation process completes, you should see the OpenSSH client added to the list of installed features.
Once you have installed the OpenSSH client, you can use it to remotely manage a Linux system. Earlier I mentioned that my preferred Linux client is PuTTY. The reason why I like using PuTTY is because it is a GUI-based application, whereas OpenSSH is entirely text based. Even so, it is still relatively easy to use OpenSSH to establish a connection to a Linux system.
You can launch OpenSSH through PowerShell by entering the SSH command. If you simply enter this command by itself, you will see a summary of the command syntax, as shown in Figure 3.
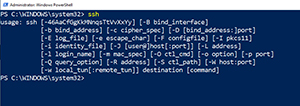 [Click on image for larger view.] Figure 3. You can access the OpenSSH command syntax by typing the ssh command by itself.
In order to actually connect to a remote system, you will need to provide the name or IP address of the system that you want to connect to. In most cases, you are also going to need to supply either a username and password (or a username and an encryption key). Suppose, for example, that I wanted to connect to a Linux virtual machine running on Azure. For the sake of this discussion, let's assume that the machine is using a public IP address of 20.169.145.113 and that the username is AzureUser. Let's also assume that the encryption key is stored in a PEM file that is stored in the Windows Documents folder and that the PEM file is named Linux.pem. Given those assumptions, the command used to connect to the remote host would be:
Ssh -i C:\users\Brien\documents\Linux.pem [email protected]
Keep in mind that this command is specific to the virtual machine that I set up for use in writing this article. You would need to substitute your own username, IP address, and path to your PEM file.
Upon connecting to a Linux virtual machine for the first time, you will receive a message telling you that the authenticity of the host cannot be established. This is totally normal and you shouldn't receive the message on future connection attempts. Just type yes when prompted, and you will be connected. You can see what the connection looks like in Figure 4.
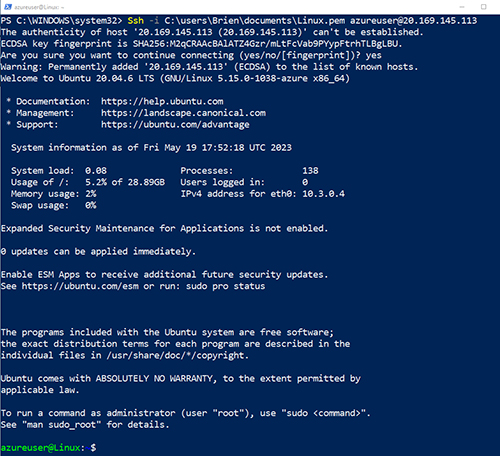 [Click on image for larger view.] Figure 4. OpenSSH has connected to an Azure virtual machine.
About the Author
Brien Posey is a 22-time Microsoft MVP with decades of IT experience. As a freelance writer, Posey has written thousands of articles and contributed to several dozen books on a wide variety of IT topics. Prior to going freelance, Posey was a CIO for a national chain of hospitals and health care facilities. He has also served as a network administrator for some of the country's largest insurance companies and for the Department of Defense at Fort Knox. In addition to his continued work in IT, Posey has spent the last several years actively training as a commercial scientist-astronaut candidate in preparation to fly on a mission to study polar mesospheric clouds from space. You can follow his spaceflight training on his Web site.