Posey's Tips & Tricks
Building a Lab Environment in Under 10 Minutes
Using Hyper-V differencing disks, administrators can quickly spin up and reset fully configured lab environments without rebuilding VMs from scratch.
Over the past few months, I have been hard at work developing a new series of video courses. As you can imagine, the course creation process required me to build some rather elaborate lab environments. The problem with that, of course, is that building a lab environment tends to be a time consuming process, and time was the one thing that I didn't have. Fortunately, I came up with a technique that allowed me to use native Hyper-V capabilities to deploy an Active Directory environment, including a domain controller, a database server, and several domain joined PCs in under 10 minutes.
The first step in the process was to build the environment in the usual way. I'm talking about creating the Hyper-V VMs and then manually installing and configuring operating systems and any software that needed to be deployed.
The one thing that made this particular deployment different from my usual Hyper-V lab deployments was that I relentlessly tested my lab environment to make sure that it was perfect. I checked and rechecked every setting that I could think of and repeatedly took steps to make sure that all of my VMs were healthy. The effort was a lot more in line with building a production environment than building a lab.
The reason why I put so much effort into verifying and testing this environment was because I wanted to use it as a template. After all, my goal was to be able to rapidly provision fully configured lab environments and so I needed to create an environment that could act as the basis for the labs that I would eventually be building.
Once I was convinced that my template lab environment was perfect, I shut down all of my virtual machines. Next, I created a new folder on my Hyper-V server's hard disk. This folder would be used to store all of the virtual hard disks that would be used within my lab environment.
The next step in the process was to create differencing disks based on all of the virtual hard disks used by the template virtual machines. These differencing disks are comparatively very small, with an initial size of only about 4 MB each. This small size helps with being able to rapidly provision a lab environment because I'm not having to clone large virtual hard disks.
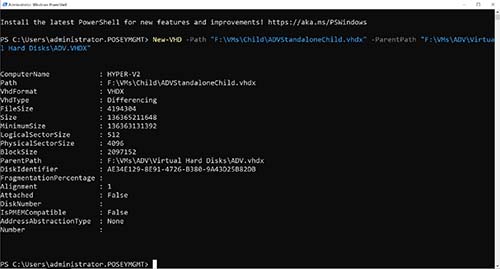
Since I was going to have to create differencing disks for a large number of virtual hard disks, I wrote a PowerShell script that handles the entire process. If you want to do it manually however, the command is:
New-VHD -Path <path to the new virtual hard disk> -ParentPath <path to the original virtual hard disk>
You can see an example of this in Figure 1.
 [Click on image for larger view.]
Figure 1. I have created a child virtual hard disk.
[Click on image for larger view.]
Figure 1. I have created a child virtual hard disk.
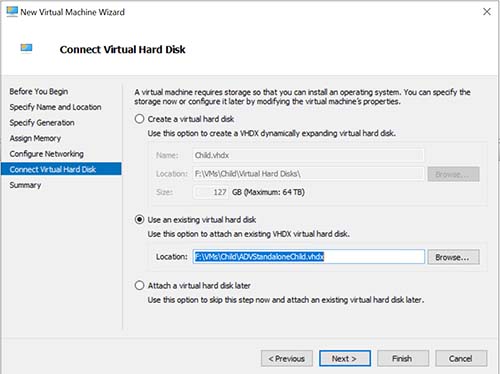
With the differencing disk created, the next step in the process is to create a new virtual machine, but configure that virtual machine to use the differencing disk that you have just created rather than using a normal virtual hard disk. Again, I used PowerShell to script the virtual machine creation process, but you can easily do the same thing using the Hyper-V Manager. All you have to do is to create the new virtual machine in the usual way. However, when you arrive at the Connect Virtual Hard Disk screen, choose the option to use an existing virtual hard disk. You can then provide a path to the differencing disk that you have created. You can see what this process looks like in Figure 2.
 [Click on image for larger view.]
Figure 2. This is how you attach a differencing disk to a virtual machine.
[Click on image for larger view.]
Figure 2. This is how you attach a differencing disk to a virtual machine.
Once the differencing disk is attached to the new VM, you can boot the VM and it will behave as a clone of the template virtual machine. The template virtual machine's virtual hard disk is treated as read only, meaning that you never have to worry about completely destroying the base configuration.
Resetting the lab environment is an equally simple process. You can simply delete the virtual machine and then delete the differencing disk. When you are ready to redeploy the lab just create new differencing disks and attach them to new virtual machines. Remember, the template environment remains untouched, so you will always be deploying the lab based on a known state.
About the Author
Brien Posey is a 22-time Microsoft MVP with decades of IT experience. As a freelance writer, Posey has written thousands of articles and contributed to several dozen books on a wide variety of IT topics. Prior to going freelance, Posey was a CIO for a national chain of hospitals and health care facilities. He has also served as a network administrator for some of the country's largest insurance companies and for the Department of Defense at Fort Knox. In addition to his continued work in IT, Posey has spent the last several years actively training as a commercial scientist-astronaut candidate in preparation to fly on a mission to study polar mesospheric clouds from space. You can follow his spaceflight training on his Web site.