Posey's Tips & Tricks
Deploying Windows Server RemoteApp, Part 2
Learn how to continue your RemoteApp deployment by configuring RD Gateway, applying certificates and setting up Remote Desktop licensing.
- Publish a test application such as Notepad to validate the RemoteApp collection.
- Configure RD Gateway and properly create and apply certificates across all RDS components.
- Install and prepare the RD Licensing role to complete the deployment.
In the previous post, we began configuring RDS RemoteApp. Now, I want to continue walking you through the setup process.
To get started, click on the RemoteApp collection that you created earlier and then click on the Publish RemoteApp Programs link. We are going to need an application that we can use for testing purposes, so click Add and then browse to C:\Windows\System32\Notepad. Once you have added Notepad, click Next, followed by Publish. When the process completes, click Close.
The next thing that we need to do is to set up a gateway. To do so, go back to the RDS Overview screen and then click on the RD Gateway icon. This will launch a wizard that will walk you through the gateway creation process.
When the wizard begins, select your server, click the arrow icon, and then click Next.
At this point, you will be taken to a screen that asks you to name the self-signed certificate that will be used to encrypt gateway traffic. The certificate name must match the gateway server’s FQDN exactly. As an example, my server is named PS-Apps.poseymgmt.com, so my certificate is also named PS-Apps.poseymgmt.com.
Click Next and you will be taken to a confirmation screen. Assuming that everything seems to be correct, click Add, followed by Close.
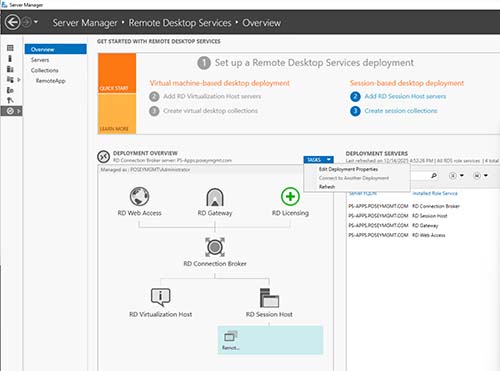
When you arrive back at the Overview screen, click on the Tasks dropdown associated with the Deployment Overview, as shown in Figure 1.
 [Click on image for larger view.]
Figure 1. Deployment Overview Tasks dropdown.
[Click on image for larger view.]
Figure 1. Deployment Overview Tasks dropdown.
Select the Edit Deployment Properties option from the Tasks dropdown.
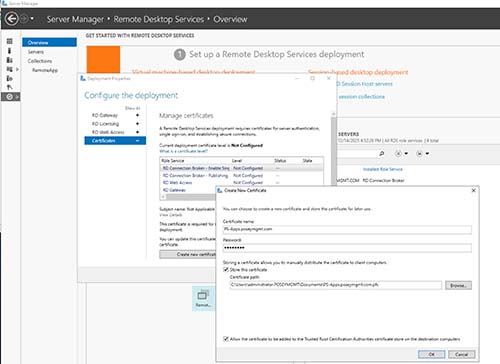
When the Deployment Properties screen opens, click on the Certificates tab. Make sure that the RD Connection Broker option is selected and then click on the Create new Certificate button. Now, enter a name and a password for the certificate that you are creating. Choose the option to store the certificate somewhere on the server for later use (be sure to include the .PFX extension). You will also need to select the option to allow the certificate to be trusted, as shown in Figure 2. Click OK to create the certificate. Click Apply to apply the certificate.
 [Click on image for larger view.]
Figure 2. Use these options when creating a certificate.
[Click on image for larger view.]
Figure 2. Use these options when creating a certificate.
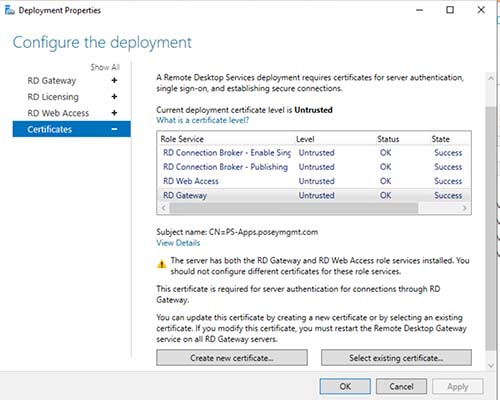
Now, select the RD Connection Broker Publishing option. This time, rather than creating a new certificate, click the Select Existing Certificate button. When prompted, supply the path to the certificate that you stored earlier. Supply the certificate’s password, select the option to trust the certificate, and click OK, followed by Apply. You will need to repeat this process for the RD Web Access and RD Gateway components. When you are done, the state of all four components should be listed as Success, as shown in Figure 3. Click OK to return to the Overview screen.
 [Click on image for larger view.]
Figure 3. The certificate has been successfully applied.
[Click on image for larger view.]
Figure 3. The certificate has been successfully applied.
The next step in the process involves configuring a licensing server. To do so, click on the RD Licensing icon, found on the Overview screen. When prompted, select your server, click on the arrow icon, and then click Next. Click Add, followed by Close to complete the installation.
As of right now, your RDS deployment should be functional. However, the licensing server is not yet configured (you have a 120 day grace period before you have to activate the licensing). You can access the licensing configuration by opening Server Manager and selecting the Remote Desktop Services > Remote Desktop Licensing Manager commands from the shortcut menu.
When the Licensing Manager opens, click on the Review Configuration link and, if necessary, click the Add to Group button to add the licensing server to the Terminal Server License Servers group within the Active Directory.
You can activate the license server by right-clicking on the listing for the server and choosing the Activate Server command from the resulting shortcut menu. Incidentally, the license server must be able to access the Internet in order to communicate with the Microsoft clearinghouse server.
About the Author
Brien Posey is a 22-time Microsoft MVP with decades of IT experience. As a freelance writer, Posey has written thousands of articles and contributed to several dozen books on a wide variety of IT topics. Prior to going freelance, Posey was a CIO for a national chain of hospitals and health care facilities. He has also served as a network administrator for some of the country's largest insurance companies and for the Department of Defense at Fort Knox. In addition to his continued work in IT, Posey has spent the last several years actively training as a commercial scientist-astronaut candidate in preparation to fly on a mission to study polar mesospheric clouds from space. You can follow his spaceflight training on his Web site.