Posey's Tips & Tricks
Linking a Physical GPU to a Hyper-V Virtual Machine
This step-by-step guide explains how to use Discrete Device Assignment to attach a physical GPU directly to a Hyper-V virtual machine, enabling hardware-accelerated workloads such as AI while bypassing deprecated RemoteFX technology.
With so many workloads now depending on AI, it's becoming increasingly necessary to link physical GPUs to Hyper-V virtual machines. Doing so involves using a technique called Discrete Device Assignment (RemoteFX has been discontinued). In this blog post, I will show you how this technique works.
In order to associate a physical GPU with a Hyper-V virtual machine, you are going to need a GPU that supports discrete device assignments. Most modern GPUs work fine, but it's still important to make sure. It's also worth noting that the technique that I am going to show you requires you to completely disassociate the GPU from the host, meaning that the GPU will only work with the virtual machine.
And speaking of the virtual machine, the VM needs to be running Windows Server 2016 or higher and it must be a Generation 2 virtual machine. Additionally, you are probably going to need to disable Secure Boot for the virtual machine. It's also worth noting that this article assumes that the virtual machine is powered off.
Incidentally, you will also need to make sure that the virtual machine is not configured to go into a saved state when the host shuts down. From within the Hyper-V Manager, open the virtual machine's settings and then select the Automatic Stop Actions. Set the Automatic Stop Action to Shut Down the Guest Operating System.
With the host and the VM properly configured, it's time to assign a GPU to a virtual machine. To get started, open an elevated PowerShell session within the host operating system. Next, you are going to need to figure out the instance ID that's associated with your GPU. To do so, enter this command:
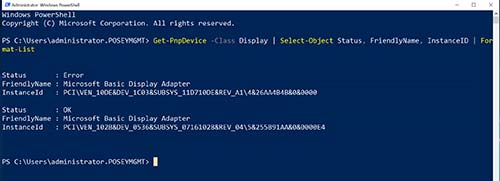
Get-PnpDevice -Class Display | Select-Object Status, FriendlyName, InstanceID | Format-List
You can see what this command looks like in Figure 1. In case you are wondering, the error message shown in the figure exists because I do not have a device driver installed for the GPU.
 [Click on image for larger view.]
Figure 1. This is how you acquire the Instance ID associated with a GPU.
[Click on image for larger view.]
Figure 1. This is how you acquire the Instance ID associated with a GPU.
Now that you know the GPU's instance ID, the next thing that you will need to do is to find the location path. You can acquire the location path by using this command:
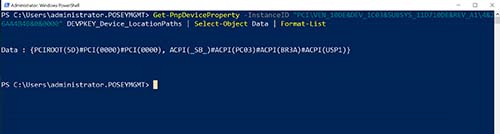
Get-PnpDeviceProperty -InstanceId "<GPU-Instance-ID>" DEVPKEY_Device_LocationPaths | Select-Object Data Format-List
You can see what this command looks like in Figure 2.
 [Click on image for larger view.]
Figure 2. This is how you retrieve the device's location paths.
[Click on image for larger view.]
Figure 2. This is how you retrieve the device's location paths.
As you look at the previous figure, you will notice that the data lists two different location paths. Typically the one that you will use is the one that makes the greatest number of references to PCI (usually the first one). However, there may be a bit of trial and error required for the next step. It's also worth noting that the brackets are not part of the device path.
The next step is to force a dismount of the GPU from the host operating system. The command used for doing so is:
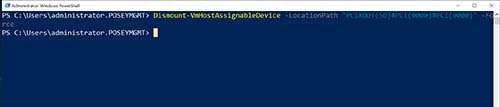
Dismount-VmHostAssignableDevice -LocationPath "<GPU-Location-Path>" -Force
You can see what this step looks like in Figure 3.
 [Click on image for larger view.]
Figure 3. I have dismounted the device from the host operating system.
[Click on image for larger view.]
Figure 3. I have dismounted the device from the host operating system.
The next step in the process is to enable your virtual machine for device assignment. The command used for doing so will need to be entered at the host operating system level (not within the virtual machine). You will however, need to know the virtual machine's name. You can acquire the virtual machine's name by either looking at the list of virtual machines within the Hyper-V Manager or by entering the Get-VM cmdlet. Once you know the virtual machine's name, the command used for enabling device assignments for your virtual machine is:
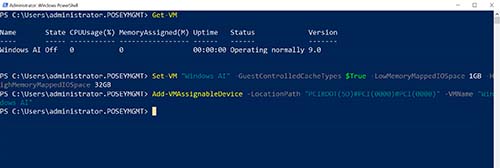
Set-VM -Name "MyVM" -GuestControlledCacheTypes $True -LowMemoryMappedIoSpace 1GB -HighMemoryMappedIoSpace 32GB
The last step in the process is to attach the GPU to the virtual machine. You are going to once again need to reference the virtual machine's location path. Here is the command:
Add-VMAssignableDevice -LocationPath "<GPU-Location-Path>" -VMName "MyVM"
You can see what this looks like in Figure 4.
 [Click on image for larger view.]
Figure 4. The GPU has been linked to the Hyper-V Virtual Machine.X
[Click on image for larger view.]
Figure 4. The GPU has been linked to the Hyper-V Virtual Machine.X
At this point, the GPU has been linked to the Hyper-V virtual machine. You can confirm the linkage by installing the device drivers and taking a look at the Windows Device Manager, as shown in Figure 5.
 [Click on image for larger view.]
Figure 5. My virtual machine is using a physical GPU.
[Click on image for larger view.]
Figure 5. My virtual machine is using a physical GPU.
About the Author
Brien Posey is a 22-time Microsoft MVP with decades of IT experience. As a freelance writer, Posey has written thousands of articles and contributed to several dozen books on a wide variety of IT topics. Prior to going freelance, Posey was a CIO for a national chain of hospitals and health care facilities. He has also served as a network administrator for some of the country's largest insurance companies and for the Department of Defense at Fort Knox. In addition to his continued work in IT, Posey has spent the last several years actively training as a commercial scientist-astronaut candidate in preparation to fly on a mission to study polar mesospheric clouds from space. You can follow his spaceflight training on his Web site.