Posey's Tips & Tricks
How To Disable The Mandatory Microsoft Authenticator App Requirement
Learn how to disable Microsoft's default requirement for its Authenticator app in Microsoft 365 and regain control over your organization's multifactor authentication settings.
Although Microsoft has been requiring the use of multifactor authentication for Microsoft 365 for some time now, the company has been aggressively pushing the use of its Microsoft authenticator app. Today, for instance, I signed into Intune and was informed that I was now being required to use the Microsoft Authenticator app and that I could only log in without it two more times.
While there are undoubtedly security benefits associated with using the Microsoft Authenticator App, it isn't for everyone. After all, an organization probably can't force users to install the app on their own personal devices. Even if they could, there may be users who don't own a smartphone or who don't know how to install and configure the app.
While I am not averse to using multifactor authentication in my own organization, there are various reasons why I do not want to use the Microsoft Authenticator App (and being forced into using it makes me want it even less). That being the case, I wanted to show you how to get around this requirement.
Before I get started, I just wanted to pass along a quick word of caution. It probably goes without saying, but opting out of using the Microsoft Authenticator App could potentially weaken your organization's security. As such, it is important to weigh the pros and cons of requiring the app and decide whether requiring the Microsoft Authenticator App is truly in your organization's best interest.
Unfortunately, removing the requirement for using the Microsoft Authenticator App is not always a straightforward process. There are any number of settings scattered across the Microsoft 365 eco system that could potentially be acting as the policy that requires the app to be used for multifactor authentication. However, if the prompt telling you that you must begin using the app appears without warning, then I would recommend beginning your search by looking at the Registration Campaign settings.
You can access the Registration Campaign settings by logging into the Microsoft Entra Admin Center, expanding the Protection tab and then clicking on Authentication Methods. From there, click on the Registration Campaign tab. You can see what this tab looks like in Figure 1.
 [Click on image for larger view.] Figure 1. Microsoft allows you to create registration campaigns that prompt users to use a more secure authentication method.
The Registration Campaign screen allows you to create a campaign that will prompt users to switch to a different, more secure form of authentication. However, if you look at the figure above, you can see that the state is currently set to Microsoft Managed. This means that Microsoft is given the authority to decide whether or not to enable such a campaign in your organization.
To change the settings associated with a registration campaign, click the Edit button. Upon doing so, the various settings shown in the figure above will become editable. This means that you can set the state to Disabled. I would also recommend disabling the Limited Number of Snoozes option. That way, if the campaign were to become enabled somehow, users will have the ability to snooze the warning.
The Edit Settings screen also provides you with the ability to exclude users or groups. While you could use this option to exclude all of your users, it's also possible to exclude a subset of your users, such as those users who do not use a smartphone for work.
When you are done, click the Save button to save your changes. On my system, the Save button appeared to be grayed out, but clicking on it had the desired effect and my changes were saved.
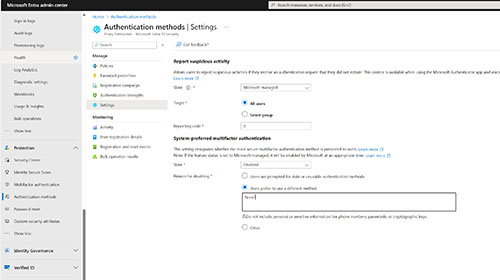
While you are at it, it may be worth taking a look at the Settings tab. The Settings tab contains another Microsoft managed setting called System Preferred Multifactor Authentication. The default configuration allows Microsoft to present its preferred multifactor authentication option to your users. You can see what the Settings tab looks like in Figure 2.
 [Click on image for larger view.] Figure 2. System preferred multifactor authentication is controlled through the Settings tab.
Interestingly, when you disable this setting, Microsoft forces you to justify your reason for doing so. However, you can make the system preferred multifactor authentication go away by clicking on the Users Prefer to Use a Different Method setting, providing a bogus reason, as shown in Figure 3, and clicking Save.
 [Click on image for larger view.] Figure 3. Microsoft makes you explain your reason for disabling system preferred multifactor authentication.
About the Author
Brien Posey is a 22-time Microsoft MVP with decades of IT experience. As a freelance writer, Posey has written thousands of articles and contributed to several dozen books on a wide variety of IT topics. Prior to going freelance, Posey was a CIO for a national chain of hospitals and health care facilities. He has also served as a network administrator for some of the country's largest insurance companies and for the Department of Defense at Fort Knox. In addition to his continued work in IT, Posey has spent the last several years actively training as a commercial scientist-astronaut candidate in preparation to fly on a mission to study polar mesospheric clouds from space. You can follow his spaceflight training on his Web site.