Posey's Tips & Tricks
Examining Microsoft 365 Privacy Options
You might not be able to stay hidden from your employer's watchful eye, but you do have some control on the amount of visibility.
Over the past few weeks I have had several people asking me about Microsoft 365 privacy. Most of these were friends or family members who were wanting to know what their employers could or could not see. I find it interesting that so many people seem to be interested in hiding their online activities from their employers all of a sudden. Incidentally, the answer to the question regarding what employers can see is that each employer has their own unique capabilities. However, you should just assume that you have absolutely no privacy if you are using a corporate owned device or if you are using a personal device that has ever been used to log into a work related account.
Unfortunately, there isn't really a lot that you can do to prevent your employer from snooping on you aside from using a dedicated device that is never connected to your employer's network and is never used to log into a work related application (including email).
While you might not be able to entirely prevent the company that you work for from spying on you, there are a few things that you can do within Microsoft 365 to limit the information that is shared with Microsoft and its partners. Microsoft 365 offers several privacy settings that are definitely worth taking a look at.
To get started, sign into Microsoft 365, click on your profile picture and then click on My Account. This will cause Microsoft 365 to open a dashboard containing a series of options pertaining to your account. You can see what this looks like in
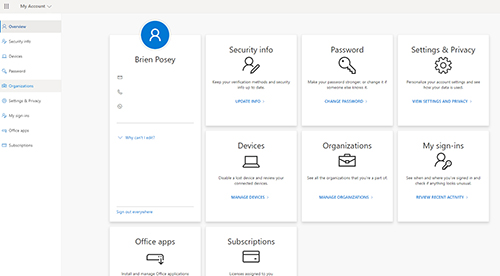 [Click on image for larger view.] Figure 1. This is where you go to find the Microsoft 365 privacy settings.
Now, click on the Settings and Privacy link. When the Settings and Privacy screen appears, click the Privacy tab at the top of the screen. This causes the browser to display the various privacy settings that are available, as shown in Figure 2.
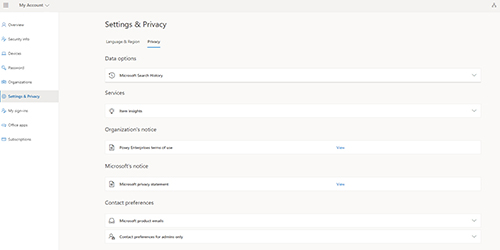 [Click on image for larger view.] Figure 2. These are the privacy settings that are available for Microsoft 365.
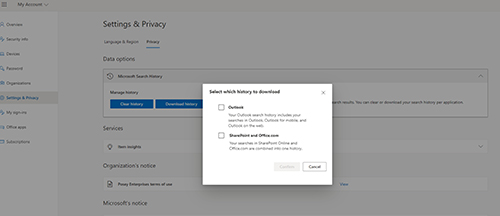
The first option that is listed is the Microsoft Search History. Clicking on Microsoft Search History gives you two options. You can clear your search history or you can download your search history.
In case you are wondering, this search history consists of any searches that you've performed within Outlook, Outlook for Mobile or Outlook on the Web. The search history also contains any searches that you have done through SharePoint Online or Office.com. The search history does not include general browser history, such as searching for an item using Google. You can see with the search history download option looks like in Figure 3.
 [Click on image for larger view.]
Figure 3. This is what the option to download search history looks like.
[Click on image for larger view.]
Figure 3. This is what the option to download search history looks like.
The next option is for Item Insights. The basic idea behind this option is that when enabled, Microsoft 365 keeps track of your collaborative work and uses it to provide you with recommendations within the Microsoft 365 environment. These recommendations might include things like documents or SharePoint sites. Item Insights are enabled by default, but you can disable them through a simple On / Off switch.
The next sections that are displayed within the Privacy screen are the Organization's Notice and the Microsoft's Notice sections. There isn't really anything that you can do within the sections. They exist solely as a way for you to be able to review your organization's terms of use and the Microsoft privacy statement.
Of the Privacy screen is the Contact Preferences section. The first option in the section is the Microsoft Product Emails option. This option consist of a single check box, which is selected by default. Once selected, this check box allows Microsoft to send feedback and training email to you related to Microsoft 365. According to the text that is displayed in the interface, Microsoft only sends feedback and training emails to help you use the products and services that you already have, so presumably this checkbox has nothing to do with marketing messages.
The last section is only accessible to administrators. It allows you to determine how Microsoft is allowed to contact you. There is one checkbox that when selected will allow you to receive information, tips and offers pertaining to Microsoft 365. Thankfully, this check box is not selected by default. The other check box is selected by default and allows you to receive communications from Microsoft partners. Fortunately, partners are not supplied with a contact phone number unless you choose to give it to them. You can see with the Contact Preferences options look like in Figure 4.
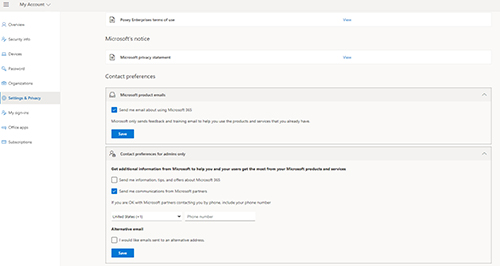 [Click on image for larger view.] Figure 4. These are the default contact preferences.
About the Author
Brien Posey is a 22-time Microsoft MVP with decades of IT experience. As a freelance writer, Posey has written thousands of articles and contributed to several dozen books on a wide variety of IT topics. Prior to going freelance, Posey was a CIO for a national chain of hospitals and health care facilities. He has also served as a network administrator for some of the country's largest insurance companies and for the Department of Defense at Fort Knox. In addition to his continued work in IT, Posey has spent the last several years actively training as a commercial scientist-astronaut candidate in preparation to fly on a mission to study polar mesospheric clouds from space. You can follow his spaceflight training on his Web site.