Posey's Tips & Tricks
Protecting Users Against E-Mail Phishing Attacks
Microsoft's go-to solution for anti-phishing protection is an anti-phishing policy. Here's how to create one in Microsoft 365.
Phishing e-mails are a huge problem for organizations of all sizes. Ransomware infections often stem from a user clicking a link within a phishing message, but phishing can cause a variety of other problems ranging from identity theft to funds being lost due to fraud. Fortunately, Microsoft 365 includes a tool that is designed to help you stop some types of phishing messages.
Microsoft's go-to solution for anti-phishing protection is an anti-phishing policy. To create such a policy, open the Security and Compliance Center, expand the Threat Management tab, then select the Compliance tab. Now, click on Policy and select the Anti-Phishing option, shown in Figure 1.
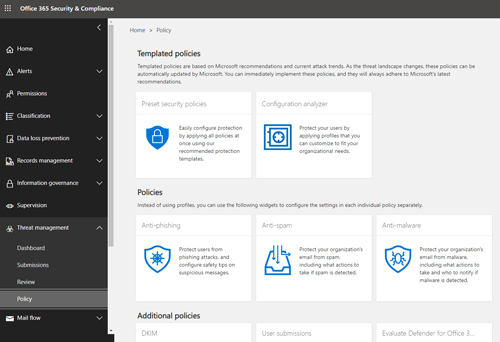 [Click on image for larger view.] Figure 1: Click on the Anti-Phishing option.
At this point, you will be taken to the Anti-Phishing screen. Click the Create button to create an anti-phishing policy. When you so, the console will launch the Create a New Anti-Phishing Policy wizard. The wizard's initial screen simply asks you to enter a name for the policy you are creating, along with an optional description. I have always been a big believer in entering really detailed descriptions whenever you have the opportunity, because a description can serve as documentation of why the policy was created, who created the policy and when, and what the policy does.
Once you finish entering a name and description for the new policy, click Next and you will be taken to the Applied To screen. The Applied To screen allows you to create one or more conditions that specify who the policy will apply to. You can apply anti-phishing policies to individual users, group members or even to entire domains, as shown in Figure 2. You will also notice in the figure that the wizard gives you the ability to carve out policy exceptions if necessary. For example, you might apply the policy to an entire domain, except for members of the IT group.
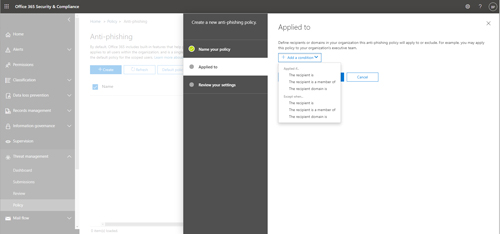 [Click on image for larger view.] Figure 2: You will need to specify who the policy will apply to, as well as any exceptions.
Click Next, and you will be taken to the Review Your Settings screen. This screen really doesn't do much other than show you the name and description you have assigned to the policy, as well as who the policy will apply to. Assuming everything looks good, click on the Create Policy screen to create the policy.
As I'm sure you noticed, the process of creating the policy didn't require you to do very much aside from specifying who the policy will apply to. The reason is that the various anti-phishing mechanisms tied to the policy are enabled by default when you create the policy. You can disable these settings, but it's usually a good idea to leave them enabled unless you have a compelling reason to turn them off.
This, of course, raises the question of what these settings are. To find out, just click on the policy you just created. When you do, you will be taken to the Edit Your Policy screen, which you can see in Figure 3.
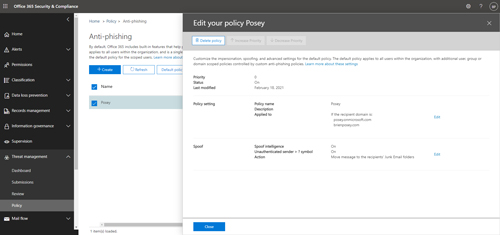 [Click on image for larger view.] Figure 3: The Edit Your Policy screen lets you make changes to your anti-phishing policy.
As you look at the figure, you will notice that there are two Edit links near the right side of the screen. If you click on the top Edit link, it will take you to an interface that is nearly identical to the one you saw back in Figure 2. You can use this interface to make changes to who the policy applies to. The bottom Edit link, on the other hand, is the one that lets you make changes to the policy's behavior.
There are three changes you can make to the policy's behavior. First, you have the option to enable or disable spoof intelligence. Spoof intelligence gives you a way to block messages from senders who spoof your domain. At first, it might seem that spoof intelligence should be globally enabled for all users, but keep in mind that globally using spoof intelligence can sometimes cause problems. For example, sometimes applications that send e-mail alerts do so in a way that makes it seem your domain is being spoofed.
The second option is to identify unauthenticated senders. When this option is disabled, Exchange will place a question mark in Outlook's sender card if the sender has not been authenticated.
The third option that you can configure as a part of an anti-phishing policy is what happens to messages from someone who has spoofed your domain. The default behavior is to place such a message into the Junk Email folder, but you can opt to quarantine the message instead.
About the Author
Brien Posey is a 22-time Microsoft MVP with decades of IT experience. As a freelance writer, Posey has written thousands of articles and contributed to several dozen books on a wide variety of IT topics. Prior to going freelance, Posey was a CIO for a national chain of hospitals and health care facilities. He has also served as a network administrator for some of the country's largest insurance companies and for the Department of Defense at Fort Knox. In addition to his continued work in IT, Posey has spent the last several years actively training as a commercial scientist-astronaut candidate in preparation to fly on a mission to study polar mesospheric clouds from space. You can follow his spaceflight training on his Web site.