Posey's Tips & Tricks
How To Rebuild a Problematic Windows 10 Installation
Sometimes the easiest fix for chronic Windows 10 problems is reinstalling Windows 10. Here's how to do it without erasing all of your files and apps.
The Windows 10 operating system is amazingly complex, especially when compared to early Windows OSes such as those from the early 1990s. One of the big disadvantages to this complexity is that it can sometimes be extraordinarily difficult -- dare I say impossible -- to fix problems that occur.
When Windows begins to have chronic problems that aren't easily correctable, the easiest thing to do is reinstall Windows. Of course, you will want to do so in a way that refreshes all of the various system files, but that doesn't erase your files and applications in the process. In this column, I will show you how it's done.
Before I get started, I need to point out that while this technique is intended to avoid data loss, data loss can still happen. I therefore strongly recommend that you make a full system backup before you try anything I am about to show you.
Refreshing a troubled Windows OS is largely a two-step process. The first step is to build a deployment image you can use during the repair process (it's easier than it sounds). The second step is to perform the reinstallation in a way that preserves your data.
Creating Windows Installation Media
The easiest way to create installation media that can be used in the repair process is to visit Microsoft's Download Windows 10 site. When you open the site in your browser, the first thing you will probably see is a big blue Update Now button, similar to the one that was used for Windows Update.
Ignore this button and scroll down to the lower portion of the page instead. There you will find a Download Tool Now button. You can see what this button looks like in Figure 1.
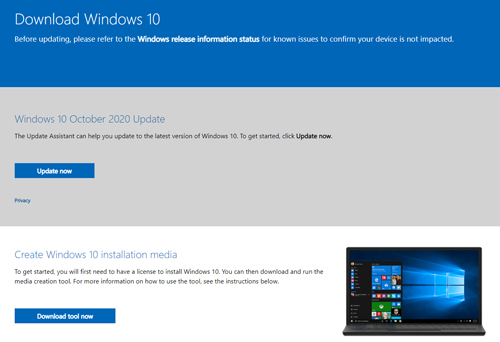 [Click on image for larger view.] Figure 1: Click the Download Tool Now button.
Upon clicking the button, Windows will ask you whether you want to open or save the tool. Click Open and, if prompted by User Account Control, make sure that you click Yes to give the tool the ability to make changes to your device. At this point, Windows 10 Setup will launch.
When prompted, accept the Microsoft Software License Terms. After a minute or so, you will see a screen like the one shown in Figure 2 asking if you want to upgrade your PC or if you would prefer to create installation media. Choose the option to create installation media and click Next.
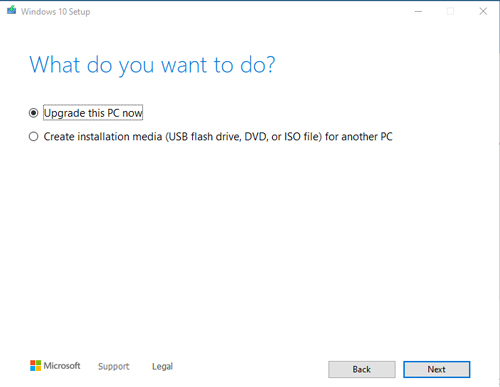 [Click on image for larger view.] Figure 2: Choose the option to create installation media and click Next.
The next screen asks you to choose your language, edition and architecture. By default, the Use the Recommended Options for this PC checkbox is selected, which causes these options to be selected automatically based on how your PC is currently configured.
Click Next, and Windows 10 Setup will ask you if you want to create the media on a USB flash drive or if you want to create an ISO file, as shown in Figure 3. I tend to prefer the ISO file option, but it's best to place the ISO file in a location other than your PC's boot disk.
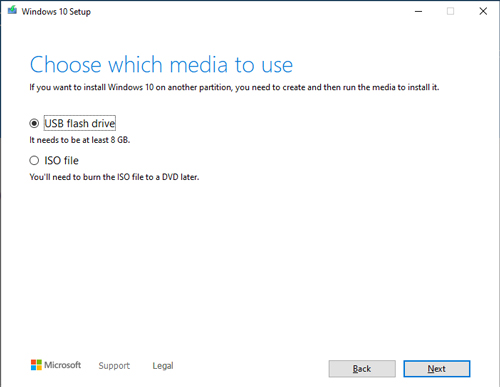 [Click on image for larger view.] Figure 3: You can create an ISO file or install the media to a USB flash drive.
Make your selection and click Next, and the installation media will be created. When the process completes, click Finish.
Rebuilding Windows
Once you have created the installation media, open it by inserting the USB flash drive or mounting the ISO file (the OS should still be running at this point; do not boot from the installation media). Now, run the Setup.exe file shown in Figure 4.
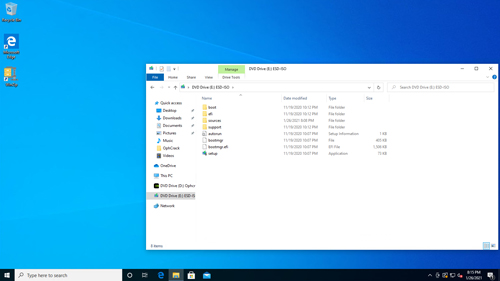 [Click on image for larger view.] Figure 4: Run the Setup.exe file.
At this point, Windows 10 Setup should launch. Click Next on the initial setup screen. Setup will check for any available updates. It's possible that Setup may restart a couple of times during this process.
After the update check completes, you will be taken to the Ready to Install screen. Make sure that this screen indicates that personal files and apps will be kept, as shown in Figure 5.
 [Click on image for larger view.] Figure 5: Make sure that Setup is configured to keep personal files and apps.
If you are in doubt, click on the Change What to Keep link, then select the option to keep personal files and apps, as shown in Figure 6. Click Next and follow the prompts to begin refreshing Windows.
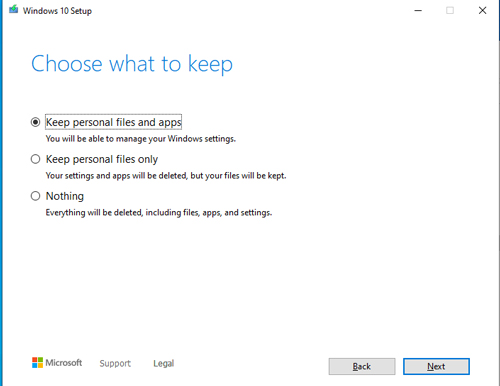 [Click on image for larger view.] Figure 6: Setup gives you the ability to choose what you want to keep.
About the Author
Brien Posey is a 22-time Microsoft MVP with decades of IT experience. As a freelance writer, Posey has written thousands of articles and contributed to several dozen books on a wide variety of IT topics. Prior to going freelance, Posey was a CIO for a national chain of hospitals and health care facilities. He has also served as a network administrator for some of the country's largest insurance companies and for the Department of Defense at Fort Knox. In addition to his continued work in IT, Posey has spent the last several years actively training as a commercial scientist-astronaut candidate in preparation to fly on a mission to study polar mesospheric clouds from space. You can follow his spaceflight training on his Web site.