Posey's Tips & Tricks
Managing Microsoft Teams Breakout Rooms
Remote work has forced organizations to get used to holding virtual meetings. That's easy enough for meetings of 10 to 15 people. But bigger gatherings require a bit more wrangling.
Over the last year, there was an abrupt transition away from in-person meetings in favor of meetings conducted 100 percent online. Even though the transition went amazingly smoothly considering the circumstances, there have been important lessons learned with regard to best practices for online meetings.
One of the big lessons many organizations learned the hard way is that interactive discussions tend not to work very well in large groups. If you're having a Microsoft Teams meeting with 10 or 15 people and need to have a group discussion, it's probably going to work out OK. If the group is much larger than that, however, chaos can quickly become the order of the day.
One way to get around the challenges associated with having group discussions as part of a large meeting is to take advantage of breakout rooms. Breakout rooms are virtual conference rooms where members of the group can step away from the larger meeting to have a more intimate discussion. Given how useful these breakout rooms can be, I wanted to take the opportunity to show you how they work.
Unfortunately, you can't configure breakout rooms from within the Teams Admin Center, which means you can't create them ahead of time. You can only create breakout rooms from within a meeting. To configure breakout rooms, start a meeting and click on the Breakout Rooms icon, shown in the figure below.
 [Click on image for larger view.] Figure 1: Click on the Breakout Rooms icon.
At this point, you will see a pop-up window appear. As you can see in Figure 2, Teams asks you to specify the number of breakout rooms you need to create for this particular meeting. You can create up to 50 breakout rooms per meeting. There is also a prompt asking whether you want to assign people to breakout rooms automatically or manually. I will come back to this option later on.
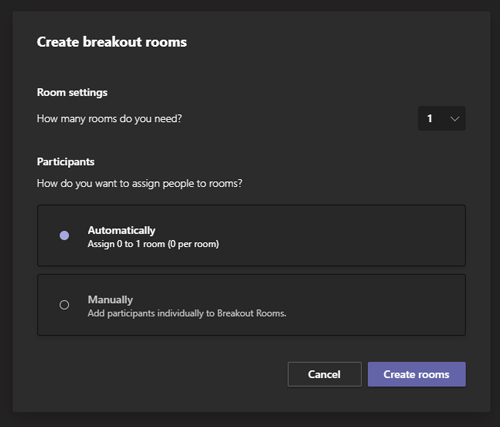 [Click on image for larger view.] Figure 2: Teams allows you to create multiple rooms based on your needs.
Click Create, and your breakout rooms will be created. The breakout rooms appear on the right side of the Teams application, as shown in the next figure.
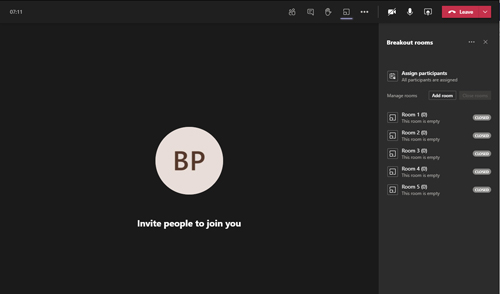 [Click on image for larger view.] Figure 3: This is what the breakout rooms look like.
Once you have created the breakout rooms, you can use them as they are. Depending on the type of meeting that you are having, however, it may be beneficial to rename the breakout rooms. For example, imagine that you were using Teams to host a small virtual conference. You could use the main meeting room to present a keynote session and use breakout rooms for separate sessions on other topics. You could easily do something similar in a corporate environment. You might create one breakout room for people who want to talk about the quarterly budget and another for people who want to talk about sales. In these or countless other use cases, it is helpful to rename the breakout rooms so users know which one to use. The meeting organizer can also manually place users into breakout rooms.
Renaming a breakout room is a simple process. Just right-click on a room and choose the Rename Room option from the shortcut menu.
Earlier I mentioned that when you create a breakout room, you have the option to assign users to the breakout rooms automatically or manually. While it's probably tempting to choose the automatic option (because who doesn't like it when things happen automatically?), the automatic option may not always meet your needs.
If you look back at Figure 3, you will notice that the breakout rooms are listed as closed. It's up to a meeting organizer to open the breakout rooms at the appropriate time. You can open a breakout room by clicking on the room and choosing the Open Room option from the shortcut menu.
If you used the Automatic option when you created the breakout rooms, opening a room will cause the users to be moved into the breakout room as soon as you open it. If, on the other hand, you go with the Manual option when creating the breakout rooms, opening a breakout room merely gives users the option of joining the room.
Incidentally, when you close a breakout room, all of the users who were in that room are automatically moved out of the breakout room and back into the main meeting space.
Breakout rooms probably aren't something you will want to use for every online meeting, but if a meeting has a lot of participants and you are trying to encourage discussion, using breakout rooms can be a great option.
About the Author
Brien Posey is a 22-time Microsoft MVP with decades of IT experience. As a freelance writer, Posey has written thousands of articles and contributed to several dozen books on a wide variety of IT topics. Prior to going freelance, Posey was a CIO for a national chain of hospitals and health care facilities. He has also served as a network administrator for some of the country's largest insurance companies and for the Department of Defense at Fort Knox. In addition to his continued work in IT, Posey has spent the last several years actively training as a commercial scientist-astronaut candidate in preparation to fly on a mission to study polar mesospheric clouds from space. You can follow his spaceflight training on his Web site.