Posey's Tips & Tricks
Creating a Linux VM in Hyper-V the Easy Way
Hyper-V in Windows 10 has a built-in tool called Quick Create that lets you automate the process of setting up new virtual machines. Here's how to use it.
As someone who has worked in IT for what seems like forever, I can vividly recall a time when it would have been considered almost blasphemous to run Linux on a Windows machine.
Today, of course, Microsoft loves Linux. In fact, Microsoft makes it super easy to deploy an Ubuntu virtual machine (VM) on Hyper-V. In this article, I will show you how it's done.
In the Windows 10 version of Hyper-V, Microsoft provides a tool called Quick Create. Quick Create is designed to simplify the process of setting up new VMs. You can access Quick Create by opening the Hyper-V Manager, right-clicking on the host name and choosing the Quick Create command from the resulting shortcut menu. You can see what the Quick Create tool looks like in Figure 1.
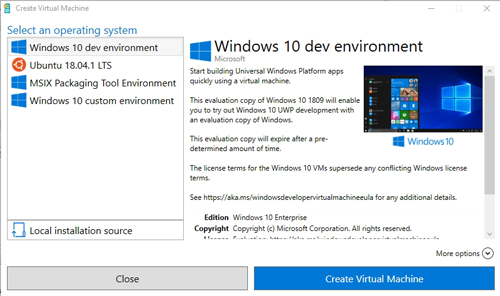 [Click on image for larger view.] Figure 1: This is what the Quick Create tool looks like.
To create a Linux VM, click on the Ubuntu option within the list of available operating systems, then click on the Create Virtual Machine button. In case you are wondering, Ubuntu is free, so you don't have to worry about purchasing an operating system license for your Linux VM.
As soon as you click the Create Virtual Machine button, Hyper-V will begin downloading the Linux software. As you can see in Figure 2, the download is roughly one-and-a-half gigabytes in size.
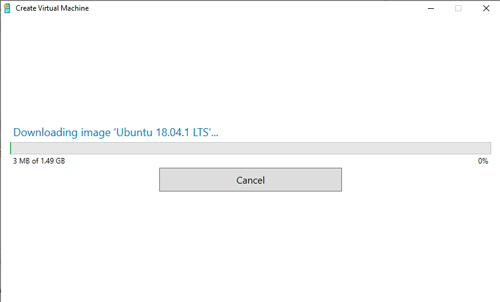 [Click on image for larger view.] Figure 2: Hyper-V automatically downloads the Linux operating system.
After several minutes, Hyper-V displays a message stating that the VM has been created. You can see what this message looks like in Figure 3.
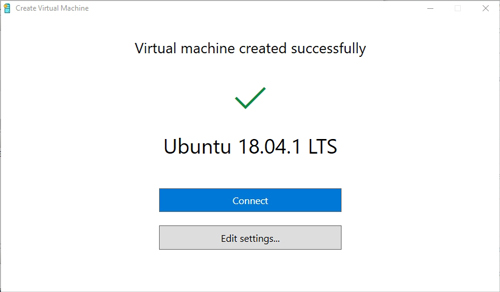 [Click on image for larger view.] Figure 3: The new Ubuntu VM has been created.
Although Hyper-V makes the process of deploying an Ubuntu Linux VM super simple, there is a good chance that you will need to make a few tweaks to the VM. If you have ever created a Hyper-V VM the "normal" way, then you know that there are generally a few parameters that you have to specify. For example, you might choose which virtual switch the VM is connected to, or you might specify how much memory is to be assigned to the VM.
Although Hyper-V largely automates the creation of Ubuntu Linux VMs through the Quick Create feature, that automation does not prevent you from making changes to the VM's settings. In fact, you might have noticed in the previous figure that there is an Edit Settings button on the screen that tells you that the VM was created successfully. Clicking the Edit Settings button opens the VM's Settings window. This is the same window that you would see if you were to right-click on the VM and choose the Settings command from the Shortcut menu.
Oh, and that reminds me: You might have noticed that the Quick Create tool didn't ask me to enter a name for the VM. As such, the VM is given a name that matches the guest operating system name (Ubuntu 18.04.1 LTS, in this case).
A quick look through the VM settings reveals that the Quick Create tool plays it safe when it comes to the settings that the VM is configured to use. Quick Create does not, for instance, enable Secure Boot, production checkpoints or any of the more advanced VM features. Instead, Quick Create keeps things simple. It connects the VM to the default virtual switch and assigns it six virtual CPUs and a couple of gigabytes of memory. You can, of course, make changes if this configuration does not meet your needs, but the whole point of using Quick Create is to completely automate the process of deploying a Ubuntu Linux VM.
It is worth noting that even though Quick Create automates the creation of the Hyper-V VM, you will still have to do a bit of configuration work within the guest operating system. As you can see in Figure 4, for instance, you will need to select your language. Other configuration tasks include choosing your keyboard layout and your time zone, and specifying a set of log-in credentials.
 [Click on image for larger view.] Figure 4: Some configuration is required within the guest OS.
Once you have answered these basic questions, Setup will take a few minutes to finish doing its thing until Ubuntu is ready to use, as shown in Figure 5.
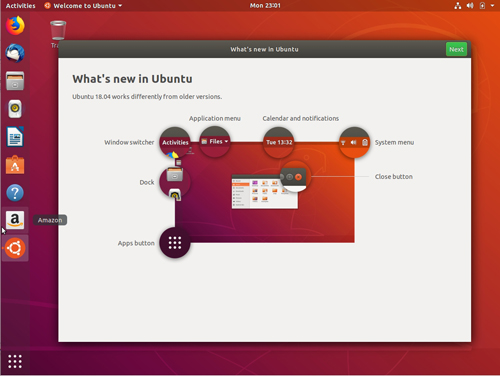 [Click on image for larger view.] Figure 5: Ubuntu is ready to use.
About the Author
Brien Posey is a 22-time Microsoft MVP with decades of IT experience. As a freelance writer, Posey has written thousands of articles and contributed to several dozen books on a wide variety of IT topics. Prior to going freelance, Posey was a CIO for a national chain of hospitals and health care facilities. He has also served as a network administrator for some of the country's largest insurance companies and for the Department of Defense at Fort Knox. In addition to his continued work in IT, Posey has spent the last several years actively training as a commercial scientist-astronaut candidate in preparation to fly on a mission to study polar mesospheric clouds from space. You can follow his spaceflight training on his Web site.