Posey's Tips & Tricks
Using Hyper-V's Storage Resource Pools with Stretched Clusters
The trickiest thing about making a stretched cluster work with Hyper-V is getting the underlying storage to work properly.
Although Hyper-V can easily function on a standalone server (or even on a Windows 10 desktop), the use of failover clustering should be considered an essential for production environments. Otherwise, a host-level failure will cause all of the virtual machines (VMs) running on the host to also fail.
Of course, the use of failover clustering is really just the beginning. Many organizations choose to create stretched clusters rather than simply using a normal failover cluster. A stretched cluster, which is also sometimes referred to as a distance cluster, is a failover cluster that spans multiple datacenters. The idea is that if a datacenter outage were to occur, then mission-critical workloads can failover to a remote datacenter.
The trickiest thing about making a stretched cluster work with Hyper-V is getting the underlying storage to work properly. Although no longer an absolute requirement, Windows failover clusters are normally designed so that each cluster node connects to a cluster-shared volume. The cluster-shared volume contains all of the VM files (such as virtual hard disks) and is accessible to every node in the cluster. Therefore, if a node were to fail, then the failover clustering service can simply transition the VMs to a different node. The VMs can continue to function because they have access to exactly the same storage that they were using previously.
Having a single cluster-shared volume does not really work in a stretched cluster. After all, if the primary datacenter were to suffer an outage, then any storage residing in that datacenter would also be offline.
To get around this problem, organizations have resorted to using storage replication. This means that the cluster-shared volume is replicated to the secondary datacenter so that there is a copy of the VM data in both locations. However, this approach introduces another problem.
If a VM were to failover to the secondary datacenter, the failover cluster service expects the VM to have continued access to the cluster-shared volume. Sure, a copy of the cluster-shared volume now exists in the secondary datacenter, but the path to the copy is likely to be different from the path to the original cluster-shared volume.
It is possible to solve this problem by using a relatively obscure Hyper-V feature called a storage resource pool. The reason I say that this feature is relatively obscure is because it is not exposed through the Hyper-V Manager, at least not initially.
A storage resource pool acts sort of like a proxy for storage access. Rather than pointing a Hyper-V VM to a cluster-shared volume, you can point the VM to a storage resource pool, which is in turn pointed toward the cluster-shared volume.
So how does this improve things over directly referencing a cluster-shared volume? Hyper-V is able to access a storage resource pool by using its name rather than its path. This means that you can create two identically named storage resource pools, one in each location. If a VM fails over to a remote datacenter, then the VM (which has been configured to use a resource pool) will find an identically named resource pool in the remote location. This resource pool points to that location's replicated copy of the cluster-shared volume, which ultimately means that the VM is able to connect to the files that it needs in order to remain functional.
Believe it or not, Microsoft makes it really easy to set up a storage resource pool. Before I show you how it is done, take a look at Figure 1. This is what a VM's Settings screen normally looks like.
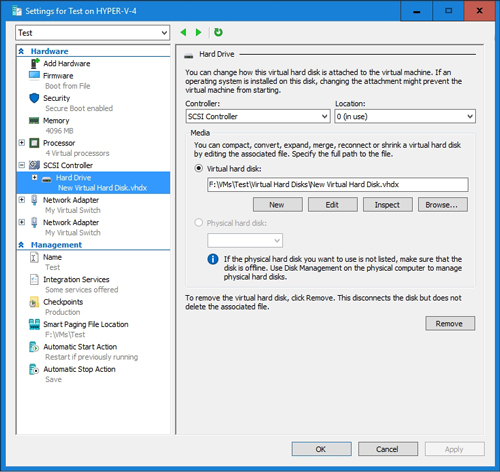 [Click on image for larger view.] Figure 1: This is what a VM's settings normally look like.
Now, let's create a storage resource pool. Remember, the storage resource pool is accessible by name, but it points to physical storage. Therefore, we need to give the storage resource pool a name and a physical storage path. Here is an example of a command used to do so:
New-VMResourcePool -Name "Hyper-V Storage" -ResourcePoolType VHD -Paths "F:\"
In this case, I am naming the resource pool "Hyper-V Storage" and I am pointing it to the F: drive. Notice that I set the ResourcePoolType to VHD, because VHDX is not a valid type name. Setting the pool's type to VHD does not prevent you from using VHDX files. You can see what the command looks like in Figure 2.
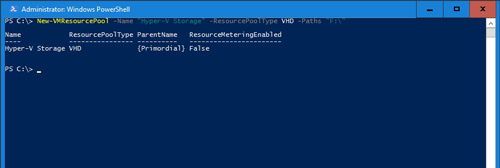 [Click on image for larger view.] Figure 2: This is how you create a storage resource pool.
Now, when I open the Hyper-V Manager and look at a VM's settings, the resource pool option is exposed. You can see what this looks like in Figure 3.
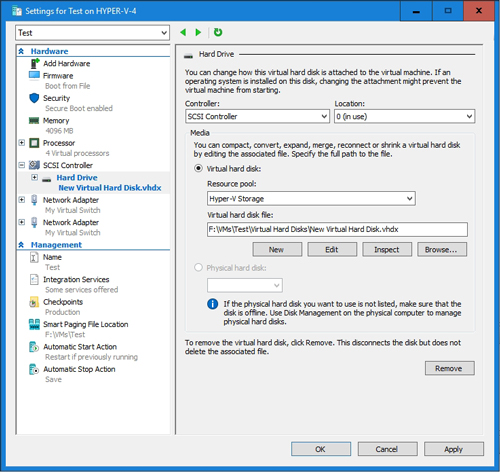 [Click on image for larger view.] Figure 3: The Hyper-V Manager acknowledges the storage resource pool's existence.
About the Author
Brien Posey is a 22-time Microsoft MVP with decades of IT experience. As a freelance writer, Posey has written thousands of articles and contributed to several dozen books on a wide variety of IT topics. Prior to going freelance, Posey was a CIO for a national chain of hospitals and health care facilities. He has also served as a network administrator for some of the country's largest insurance companies and for the Department of Defense at Fort Knox. In addition to his continued work in IT, Posey has spent the last several years actively training as a commercial scientist-astronaut candidate in preparation to fly on a mission to study polar mesospheric clouds from space. You can follow his spaceflight training on his Web site.