Posey's Tips & Tricks
How To Sort Objects in PowerShell
PowerShell sometimes displays far more information than you can comfortably digest. Thankfully, there are ways to display only the information that really matters.
One of the things I have always liked about PowerShell is that it is integrated so deeply into the Windows operating system that you can use it to get information on just about anything. The downside to this, however, is that sometimes PowerShell displays far more information than you can comfortably digest.
Thankfully, there are some ways to narrow down PowerShell's output and display the information that really matters.
One of the easiest things you can do is to sort PowerShell's output so that the values you are most interested in rise to the top. Let me show you what I mean.
If I were to type the Get-Process cmdlet into a PowerShell window on the PC that I am writing this article on right now, the results would list dozens of processes. That's a lot of information to read through. At the same time, though, if I am entering the Get-Process cmdlet, then there is probably something specific that I am looking for. Maybe I want to see which process is consuming the most memory or the most CPU time.
This is where sorting comes into play. I can sort the list of processes by any column that I want.
Suppose for a moment that I noticed that my computer was being sluggish, so I wanted to see which processes were consuming the most CPU time. To do so, I would use this command:
Get-Process | Sort-Object -Property CPU
If you look at Figure 1, you can see that the command initially appears not to work. What is actually happening, however, is that the CPU usage is being sorted from low to high. The CPU column is empty, because none of the processes shown in the screen capture is using CPU time.
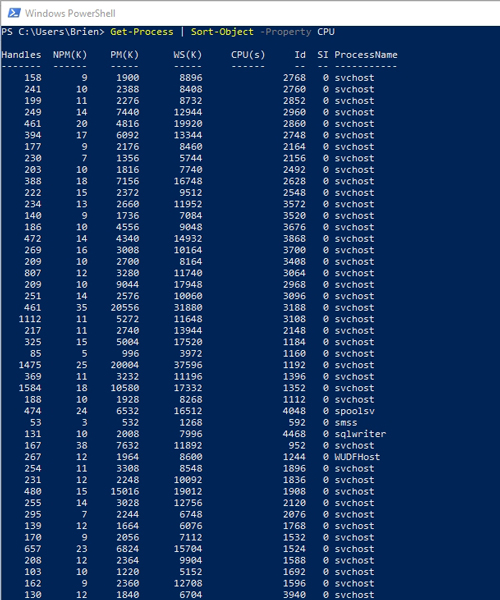 [Click on image for larger view.] Figure 1: At first glance, the CPU column appears to be empty.
To resolve this problem, we can perform a descending sort. The command works in exactly the same way as what you just saw, except that we append -Descending to the end of the command. You can see the command and its results in Figure 2.
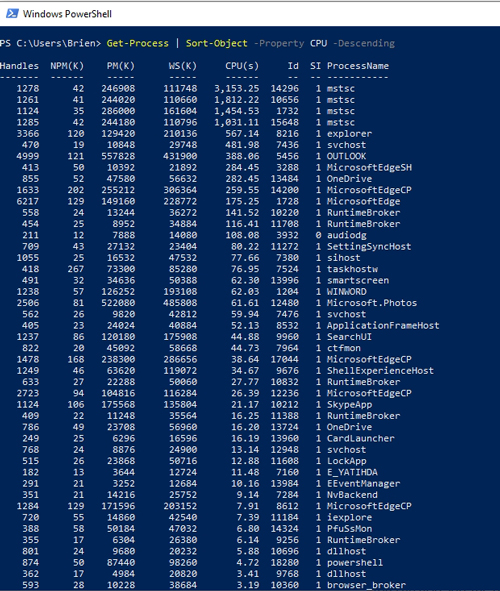 [Click on image for larger view.] Figure 2: This is how you perform a descending sort.
That's how you can do a simple sort in PowerShell. Incidentally, you can perform a secondary sort by specifying another sort field. If I wanted to sort first by CPU usage and then by name, for example, I could use a command like this one:
Get-Process | Sort-Object -Property CPU,ProcessName
Sorting a PowerShell command's output can go a long way toward making the output more digestible, but there are some other things that you can do to narrow down the results. In the case of the Get-Process cmdlet, for example, maybe I could cut through some of the clutter by getting rid of the columns that I am not using. This is easy enough to do. All I have to do is to pipe the command's output into the Select-Object cmdlet and then list the columns that I want to display. Here is what such a command might look like:
Get-Process | Sort-Object -Property CPU -Descending | Select-Object ProcessName, CPU
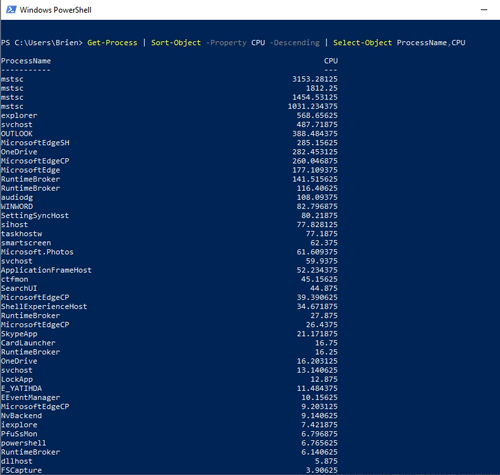 [Click on image for larger view.] Figure 3: I have sorted the command's output by CPU usage and hidden the unneeded columns of information.
As you can see in the command above, the output is a lot cleaner. However, the problem is that there are still an awful lot of results to look at. There are a few different ways to clean things up. One option might be to filter the output by value. For example, maybe we are only interested in items with CPU values of 10 or higher. If that is the case, then we can hide results with CPU values of less than 10 by using a command like this one:
Get-Process | Where-Object {$_.CPU -gt 10} | Sort-Object -Property CPU -Descending | Select-Object ProcessName, CPU
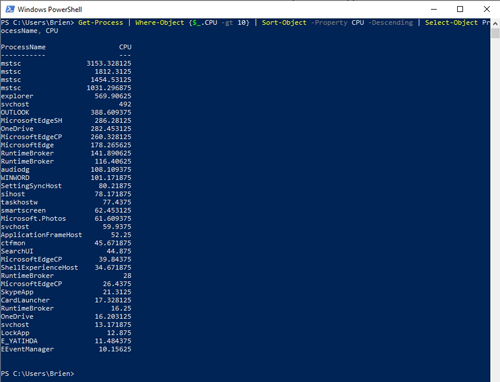 [Click on image for larger view.] Figure 4: I have hidden all of the results in which the CPU value is less than 10.
One more thing that you can do is display only the top results. Suppose for a moment that I really don't care what the actual values are -- I just want to see the five processes that are consuming the most CPU time. Here is what such a command might look like:
Get-Process | Sort-Object -Property CPU -Descending | Select-Object ProcessName, CPU -First 5
You can see the results of this command in Figure 5.
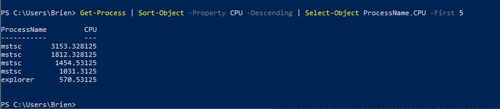 [Click on image for larger view.] Figure 5: I have narrowed the output down to the top five results.
By using various techniques, I have condensed a list of dozens of processes down to what little bit of information actually matters. Keep in mind that although I used the Get-Process cmdlet for the sake of demonstration, the techniques that I have shown in this article actually work with a huge variety of PowerShell commands.
About the Author
Brien Posey is a 22-time Microsoft MVP with decades of IT experience. As a freelance writer, Posey has written thousands of articles and contributed to several dozen books on a wide variety of IT topics. Prior to going freelance, Posey was a CIO for a national chain of hospitals and health care facilities. He has also served as a network administrator for some of the country's largest insurance companies and for the Department of Defense at Fort Knox. In addition to his continued work in IT, Posey has spent the last several years actively training as a commercial scientist-astronaut candidate in preparation to fly on a mission to study polar mesospheric clouds from space. You can follow his spaceflight training on his Web site.