Posey's Tips & Tricks
Getting Started with PowerApps in Office 365
Microsoft is helping non-developers build functional apps without writing any code. Here's how.
As an IT admin type, I have a tendency to stay away from tools and services that are geared solely toward developers. Sure, I have written plenty of really elaborate PowerShell scripts, but I'm by no means a professional developer.
Even so, an Office 365 application called PowerApps recently caught my attention. PowerApps is an Office 365 tool that lets you build applications without having to write code.
As you would probably expect, PowerApps does allow you to build apps completely from scratch. However, PowerApps also has a number of sample applications built-in. You can use these sample applications as a starting point for building your own applications, or as a tool for learning how PowerApps works.
When you launch PowerApps, the sample apps are listed on the home screen. As you can see in Figure 1, sample apps include things like Service Desk, Budget Tracker, Cost Estimator and more. To use one of these apps as a starting point, just click on the app and then click Make This App.
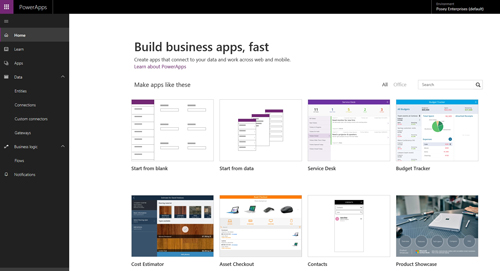 [Click on image for larger view.] Figure 1: PowerApps includes lots of sample apps that you can use as a starting point.
At this point, you will be taken into the interface that is used for creating the app. The interface, which is called PowerApps Studio, displays a splash screen that offers to give you a quick tour. Although PowerApps Studio is not difficult to use, I highly recommend taking the tour. The tour only takes about a minute to complete and shows you the most important elements of the PowerApps Studio.
Once the tour is over (or if you opt to skip the tour), you will be taken to a screen that looks like the one shown in Figure 2. This screen can admittedly be a little bit overwhelming at first, but once you start getting a feel for the interface, it really isn't all that difficult.
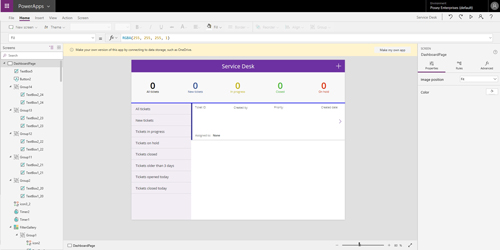 [Click on image for larger view.] Figure 2: This is what PowerApps Studio looks like.
As you look at the figure above, you will notice the tree view on the left side of the screen. The tree view lists application screens and the elements that appear on those screens. If you look at Figure 3, for example, you can see that I have collapsed the tree so that it shows only the application screens. Right now, the PriorityPage screen is selected, and you can see a preview of that screen in the middle of the interface.
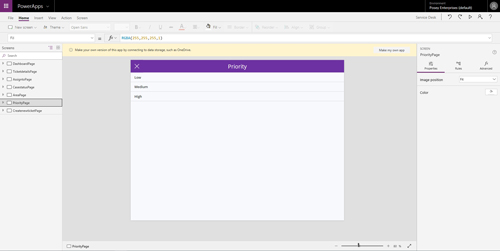 [Click on image for larger view.] Figure 3: This app consists of seven screens, each of which is listed in the tree.
If you look at Figure 4, you can see that I have clicked on the purple area in the preview window (the purple text box that says Priority). My clicking on this text box caused two things to happen. First, the tree has been expanded to reveal the individual objects that make up the PriorityPage. As you can see in the figure, the text box that I have selected is called TextBox4_7.
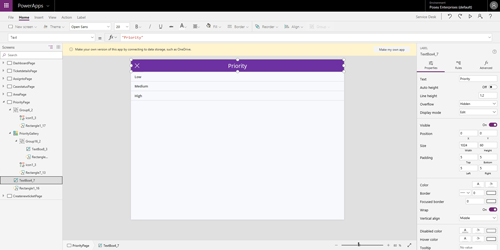 [Click on image for larger view.] Figure 4: This is what happens when I click on the text box.
The other thing that happens is that a number of editing controls are exposed on the right side of the screen. By using these controls, I can change the size, color and position of the text box. I can even change the text itself and make the text box say something different. Keep in mind, I am only using a text box as an example. You can modify the attributes of any object in a similar way.
Of course this raises the question of how you can create your own screens and objects. To create a new screen, just click the New Screen icon and then choose the type of screen that you want to create, as shown in Figure 5.
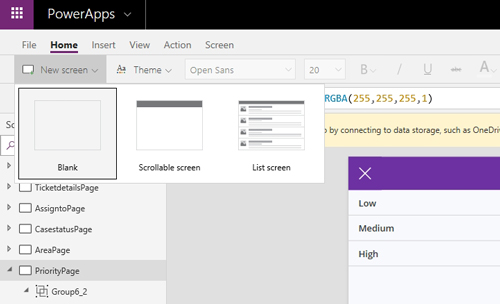 [Click on image for larger view.] Figure 5: Choose the type of screen that you want to create.
Adding objects to a new or existing screen is just as easy. Go to the Insert tab and choose the type of object that you want to insert. As you can see in Figure 6, you can insert things like labels, buttons, text, controls and much more.
 [Click on image for larger view.] Figure 6: Use the Insert tab to insert objects.
As you can see, PowerApps makes it relatively easy to build an application without having to write any code. Even so, PowerApps does take some getting used to, so I recommend building a few sample apps as a way of getting a feel for the tool before you attempt to create a production application.
About the Author
Brien Posey is a 22-time Microsoft MVP with decades of IT experience. As a freelance writer, Posey has written thousands of articles and contributed to several dozen books on a wide variety of IT topics. Prior to going freelance, Posey was a CIO for a national chain of hospitals and health care facilities. He has also served as a network administrator for some of the country's largest insurance companies and for the Department of Defense at Fort Knox. In addition to his continued work in IT, Posey has spent the last several years actively training as a commercial scientist-astronaut candidate in preparation to fly on a mission to study polar mesospheric clouds from space. You can follow his spaceflight training on his Web site.