Posey's Tips & Tricks
How To Reuse Old Disks in Storage Pools
The easiest way to accomplish this task is to modify the individual disk attributes.
A couple of months ago, I encountered an interesting situation with regard to the disks in one of my servers. At the time, I had two identical Hyper-V servers, each of which were equipped with five 3TB disks (and a system disk). The 3TB disks all belonged to a storage pool and there was a single virtual disk (using the Parity layout) created on top of the storage pool. These Hyper-V servers hosted my file server (hence the reason for the high capacity). The second Hyper-V server stored a replica of the virtual machine.
My problems began when my file server started running low on space (I do a lot of video work). As such, I decided to replace all of my 3TB disks with 5TB disks. The storage upgrade took some time to complete, but the process went very smoothly. Of course when all was said and done, I was left with ten, 3TB disks. I hated to dispose of these disks, because most of the disks were relatively new and should theoretically have a lot of life left in them. As such, I decided to use some of the leftover disks to increase the storage capacity for some of my lab servers. This was when things got interesting. I found that I was unable to add the disks to the storage pool on my lab server.
My first thought was that I probably needed to get rid of any existing volume on the disk. I connected the disks to another machine and used the old school Disk Management Console (DiskMgmt.msc) to examine the disks and remove any previously existing volumes. Being that this was a couple of months ago, I honestly can't remember if the Disk Management Console showed me any volumes or not. In any case, nothing that I did through the Disk Management Console fixes the problem. I was still unable to add the disks to my storage pool.
After doing some research, I learned the reason why I was unable to reuse the disk in a different storage pool. Windows Server maintains a set of attributes for each physical disk. You can see these attributes by opening PowerShell and entering the following command:
Get-PhysicalDisk | FL
You can see an example of the output in Figure 1. I actually made this screen capture on a desktop computer running Windows 10, because that particular machine only contains a single disk. Had I run the command on a machine that is equipped with multiple disks, all of the disks would have been shown.
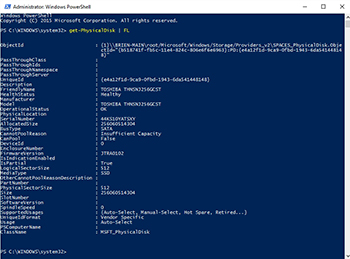 [Click on image for larger view.] Figure 1. You can use the Get-PhysicalDisk | FL command to examine disk attributes.
As you look at the screen capture shown above, you will notice that one of the attributes is named CanPool. This is the attribute that controls whether or not the disk can be added to a storage pool. In the screen capture above, CanPool is set to False, which means that the disk cannot be pooled. In this particular case, the reason why the disk cannot be pooled is because it is a system disk. There are any number of other reasons why Windows might flag a disk as being unsuitable for pooling. For instance, a disk might contain a cluster shared volume, or be configured as a dynamic disk.
In my particular case, things worked a bit differently. The disks that I was trying to use had previously belonged to a different storage pool, on a different server. Windows would not allow me to do anything with the disks. Presumably, this was due to some sort of protective mechanism designed to preserve the disk's integrity. Thankfully, there is a way around the problem.
Obviously, I can't go back in time and show you how my exact situation played out, but I can recreate it (within the limits of my available hardware). For the purposes of this article, I installed a leftover disk from a different server into a physical server running the Windows 2016 preview. This server previously contained only a system disk, and no storage pool of its own. When I inserted the foreign disk, Server Manager displayed the storage pool from which the disk had come (on the old server), the previously existing virtual hard disk, and the disks that made up the storage pool. You can see what this looks like in Figure 2.
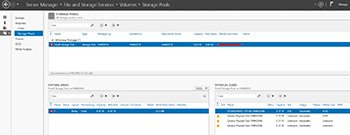 [Click on image for larger view.] Figure 2. Server Manager displays my old storage pool.
Any attempt to modify the storage pool, remove disks from the storage pool, or even to attach the virtual disk were met with errors. This was the same behavior that I encountered in my production environment.
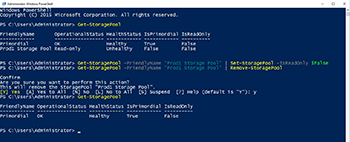
The solution to this problem is to use PowerShell. The trick is to remove the ReadOnly attribute from the storage pool. Upon doing so, you should be able to get rid of the storage pool, and use the disk for your own purposes. The commands used for doing so are:
Get-StoragePool –FriendlyName "<storage pool name>"  | Set-StoragePool –IsReadOnly $False

  Get-StoragePool –FriendlyName "<Storage Pool Name>"  | Remove-StoragePool
You can see what this entire process looks like in Figure 3.
 [Click on image for larger view.] Figure 3. I was able to remove the old storage pool.
Now, if I refresh Server Manager, I can see that the disk has become usable, as shown in Figure 4.
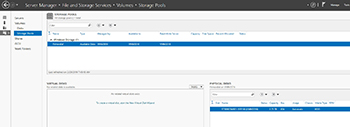 [Click on image for larger view.] Figure 4. My disk is now usable.
About the Author
Brien Posey is a 22-time Microsoft MVP with decades of IT experience. As a freelance writer, Posey has written thousands of articles and contributed to several dozen books on a wide variety of IT topics. Prior to going freelance, Posey was a CIO for a national chain of hospitals and health care facilities. He has also served as a network administrator for some of the country's largest insurance companies and for the Department of Defense at Fort Knox. In addition to his continued work in IT, Posey has spent the last several years actively training as a commercial scientist-astronaut candidate in preparation to fly on a mission to study polar mesospheric clouds from space. You can follow his spaceflight training on his Web site.