Posey's Tips & Tricks
Dealing With Monitor Madness in Windows
Let's run through some common issues you may be having with your monitors not playing nicely with Windows.
I have recently completed some upgrades on my primary desktop PC, including some new monitors. In doing so, however, I ran into a few issues pertaining to monitor arrangement and touch input. That being the case, I wanted to share with you some of the problems that I encountered and how I solved them.
Incorrect Monitor Placement
Normally, when you deploy a multi-monitor configuration Windows will automatically span the desktop across all of your monitors. Even so, the way that Windows chooses to arrange your monitors probably isn't going to be the same as the way that the monitors are positioned on your desk.
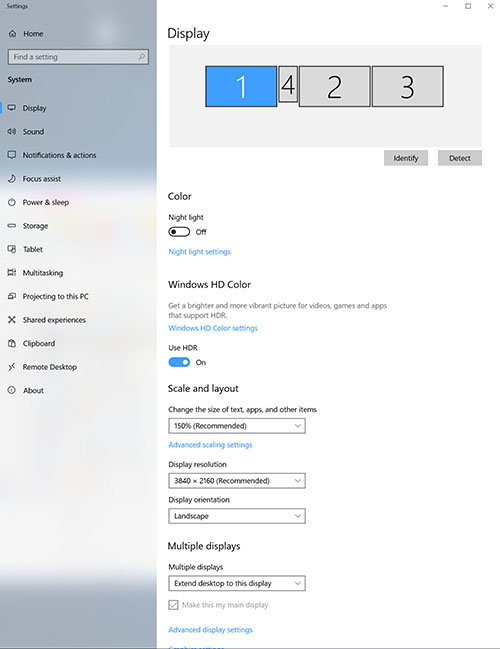
To fix the problem, right click on the Windows desktop and select the Display Settings option from the shortcut menu. When you do, you will see a graphical representation of your monitor arrangement, as shown in Figure 1.
 [Click on image for larger view.] Figure 1. Windows provides you with a graphical representation of the way that your monitors are arranged.
To get Windows to arrange your monitors in the same way that they are arranged on your desk, just click the Identify button. When you do, Windows will briefly display a number in the lower left corner of each monitor. These numbers correspond to the numbers shown on the chart in the figure above. Once you know the number that corresponds to your physical monitors, you need only to drag and drop the monitors shown in the figure so that they match the arrangement on your desk.
Incidentally, if you are wondering, the reason why monitor 4 is so small, it's because it corresponds to a low resolution, page view monitor in portrait orientation. You can change a monitor' orientation by selecting it and then adjusting the Display Orientation setting, shown in Figure 2.
 [Click on image for larger view.] Figure 2. Windows contains an option for changing a monitor's display orientation.
Incorrect Icon Placement
[Click on image for larger view.] Figure 2. Windows contains an option for changing a monitor's display orientation.
Incorrect Icon Placement
One of the problems that I ran into with my new monitor arrangement was that Windows placed all of my desktop icons on the wrong screen. I have always used my left most monitor as my primary display, and that' where I normally keep all of my desktop icons. However, Windows decided to move all of my desktop monitors elsewhere.
There are two ways to fix this problem, and neither solution involves moving the physical monitor (or even swapping display cables). If you physically rearrange the monitors then you might get the icons back onto the correct screen, but the displays will once again be in the wrong order. As soon as you rearrange the displays within Windows to match the physical monitor arrangement, the icons will once again be on the wrong screen.
So with that said, the first solution to this problem is to manually move the icons from one screen to the other. Dragging all of your icons from one screen to another can be a tedious and cumbersome process, but it works.
A better solution is to simply tell Windows which display you want to use as your primary monitor. If you look near the bottom of Figure 2, you will notice that there is a checkbox for an option to Make This My Main Display. In the figure, the checkbox is greyed out because the monitor is already the main display. All you have to do is click on the tile representing the monitor that you want to designate as your primary monitor. Once the monitor is selected, just select the Make This My Main Display checkbox.
Touch Control of the Wrong Monitor
By far the craziest problem that I encountered during my upgrades, something that I have never seen before, was that touch input was controlling the wrong monitor. In other words, I tried using touch input on one monitor, but the input was actually registered on a different monitor.
The reason why this problem can happen is because for all practical purposes, Windows treats a monitor and its touch interface as two different devices. Remember, touch input is not transmitted through HDMI or Display Port connectivity. All touch and ink input is sent through a USB connection. When you perform touch input on a monitor, Windows initially has no idea which monitor you are touching. It only knows that you have touched one of your monitors and assumes that you are interacting with Monitor 1.
The fix for the problem is relatively simple, though somewhat difficult to explain. Right click on the Start button and Select the Run command from the menu. When the Windows Run prompt appears, enter the word Control to open the legacy Control Panel. Now, type the word Touch into the Control Panel' search box.
At this point, click on Tablet PC Settings and then click on the Setup button, shown in Figure 3. When you do, you will see a prompt asking if you want to identify a screen for pen input or for touch input. Select the Touch Input option.
At this point, all of your monitors will go blank, displaying nothing but a white background. One of the monitors however, will display a bit of text. If the text is displayed on your touch screen monitor then tap the screen and then press Enter. If the text is not being displayed on your touch screen monitor, then press Enter to move to text to a different monitor. Keep pressing Enter until the text is eventually displayed on the correct screen. At that point, you can tap the screen and press Enter to designate that particular display as your touch screen monitor.
 [Click on image for larger view.] Figure 3. Click the Setup button.
Keep in mind that this procedure only serves to designate a monitor for touch input. If you also plan on using the monitor with a pen, you will need to repeat the process, selecting the Pen Input option instead of Touch Input.
About the Author
Brien Posey is a 22-time Microsoft MVP with decades of IT experience. As a freelance writer, Posey has written thousands of articles and contributed to several dozen books on a wide variety of IT topics. Prior to going freelance, Posey was a CIO for a national chain of hospitals and health care facilities. He has also served as a network administrator for some of the country's largest insurance companies and for the Department of Defense at Fort Knox. In addition to his continued work in IT, Posey has spent the last several years actively training as a commercial scientist-astronaut candidate in preparation to fly on a mission to study polar mesospheric clouds from space. You can follow his spaceflight training on his Web site.