Posey's Tips & Tricks
Launching a PowerShell Script from Excel, Part 1: Create the Way
It's time to put Excel's newest feature to the test.
Microsoft recently announced that they are adding a feature to Excel that will allow Python code to be embedded and used for advanced analytics. That made me wonder if it might be possible to create an Excel spreadsheet that leverages PowerShell.
Microsoft has long offered an Excel PowerShell module, but that module is primarily used for creating and modifying Excel documents from PowerShell. It does nothing to allow PowerShell code to be embedded within Excel. Even so, there is a roundabout way of getting the job done.
In this series, I will show you how to build an Excel spreadsheet that executes PowerShell code at the click of a button. I will start out by showing you how to make a simple script call, and will then build on that technique until we progress to the point of being able to use PowerShell to take action on data that is stored in the spreadsheet.
Exposing the Developer Tools
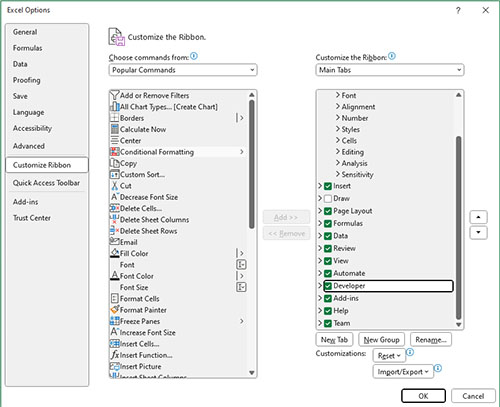
The first thing that you will need to do is to configure Excel to display the developer tools. To do so, open Excel and then right click on the ribbon and choose the Customize the Ribbon option. This will cause Excel to display a dialog box that allows you to choose which items will appear on the ribbon. Select the Developer checkbox, shown in
Figure 1, and click OK.
 [Click on image for larger view.]
Figure 1. Select the Developer checkbox and click OK.
Creating a Button
[Click on image for larger view.]
Figure 1. Select the Developer checkbox and click OK.
Creating a Button
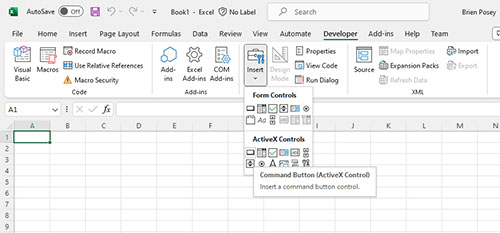
Since the main goal in this blog series is to create an Excel document that launches a PowerShell script at the click of a button, the next thing that we need to do is to create a button within a blank spreadsheet. To do so, go to the Developer tab at the top of the workbook and then click on the Insert button. Next, select the Command Button options found in the ActiveX Controls section. You can see what this looks like in
Figure 2.
 [Click on image for larger view.]
Figure 2. Go to the Developer tab and then click Insert, and then click Command Button.
[Click on image for larger view.]
Figure 2. Go to the Developer tab and then click Insert, and then click Command Button.
At this point, you will need to use your mouse to select the area where the button should appear. Just click and drag to create a button of the desired size and in your preferred location. Once the button has been created, you can make adjustments by clicking the button and then using the control nubs to change the button's size and shape. You can also drag the button to a new location if necessary.
Adding Code to the Button
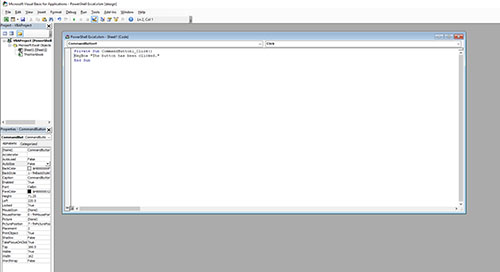
So far, we have created a button within an Excel spreadsheet, but the button doesn't actually do anything. As such, we need to tell Excel what should happen whenever someone clicks the button. To do so, right click on the button and select the View Code option from the shortcut menu. This will cause Excel to open the Microsoft Visual Basic for Applications window. This window will initially be configured to associate a subroutine with the button, but the subroutine will be empty. If you want to add a simple bit of code just to try making the button do something, then try this:
Private Sub CommandButton1_Click()

  MsgBox "The button has been clicked."

  End Sub
You can see the code displayed in Figure 3.
 [Click on image for larger view.]
Figure 3. This is the code that will be associated with the button.
[Click on image for larger view.]
Figure 3. This is the code that will be associated with the button.
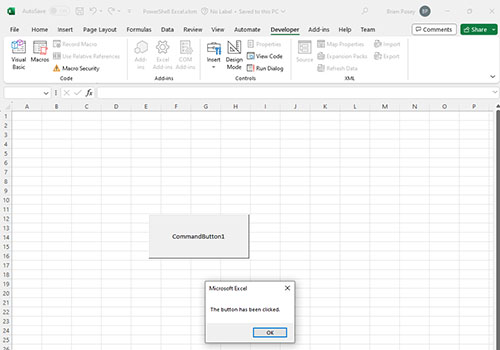
This code will cause a dialog box to be displayed along with text that says the button has been clicked. In order for the code to run, you need to do two things. First, you need to close the Microsoft Visual Basic for Applications window. Second, you need to go back to the Developer tab and click the Design Mode icon on the toolbar to toggle it off. Now, when you click on the button, the code should execute and the message should be displayed. You can see what this looks like in Figure 4.
 [Click on image for larger view.]
Figure 4. After you click the Design Mode icon to turn off Design Mode, you can click the button to test it.
[Click on image for larger view.]
Figure 4. After you click the Design Mode icon to turn off Design Mode, you can click the button to test it.
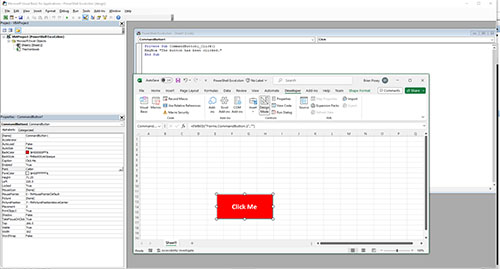
There are two more things that you need to know before we move on. First, in the real world, you probably would not want the button to be named CommandButton1, but rather the button should display text reflecting its purpose. If you look at the lower left corner of Figure 3, you can see that there are a number of attributes associated with the button. You can edit any of these attributes to change the button's text, font, color, or just about anything else that you might want to change. If you look at Figure 5, you can see that by modifying the various attributes, I have made the button red with large white text that now says Click Me.
 [Click on image for larger view.]
Figure 5. I have modified the button's attributes to change its appearance
[Click on image for larger view.]
Figure 5. I have modified the button's attributes to change its appearance
The other thing that you need to know is that because we have created a functional button, Microsoft considers the spreadsheet to be macro enabled. That means that when you save the spreadsheet, you will have to save the document as an Excel Macro-Enabled Workbook (*.xlsm). Otherwise, you will lose any automations that you have built into the spreadsheet.
Now that I have shown you how to create a button within an Excel spreadsheet, I want to move forward with using that button to launch a PowerShell script. I will show you how in Part 2.
About the Author
Brien Posey is a 22-time Microsoft MVP with decades of IT experience. As a freelance writer, Posey has written thousands of articles and contributed to several dozen books on a wide variety of IT topics. Prior to going freelance, Posey was a CIO for a national chain of hospitals and health care facilities. He has also served as a network administrator for some of the country's largest insurance companies and for the Department of Defense at Fort Knox. In addition to his continued work in IT, Posey has spent the last several years actively training as a commercial scientist-astronaut candidate in preparation to fly on a mission to study polar mesospheric clouds from space. You can follow his spaceflight training on his Web site.