Posey's Tips & Tricks
How To Create Windows 10 Installation Media
Microsoft makes the Windows installation media available for download, but you will have to put it into a format that aligns with how you plan to use the installation files.
There was a time long, long ago when purchasing Windows meant receiving a box filled with floppy disks, instructions and more. Today, of course, buying a Windows license usually just means you receive a license key. So where do you get the media that will actually allow you to install Windows? It's such a simple question, yet it is something that I get asked on a regular basis.
Not surprisingly, Microsoft makes the Windows installation media available for download, but after downloading Windows 10 you will have to put it into a format that aligns with how you plan to use the installation files.
To get started, just go to this Windows 10 download page and click on the Download Tool Now button. This will cause Windows to download and install the Windows 10 Setup tool.
The tool's initial screen asks you to accept the Microsoft software licensing terms. This brings up an important point: Even though Microsoft makes the installation media freely available to anyone who wants to download it, you will need to purchase a license in order to legally use Windows 10.
Once you have accepted the license agreement, you will be taken to a screen like the one shown in Figure 1 that asks whether you want to upgrade your own PC or if you prefer to create installation media. Since this article is all about creating installation media, be sure to choose the Create Installation Media option and click Next.
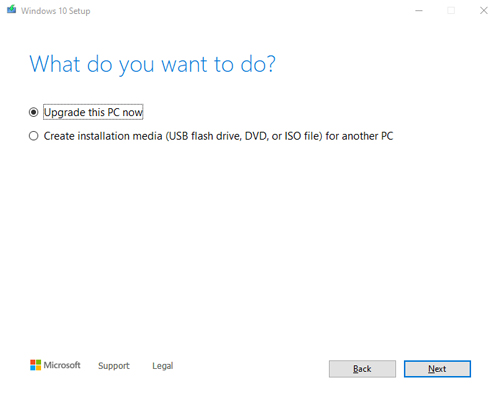 [Click on image for larger view.] Figure 1: Choose the option to create installation media.
At this point, Setup will ask you to choose your preferred language, Windows edition and architecture. After making your selection, you will come to a screen that asks what type of media you want to create. As you can see in Figure 2, Microsoft gives you two choices: You can write the Windows installer to a USB flash drive, or you can create an ISO file. For the purposes of this article, I am going to start by showing you the USB flash drive option, then from there I will talk about ISO files.
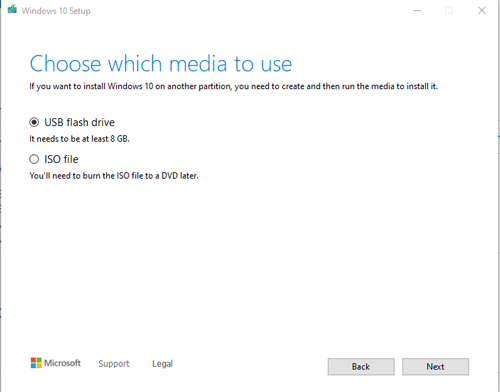 [Click on image for larger view.] Figure 2: You can either write the Windows installation files to a USB flash drive or to an ISO file.
When you select the USB flash drive option, you will be prompted to choose a USB flash drive to use. It is worth noting that the drive must have at least 8GB of free space, and any data that currently exists on the drive will be erased. It is also important to note that the software doesn't give you an "Are you sure?" warning before erasing the USB flash drive, so it's important to make sure that you insert the correct disk before running the software.
Writing the installation media to a USB flash drive is a simple process. Just insert the USB disk, choose the USB flash drive option and the tool will automatically download the Windows Setup files and write them to the disk. When the process completes, you will simply see a message indicating that your USB flash drive is ready.
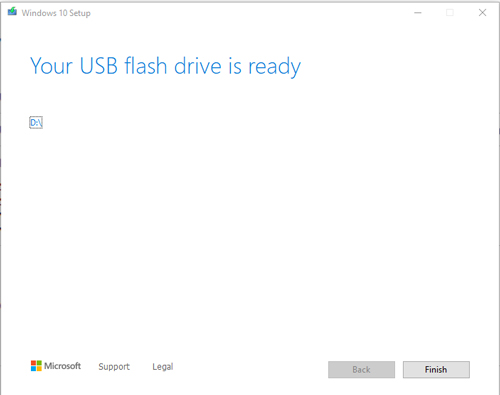 [Click on image for larger view.] Figure 3: The USB flash drive has been created.
Creating an ISO file is an equally simple option. Once you create the ISO file, you can use it to create an installation DVD or to create virtual machines. I will show you how to do both.
Upon selecting the ISO option, Windows will begin the download process. The file is multiple gigabytes in size, so depending on the speed of your Internet connection, the download can take a while to complete. Once the process completes, you will see a notification that the ISO file has been downloaded.
If your goal is to create an installation DVD, insert an appropriately sized blank DVD into your computer's DVD burner. Next, right-click on the ISO file and choose the Burn Disk Image command from the shortcut menu, as shown in Figure 4.
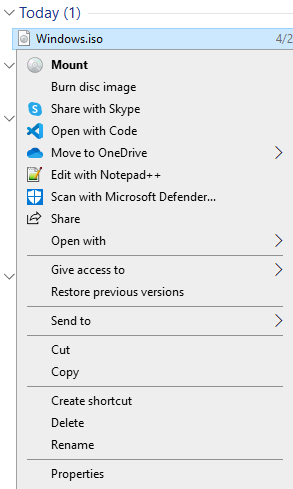 Figure 4: Right-click on the ISO file and choose the Burn Disk Image command from the shortcut menu.
If you have an older machine, it's a good idea to make sure you don't have anything else running at the time. Some DVD burners can be finicky if they are unable to achieve a sustained bit rate during the burning process.
As previously mentioned, you can also use the ISO file to create Hyper-V virtual machines. Assuming you already have Hyper-V installed, open Hyper-V Manager. Choose the New | Virtual Machine commands to begin the process of creating a new virtual machine. Work your way through the New Virtual Machine Wizard until you reach the Installation Options screen. Here you will need to choose the option to install an operating system from a bootable image file and then provide the path to the ISO file that you have downloaded. You can see what this looks like in Figure 5.
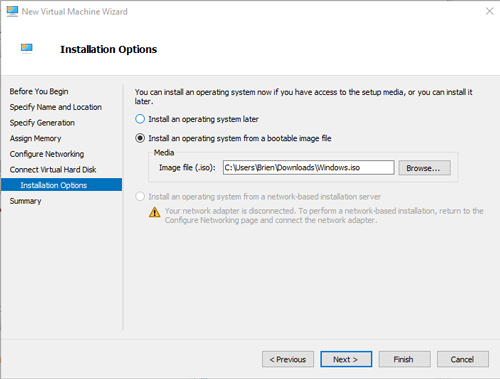 [Click on image for larger view.] Figure 5: You can use the ISO file to install Windows onto a Hyper-V virtual machine.
As you can see, the media creation tool gives you a lot of options. Incidentally, if you need direct access to the Windows installation files for some reason, your best option is to create an ISO file. If you look back at Figure 4, you will notice that when I right-clicked on the ISO file, the resulting shortcut menu contains a Mount command. Choosing Mount allows you to treat the ISO file as a local drive, making all of its contents accessible to the desktop. When you are done, just right-click on the drive letter that has been mapped to the ISO file and then choose the Eject command.
About the Author
Brien Posey is a 22-time Microsoft MVP with decades of IT experience. As a freelance writer, Posey has written thousands of articles and contributed to several dozen books on a wide variety of IT topics. Prior to going freelance, Posey was a CIO for a national chain of hospitals and health care facilities. He has also served as a network administrator for some of the country's largest insurance companies and for the Department of Defense at Fort Knox. In addition to his continued work in IT, Posey has spent the last several years actively training as a commercial scientist-astronaut candidate in preparation to fly on a mission to study polar mesospheric clouds from space. You can follow his spaceflight training on his Web site.