Posey's Tips & Tricks
Automating Virtual Machine Activation in Hyper-V
Microsoft's "automatic virtual machine activation" feature lets you spin up a short-lived VM without wasting a license key. Here's how to use it.
As a freelance tech author, I find myself creating virtual machines (VMs) almost every day. I write about a wide variety of topics and use VMs to test and validate the concepts that I am writing about. One of the issues that I occasionally run into is the question of what to do about VM activations.
To be perfectly honest, I don't even bother activating most of the VMs that I create. Those VMs usually have a lifespan ranging from hours to days, so there isn't really a reason for me to activate them. However, activations become more problematic when I am creating video courseware.
The reason for this is that if I am recording a video tutorial, then I can't really get away with having a message stating that "the server has not been activated" prominently displayed on the server's desktop. At the same time, I don't want to waste a license key on a VM that will only exist for a short period of time.
Thankfully, there is a workaround to this problem. Windows Server 2012 R2 and higher versions support a feature called "automatic virtual machine activation," or AVMA as Microsoft sometimes calls it. For a long time, I neglected to take a serious look at this feature because I assumed that it was just another way to activate Windows. What I didn't realize, however, is that AVMA actually solves several problems.
For starters, AVMA does not force you to waste product keys. Rather than entering your product key into each VM and having that product key's activations eventually depleted, you can use a special-purpose product key. When Windows sees that one of these product keys has been used, it uses the underlying Hyper-V host to activate Windows.
The really nice thing about this technique is that it works for VMs that do not have Internet connectivity. This means that you can activate those back-end VMs or branch office VMs that are not connected to the Internet.
The VM activation process is actually super simple. The main thing that you need in order to make the activation process work is one of the previously mentioned product keys. So where do you get these product keys? Right here. Microsoft has published a list of product keys that can be used for VMs. These product keys are publicly available and never expire. Here are the keys:
- Windows Server 2019 Datacenter Edition
H3RNG-8C32Q-Q8FRX-6TDXV-WMBMW
- Windows Server 2019 Standard Edition
TNK62-RXVTB-4P47B-2D623-4GF74
- Windows Server 2019 Essentials
2CTP7-NHT64-BP62M-FV6GG-HFV28
- Windows Server Version 1809 Datacenter Edition
H3RNG-8C32Q-Q8FRX-6TDXV-WMBMW
- Windows Server Version 1809 Standard Edition
TNK62-RXVTB-4P47B-2D623-4GF74
- Windows Server 2012 R2 Datacenter Edition
Y4TGP-NPTV9-HTC2H-7MGQ3-DV4TW
- Windows Server 2012 R2 Standard Edition
DBGBW-NPF86-BJVTX-K3WKJ-MTB6V
- Windows Server 2012 R2 Essentials
K2XGM-NMBT3-2R6Q8-WF2FK-P36R2
- Windows Server 2016 Datacenter Edition
TMJ3Y-NTRTM-FJYXT-T22BY-CWG3J
- Windows Server 2016 Standard Edition
C3RCX-M6NRP-6CXC9-TW2F2-4RHYD
- Windows Server 2016 Essentials
B4YNW-62DX9-W8V6M-82649-MHBKQ
To activate the VM, open an elevated Command Prompt window and enter this command:
Slmgr /ipk <a product key from the list above>
The product key needs to match the guest operating system, but does not necessarily have to match the host operating system. Let me give you an example. I have a VM that is running Windows Server 2016 Datacenter Edition. This VM had previously resided on a Windows Server 2016 Hyper-V host, but the host was recently upgraded to Windows Server 2019 Datacenter Edition. As you can see in Figure 1, the OS has not been activated.
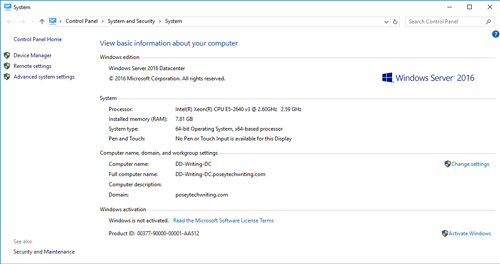 [Click on image for larger view.] Figure 1: The VM has not yet been activated.
Since the guest OS is running Windows Server 2016 Datacenter Edition, the activation command is:
Slmgr /ipk TMJ3Y-NTRTM-FJYXT-T22BY-CWG3J
You can see what the activation process looks like in Figure 2.
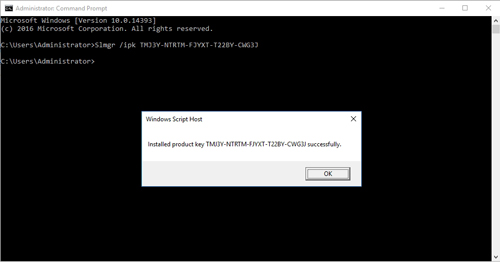 [Click on image for larger view.] Figure 2: This is how you activate a VM.
If you look at Figure 3, you can see that Windows is now activated. It is worth noting, however, that clicking the Refresh icon did not cause the activation status to change. I had to actually close and then re-open the Control Panel.
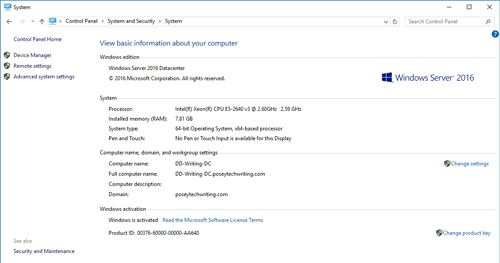 [Click on image for larger view.] Figure 3: The VM is now activated.
The important takeaway here is that I was able to use this technique even though the Hyper-V host and the VM are not running the same operating system as one another.
About the Author
Brien Posey is a 22-time Microsoft MVP with decades of IT experience. As a freelance writer, Posey has written thousands of articles and contributed to several dozen books on a wide variety of IT topics. Prior to going freelance, Posey was a CIO for a national chain of hospitals and health care facilities. He has also served as a network administrator for some of the country's largest insurance companies and for the Department of Defense at Fort Knox. In addition to his continued work in IT, Posey has spent the last several years actively training as a commercial scientist-astronaut candidate in preparation to fly on a mission to study polar mesospheric clouds from space. You can follow his spaceflight training on his Web site.