Posey's Tips & Tricks
Microsoft Graph Primer, Part 2: Connecting an App to Microsoft Graph
Brien walks you through the steps of setting up an application to use the Microsoft Graph API.
In Part 1, I explained what Microsoft Graph is and what it is used for. Near the end, I explained that before an application can take advantage of Graph, it will generally have to be registered.
In this installment, I want to show you what this registration process looks like.
To register an application (or to create a connector for an application that does not yet exist), open the Azure Active Directory portal and click on Enterprise Applications. Next, click on New Application and then choose the option to register an application that you are developing, as shown in Figure 1.
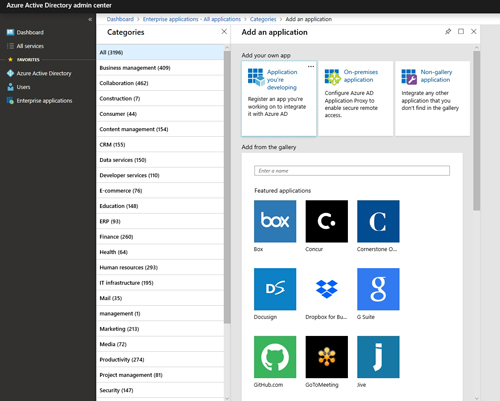 [Click on image for larger view.] Figure 1: Choose the option to register an application that you are developing.
Now, click the link to go to the App Registration page, then click Register an Application. You will then be taken to a page that asks you to provide a name for your application and to specify who should be able to access that application. You can see what this looks like in Figure 2.
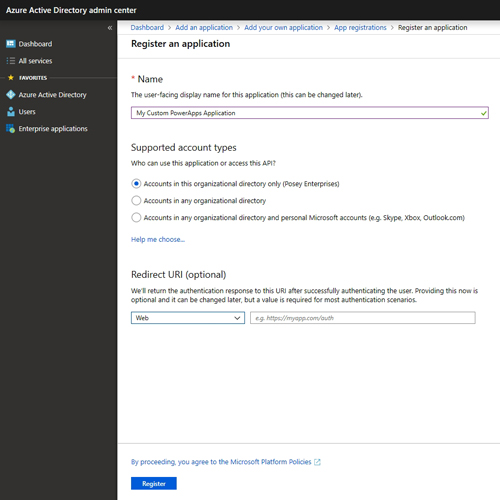 [Click on image for larger view.] Figure 2: Provide a name for the application and tell Azure AD who should be able to access it.
Click the Register button. You will be taken to a screen that shows the Application ID, Directory ID and Object ID, as shown in Figure 3. You will need to make note of your Application ID.
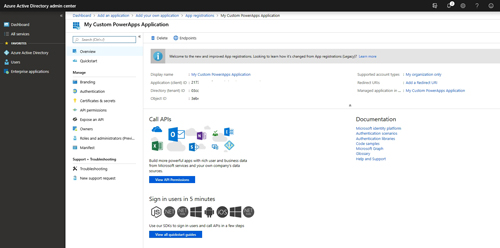 [Click on image for larger view.] Figure 3: Make note of the Application ID.
If you look at the figure above, you will notice that one of the tabs listed is called API Permissions. When you click on this tab, you will see that there is a delegated Graph permission, but you will typically need to add some additional permissions. Click the Add a Permission button and you will be taken to a screen that allows you to choose the API permissions that are required by the application, as shown in Figure 4.
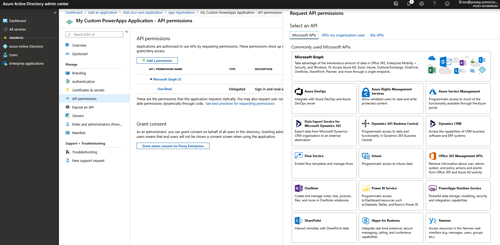 [Click on image for larger view.] Figure 4: You will typically need to assign some additional permissions to the application that you are registering.
Once you have assigned any required permissions to the application, the next thing that you will have to do is provide a way for the application to identify itself to Azure AD. You can do this by either associating a certificate with the application or by using a shared secret. Both options can be found under the Certificates & Secrets tab.
If you want to create a client secret, then just click on the New Client Secret button and type a descriptive name that you can use to identify the secret. The application name is usually a good choice. You can also set an expiration period for the secret if you so desire. You can see what this process looks like in Figure 5.
 [Click on image for larger view.] Figure 5: This is how you create a client secret.
When you click the Add button, Azure AD will display a value for your secret. You will need to associate this value with your application. The way that you would accomplish this varies depending on the application, but in the case of a custom PowerApps application, the secret value is added to the connector.
From within PowerApps, click on the Custom Connectors tab, then click on New Custom Connector and choose the Create From Blank option. Now, enter a name for the connector and click Continue.
At this point, you will see a screen that asks you to provide your host name and a base URL. You can also specify a background color to use on the connector's icon, and you can provide a detailed description of the connector if you like.
Once you finish entering this information, click on the Security button at the bottom of the screen. When you reach the Security screen, you will need to set the Authentication Type to OAuth 2.0. You will also need to set the Identity Provider to Azure AD, as shown in Figure 6. Next, you will need to enter the Client ID that you wrote down earlier and your Client Secret.
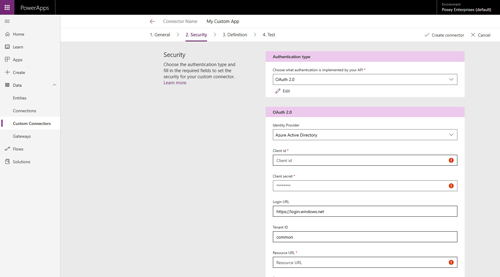 [Click on image for larger view.] Figure 6: Set the Authentication Type to OAuth 2.0 and set the Identity Provider to Azure AD.
Finally, fill in the Resource URL and any other application-specific details that are needed in order to complete the wizard.
Although a full-blown application deployment is beyond the scope of this series, my hope is that by seeing the relationship between connectors, applications, Azure AD and APIs such as Microsoft Graph, you have gained a better understanding of what Microsoft Graph is and what it does.
About the Author
Brien Posey is a 22-time Microsoft MVP with decades of IT experience. As a freelance writer, Posey has written thousands of articles and contributed to several dozen books on a wide variety of IT topics. Prior to going freelance, Posey was a CIO for a national chain of hospitals and health care facilities. He has also served as a network administrator for some of the country's largest insurance companies and for the Department of Defense at Fort Knox. In addition to his continued work in IT, Posey has spent the last several years actively training as a commercial scientist-astronaut candidate in preparation to fly on a mission to study polar mesospheric clouds from space. You can follow his spaceflight training on his Web site.