Posey's Tips & Tricks
How To Replace the Hard Drive on a Windows 10 PC, Part 1
Windows 10 comes with some native tools to help you expand your hard disk space. Here's how to get started on freeing up some room.
It never ceases to amaze me how quickly hard disk space is consumed.
Roughly about a year ago, I replaced my primary desktop PC with a newer one. Since I don't actually save any data on my PC, I opted for a 250GB SSD. After all, I have a few programs installed, but that's about it.
Now here I am a year later, and I am down to about 21GB of free storage, as shown in Figure 1.
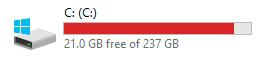 Figure 1: The existing drive only has 21GB of free space.
So where did all of my storage space go? Like I said, I don't store any data on the PC, so it's not like I filled up the hard drive with pictures, videos or Word documents. The drive is mostly filled with programs, but Disk Cleanup reports 44GB in temporary Internet files, as shown in Figure 2. I periodically clean that out, but all the various updates seem to reclaim that space almost immediately.
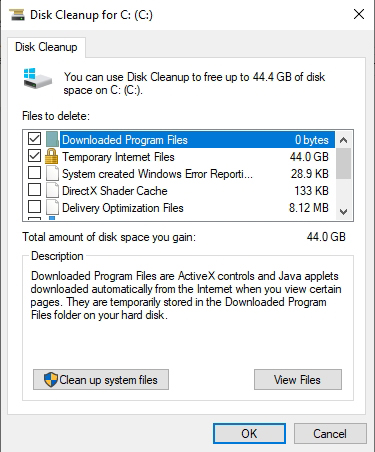 Figure 2: Temporary Internet files are consuming 44GB of space.
I decided to replace my 250GB SSD with a 1TB SSD. The question then became a matter of how to best accomplish the task at hand. I decided to try my hand at using the native tools.
Windows 10 does include a legacy backup application. To access it, enter the Control command at the Run prompt. This opens the Control Panel. Now, go to System and Security and click on Backup and Restore (Windows 7). This will open the Backup and Restore utility, which you can see in Figure 3.
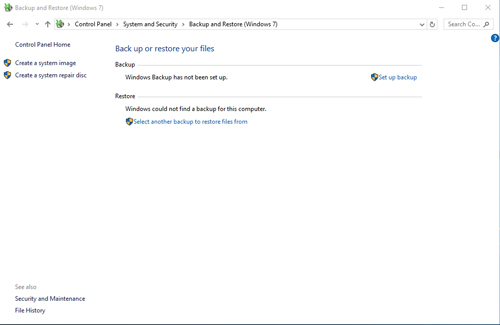 [Click on image for larger view.] Figure 3: This is the Backup and Restore utility.
Click on the option to create a system image. You will now see a screen asking where you want to save the backup. I recommend using an external hard drive like what I am doing in Figure 4. Click Next followed by Start Backup, and the backup will begin.
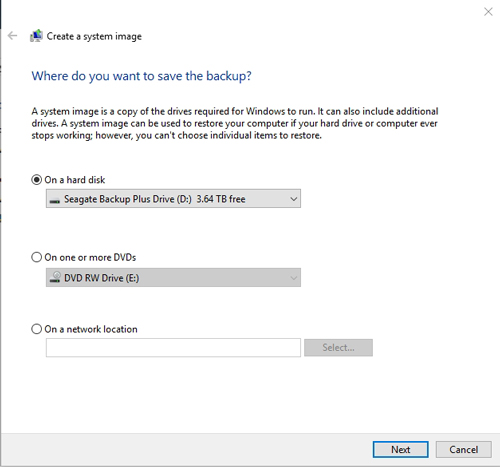 Figure 4: I am using an external hard drive for the backup.
Once the initial backup completes, the backup utility displays a message asking if you want to create a system repair disk. You will need the system repair disk in order to reimage the computer. As you can see in Figure 5, Windows prompts you to insert a blank DVD and then proceeds to create the system repair disk.
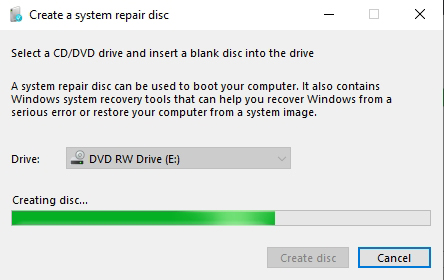 Figure 5: The system repair disk is being created.
Once you have finished creating a system repair disk, it is time to shut down the computer and replace the hard disk. Now, boot from the system repair disk.
When the disk boots, it will launch Windows Setup. Rather than actually setting up Windows, click Next and then click on the Repair Your Computer link at the bottom of the screen. This will cause Windows to take you to a blue screen asking you to choose an option. Choose the Troubleshoot option, followed by System Image Recovery and Windows 10. Now, just select the image that you want to use, and choose the option to format and repartition the hard disk. When you complete the wizard, your computer will be reimaged.
In my case, the reimaging worked perfectly, but one additional (but not unexpected) step was required at the end. If you look at Figure 6, you can see that although the reimaging process cleared out some of the system clutter, I still only have about 38GB of free space available. This is because Windows restored an image. Therefore, I had to manually enlarge my C: volume.
 Figure 6: The volume needs to be enlarged to take advantage of the available disk space.
Open the Disk Management Console by entering the DiskMgmt.msc command at the Run prompt. As you can see in Figure 7, I have over 600GB in unallocated space on Disk 0.
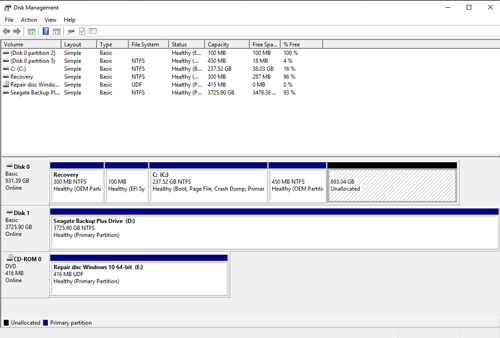 [Click on image for larger view.] Figure 7: There is over 600GB of free space on the drive.
The problem is that this free space is locked away, and is not readily available for our use. If I were to right-click on the C: drive, then there is no option to extend the volume. Fortunately, there is a way to deal with this problem. I will show you how in Part 2.
About the Author
Brien Posey is a 22-time Microsoft MVP with decades of IT experience. As a freelance writer, Posey has written thousands of articles and contributed to several dozen books on a wide variety of IT topics. Prior to going freelance, Posey was a CIO for a national chain of hospitals and health care facilities. He has also served as a network administrator for some of the country's largest insurance companies and for the Department of Defense at Fort Knox. In addition to his continued work in IT, Posey has spent the last several years actively training as a commercial scientist-astronaut candidate in preparation to fly on a mission to study polar mesospheric clouds from space. You can follow his spaceflight training on his Web site.