Posey's Tips & Tricks
How To Improve the Performance of Windows 10 in a Hyper-V VM
Brien walks through the steps of troubleshooting a (very) slow Windows 10 virtual machine. Hint: Disable your virtual memory at your own risk.
The minimum hardware requirements for running Windows 10 are very modest. In fact, they are nearly identical to those of much earlier Windows versions such as Windows 7 and Windows 8.
In spite of the fact that Windows 10 is supported for use on lightweight hardware, I have occasionally run into significant performance problems when running Windows 10 within a Windows Server 2016 Hyper-V virtual machine (VM).
Just to review, the minimum requirements for running a 64-bit instance of Windows 10 include:
- 1GHz or faster processor
- 2GB of memory
- 20GB of hard disk space
- A DirectX 9-compatible graphics card with a WDDM 1.0 driver
- A display that is capable of displaying 800x600 resolution
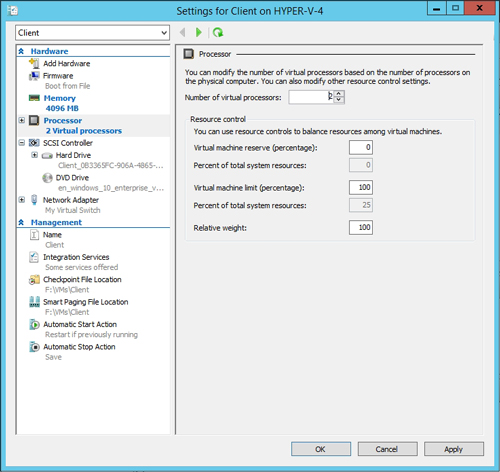
To give you a more concrete example of the performance problems, I recently created a Windows 10 VM that has roughly twice the hardware that is required for running the Windows 10 operating system. Since Windows 10 requires 2GB of RAM, I provisioned the VM with 4GB. Since Windows 10 will run on a single CPU core, I allocated two cores. You can see the VM's configuration shown in Figure 1.
 [Click on image for larger view.] This VM has twice as much memory and twice as many CPU cores as are required for running Windows 10.
When I say that the VM performed poorly, that may be the understatement of the year. When I logged into the VM by entering a password, for example, the password character indicators slowly appeared on screen one at a time, and it probably took about 20 seconds for all of the characters to appear onscreen, even though it only took me a second or two to actually type the password.
So why did Windows 10 perform so slowly? As is the case for most performance problems in Hyper-V, the root cause of the performance problems in this case was resource contention. The thing that made this so unexpected was that no other VMs were running on the host at the time.
So what can you do to fix Windows 10 performance problems when resource contention becomes an issue? First, try to figure out where the performance bottleneck is coming from. Typically, you will need to use the Performance Monitor or another tool such as the Task Manager to diagnose the underlying cause of the performance problems. Keep in mind that if you run these tools inside of the Windows 10 VM, then the resulting performance data will be skewed based on the resources that have been allocated to the VM. You may need to do some performance monitoring at the host level, or possibly even within some other VMs in order to determine the source of the heavy resource utilization.
In my situation, I eventually traced the performance problems to my storage array. Apparently, an error had occurred on the array, and an integrity check was consuming a sufficient number of I/O cycles to negatively impact performance. I was able to slightly improve performance by increasing the number of virtual CPUs assigned to the VM to four, and by giving the VM a lot more memory (8GB), but performance didn't go back to normal until the storage problem had been resolved.
But suppose that I had traced my performance problems to other VMs that were running on the host, and there weren't any problems beyond VM-related resource contention. Let's also suppose that allocating more hardware to the VM or live-migrating the VM to another host was not an option. In this type of situation, the key to improving performance is to reduce the VM's resource consumption. Although I am focusing on things that you can do inside of a VM, keep in mind that if you can make other VMs run more efficiently, then you may free up additional hardware resources.
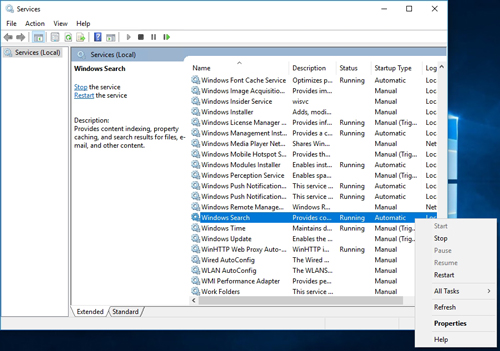
With that said, there are a couple of easy things that you can do to reduce Windows 10's workload. First, you can disable the Indexing service (which is now known as the Windows Search service). To do so, enter the Services.msc command at the Run prompt. This will open the Service Control Manager. Now, locate the Windows Search service, and stop the service and set its startup type to Disabled.
 [Click on image for larger view.] You can reduce storage IOPS consumption by disabling Windows Search.
Another thing that you may be able to do is to disable the use of virtual memory. Doing so may help you to reduce storage IOPS, but disabling virtual memory can be risky. Virtual memory uses disk storage to make up for shortages in RAM. The topic of whether or not disabling virtual memory is a good idea has been hotly debated, but you should not even attempt to go without virtual memory unless your VM has plenty of RAM.
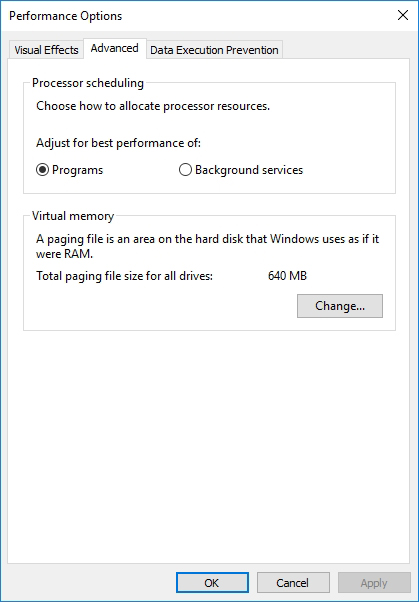
To turn off virtual memory, right-click on the Start button and then choose the System option from the resulting menu. When the Settings screen appears, scroll to the bottom and click System Info to access the System screen. Now, click on Advanced System Settings and then click on the Settings button that is found in the resulting dialog box's Performance section. Finally, go to the Advanced tab and click the Change button that is found in the Virtual Memory section, as shown in Figure 3.
 Sometimes disabling virtual memory can help with performance, but sometimes disabling virtual memory can cause stability problems.
About the Author
Brien Posey is a 22-time Microsoft MVP with decades of IT experience. As a freelance writer, Posey has written thousands of articles and contributed to several dozen books on a wide variety of IT topics. Prior to going freelance, Posey was a CIO for a national chain of hospitals and health care facilities. He has also served as a network administrator for some of the country's largest insurance companies and for the Department of Defense at Fort Knox. In addition to his continued work in IT, Posey has spent the last several years actively training as a commercial scientist-astronaut candidate in preparation to fly on a mission to study polar mesospheric clouds from space. You can follow his spaceflight training on his Web site.