Spike on SharePoint
How To Create SharePoint 2013 Content Databases and Site Collections
Here's a step-by-step instruction on how to create a number of site collections, content databases and how to combine them.
- By Spike Xavier
- 06/18/2014
There are times when I like to have Site Collections in their own content databases. At times I do training for SharePoint and I like to use a certain demonstration to show how Sharepoint works with its content databases and Site Collections. I also find that there are times when I'm developing in SharePoint that I like to try different scenarios in order to test performance and also to work with larger numbers of Site Collections.
In this article I will go through this demonstration.
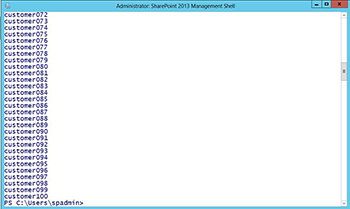
I will use the SharePoint Management Shell to create 100 Site Collections. In order to keep them consistent I format the strings so I have customer001 through customer100 (as opposed to customer1 through customer100).
I create one content database for them to go into and take the existing Content Database offline so all the site collections will go into my new content database. Then I create a content database for each site collection and move each one into its own content database. I switch back and forth between the SharePoint Management Shell and Central Administration to watch it all happen.
Once they are all created and in the content database, I add the default associated SharePoint Security Groups to each of the Site Collections. This brings something up in SharePoint 2013 that I like to point out.
I would not perform this in production without serious planning with the database folks, but I love doing stuff like this in my development or classroom environment because it helps to understand how it all works.
(This is a development environment so I am doing all of this logged in as the SPAdmin Install account. This has all the privileges needed to do all of this stuff.)
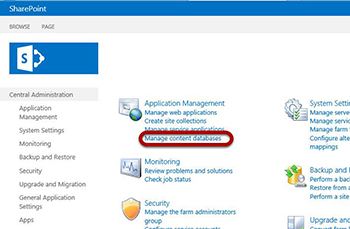
In Central Administration I click the Link to manage content databases.
 [Click on image for larger view.] Figure 1.
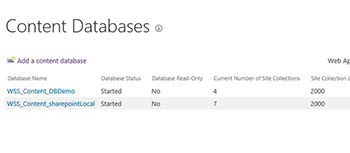
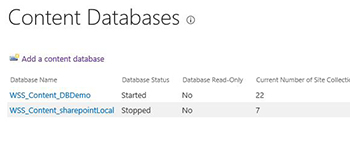
First I'll get a lay of the land, so to speak, and check out which content databases currently exist in the SharePoint Web Application I'm going to be working with. When a new SharePoint Web Application is created, a Content Database is provisioned to hold all of the data of its site collections.
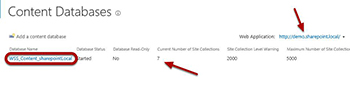
I make sure I'm in the correct SharePoint Web Application and take note of the number of Site Collections it currently contains. At this point there are 7.
 [Click on image for larger view.] Figure 2.
I click on the WSS_Content_sharepointLocal content database link to get to the Manage Content Database Settings page for this database.
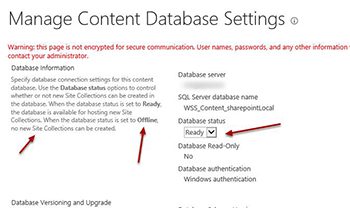
I'm not worried about the warning about the encryption since this is a Dev virtual machine. I notice that the Database Status is ready.
 [Click on image for larger view.] Figure 3.
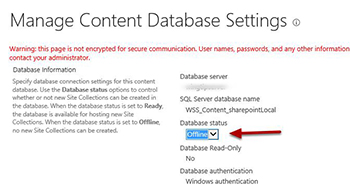
Ready means that more site collections can be added to this content database up to the limit number on the previous screen. (5000). I am going to change the status to offline. When I first saw this I thought it meant that all of the Site Collections would be offline, but it just means that no more Site Collections will be placed inside of it. They do a great job of explaining this which is pointed out with the red arrows.
With the WSS_Content_sharepointLocal Content Database offline I click ok.
(Clicking ok is done by scrolling to the bottom.)
 [Click on image for larger view.] Figure 4.
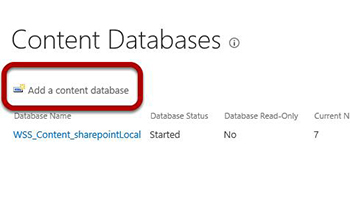
I now head back to my Manage Content databases screen.
 [Click on image for larger view.] Figure 5.
I click the link Add a Content Database.
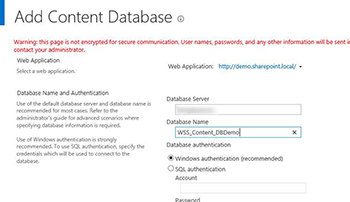
The Add Content Database Form appears and I fill it out appropriately
 [Click on image for larger view.] Figure 6.
At the bottom of the screen I click ok (not shown).
I verify the settings of my new Content database.
 [Click on image for larger view.] Figure 7.
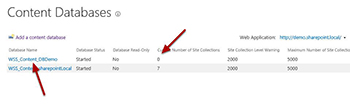
Currently there are zero site collections in my new content database.
I see seven in the WSS_Content_sharepointLocal Database, as noted previously. As I add the site collections I am expecting them all to go into the new Content database. Had I left the other one online the new Content Database would get the first seven site collections and then they would go back and forth trying to keep the number of site collections even.
I open up the SharePoint 2013 Management Shell in Administrator Mode (this is how it should open up but I always right click and choose run as administrator). Old habits die hard.
 [Click on image for larger view.] Figure 8.
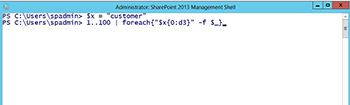
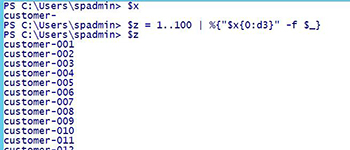
I create a variable $x and put the string "customer" into it. I then create the numbers one through 100 and pipe that into a foreach statement with pre pends the numbers with the string in $x but formats each of the numbers with leading zeroes so that there will be uniformity in the names. For example this is what makes the result customer001 as opposed to customer1. There are a couple of fantastic blogs about Format Strings, and an amazing comprehensive article on TechNet that explains in detail how to do this.
I verify that my Format String piece worked as expected and then move on to some fun.
 [Click on image for larger view.] Figure 9.
I reload the value of $x with a "customer-" and then pump 1-100 into a variable $y and pipe it through the previously tested snippet.
 [Click on image for larger view.] Figure 10.
This gives me the strings customer-001 through customer-100 in the variable $y.
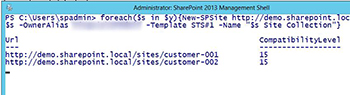
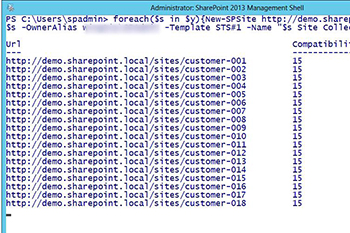
I loop through the variable $y and foreach value I create a new site collection.
 [Click on image for larger view.] Figure 11.
I use the New-SPSite Commandlet and provide a URL which ends with the $s which represents the current value in the collection of strings in $y. I set the site collection administrator (-OwnerAlias), I set the site template for the top level site of the site collection as a blank site (STS#1) and set the title of the top level site to $s Site Collection, which for the first one would be "Customer-001 Site Collection."
I watch the magic happen.
 [Click on image for larger view.] Figure 12.
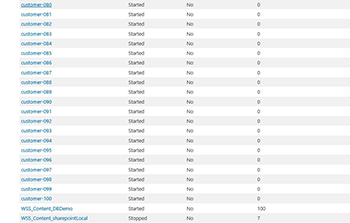
As the site collections are created they will appear on the screen. After a couple I switch back over to Central Administration and the Content Databases screen.
I hit refresh and watch the site collections get created in the WSS_Content_DBDemo content database.
 [Click on image for larger view.] Figure 13.
In this screen shot there are four. I won't really be sure that taking the other Content database offline works until I get to seven.
I go back to the SharePoint 2013 management shell and make sure it's over seven.
 [Click on image for larger view.] Figure 14.
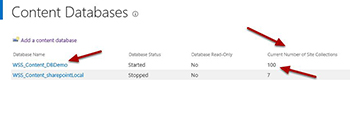
Now when I check the Content Databases screen in Central Administration I'm expecting that all my new site collections are in the new content database.
As expected the number of site collections in the 'offline' WSS_Content_sharepointLocal content database has remained at seven.
 [Click on image for larger view.] Figure 15.
The number of site collections in my new content database will continue to grow until the script is done. When it's all said and done I'm expecting there to be 100 site collections in there.
 [Click on image for larger view.] Figure 16.
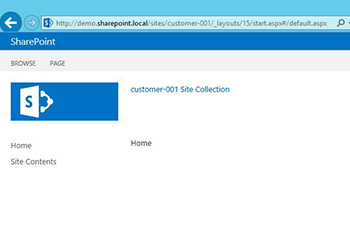
I check to make sure that the site collections are working by going to the first one.
 [Click on image for larger view.] Figure 17.
I verify that it works, and notice the title is what I expected. I will now take a look at the SharePoint security groups.
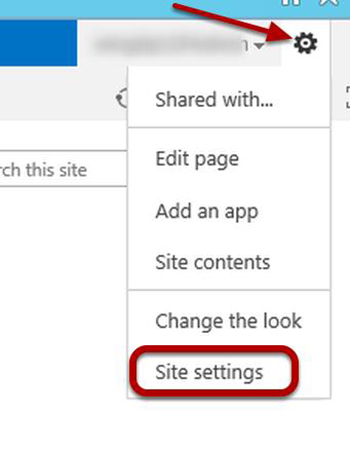
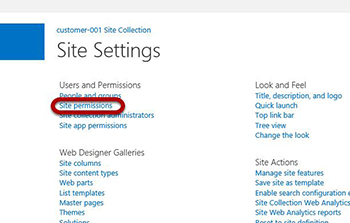
Using the Site Actions Gear (I'm not sure of the official name at this point) I click on Site Settings.
 [Click on image for larger view.] Figure 18.
This takes me to the Settings page for the top level site of my site collection. I click on Site permissions.
 [Click on image for larger view.] Figure 19.
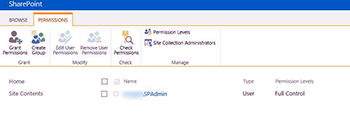
When using PowerShell and the New-SPSite Commandlet the way I did, the default SharePoint Security Groups do not get created. Since I only passed in a primary site collection administrator (-OwnerAlias) that's all there is.
 [Click on image for larger view.] Figure 20.
I could one at a time create new security groups and assign permission levels to them in the browser but it is much easier with PowerShell, so I'll take that route. But first I'm going to create 100 SPContent Databases.
I create a new variable $z and put the numbers 1-100 into it. I pipe that into a foreach (the % is shorthand for foreach-object, which foreach is shorthand for. and use the Format String technique to get customer-001 - customer-100.
 [Click on image for larger view.] Figure 21.
When I'm done I type $z into the prompt to check my work.
Now I run a foreach($m in $z) and use the New-SPContentDatabase Commandlet to create 100 new SPContent Databases in the http://demo.sharepoint.local web application and name them customer001-customer-100.
 [Click on image for larger view.] Figure 22.
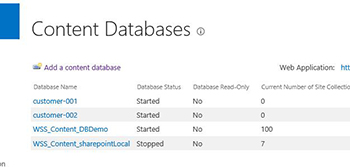
This will take a little while, but I go back to the Content databases screen in Central Administration and monitor the progress.
I've already got two new SPcontent databases but I expect to see many more.
 [Click on image for larger view.] Figure 23.
I go into SQL Server Management Studio and expand the Databases folder to see the new SPContent databases appearing in the list of databases
 [Click on image for larger view.] Figure 24.
As more and more Content databases are created I will see them in Management Studio. I switch back to the SharePoint Management Shell to monitor the progress.
 [Click on image for larger view.] Figure 25.
In my development environment this actually took a bit of time to run (more than 30 minutes).
When it's done I switch back to Central Administration.
 [Click on image for larger view.] Figure 26.
Now I have enough content databases to put each site collection I created into its own content database. I would never just do this, I would make sure that the DBA was in on the planning stages and that this was now part of his or her maintenance and disaster recovery plan. But in my development and testing environment it is no problem to do stuff like this to really understand how it works and how SharePoint and SQL Server work together to deal with the content in SharePoint Site Collections.
Now I will move each Site Collection into its own content database. I still have all the site collections in the variable $z.
 [Click on image for larger view.] Figure 27.
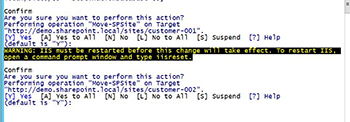
I move the site collections with the Move-SPSite Commandlet, passing in the URL of each site collection and the DestinationDatabase name.
I read the prompt and then confirm.
 [Click on image for larger view.] Figure 28.
There is a prompt to make sure I want to do this for each move, and a reminder that IIS needs to be reset for the changes to take effect. I just hit enter because the default is yes. There is probably a parameter I can pass in to not see the prompt, but I just hit enter each time.
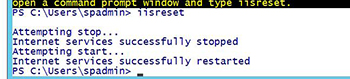
When I'm done I reset IIS with the IISReset command.
 [Click on image for larger view.] Figure 29.
In my development environment, no big deal, it's just me, but I wouldn't just do an IISReset without thinking in production of course.
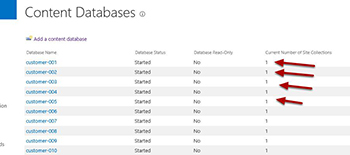
Back to Central Administration where I see each site collection has been moved into its own content database.
This can come in handy at times for many reasons. Not that each Site Collection needs its own content database, but there are times when I want to dedicate a Site Collection to its own Content database.
I'm going to set the default SharePoint Security Groups now so I grab the new site collections and put them into the $sc variable.
 [Click on image for larger view.] Figure 30.
 [Click on image for larger view.]
Figure 31.
[Click on image for larger view.]
Figure 31.
I need to pass in the -limit all so that I get them all in there since there are 100.
I loop through and create the default SharePoint Security Groups.
 [Click on image for larger view.] Figure 32.
I used the STS#1 template code which is for a Blank Site. This will have an impact which I will see in a minute.
I notice that when using this method to add the default SharePoint Groups, in conjunction with a top level site based on the Blank Site template something interesting happens.
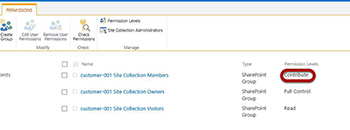 [Click on image for larger view.] Figure 33.
When I used the CreateDefaultAssociatedGroups method on the rootWeb object it assigned the Contribute Permission level to the Members Group. This is how it worked in SharePoint 2010. However in SharePoint 2013 if I create a new Site Collection using Central Administration using the Team Site as the top level site template it assigns the Edit permission level to the Members group. At least that's the case when I choose to create a site collection with the top level site based on the 2013 Team Site. I created these site collections using the Blank Site Template which is only available in Central Administration using the 2010 experience. If I do that, the permission level assigned to the Members Group is contribute. This is interesting and I may explore this in another article ...
That's it. I created 100 site collections, 100 content databases and then moved each site collection into its own content database.
What's not shown in this article is me removing everything which I will do with the SharePoint Management Shell, but I could also have used a Snapshot. After all, it's a development environment ...
About the Author
Spike is a full-time trainer and consultant with Transmission I.T. He began his career in computers in the early 1980s with Fortran IV. Sometime in 2007, he found SharePoint and has been working with it ever since. His interests are SharePoint, HTML 5, JavaScript and ASP.NET. He was the head of the Arizona SharePoint Pros user group for the last few years and speaks at conferences and user groups.