Windows Server How-To
How To Reclaim Storage Space from Hyper-V Virtual Machines
Battle quickly shrinking storage space by deleting and compacting physical disks.
If you use Hyper-V as a server virtualization platform, you might have noticed physical storage space being depleted more quickly than it should be. In this article, I am going to show you two reasons why your Hyper-V server may be consuming excessive storage space, and how you can get back some of your lost storage space.
One reason why you may be burning through physical disk space more quickly than anticipated has to do with a safety mechanism within Hyper-V. Let me show you what I mean.
If you look at Figure 1, you can see that I have created a virtual machine called Storage Space Demo. This virtual machine has a single virtual hard disk named Storage Space Demo.vhdx. The virtual hard disk resides at F:\VMs\Storage Space Demo\Virtual Hard Disks\.
 [Click on image for larger view.] Figure 1. I have created a virtual machine named Storage Space Demo.
Now, for the sake of demonstration, I am going to delete the virtual machine, as shown in Figure 2.
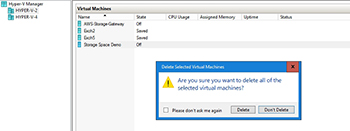 [Click on image for larger view.] Figure 2. I am deleting the Storage Space Demo virtual machine.
Now, check out Figure 3. Although the virtual machine is gone, the virtual hard disk was not deleted. This is a Hyper-V safety feature. The Hyper-V Manager protects against accidental VM deletion by leaving the virtual hard disk intact. That way, if a virtual machine is accidentally deleted, it is relatively easy to create a new VM and link it to the existing virtual hard disk.
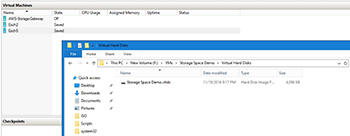 [Click on image for larger view.] Figure 3. The virtual hard disk remains even after the corresponding VM has been deleted.
Of course the disadvantage to this safety feature is that keeping old virtual hard disks means that virtual machines that no longer exist continue to consume physical storage. The solution to the problem is to periodically remove virtual hard disks that are no longer needed.
Shrinking Virtual Hard Disks
Another way that you may be able to reclaim some physical storage space is by shrinking virtual hard disk files.
When I created the demo virtual machine that was shown in Figure 1, I used the default virtual hard disk size of 127GB. If you look at Figure 3 however, you will notice that the virtual hard disk file is only 4MB in size. The reason for this is that the Hyper-V Manager creates dynamically expanding virtual hard disks by default.
Dynamically expanding virtual hard disks are designed to conserve physical storage space. When created, a dynamically expanding virtual hard disk initially only consumes a few MB of space. As data is written to the virtual hard disk, the virtual hard disk file expands to accommodate that data. The file can expand up to either the limit that was specified at the time of creation (in my case, 127GB) or until the server runs out of physical disk space.
The nice thing about dynamically expanding virtual hard disks is that they will only claim as much physical storage space as it takes to accommodate the data that is stored on the virtual disk. What you might not realize however, is that although these virtual disks can grow dynamically, they cannot dynamically shrink.
Suppose for instance, that you write 10GB of data to a dynamically expanding virtual hard disk. The virtual hard disk will consume 10GB of physical disk space to accommodate the data. If you then delete the 10GB of data, the amount of space consumed by the virtual hard disk will not change.
Before you compact a virtual hard disk, it is a good idea to defragment it. It is also a good idea to create a backup of the disk, just in case anything should go wrong while compacting the disk.
When you are ready, you can begin the process of compacting a dynamically expanding virtual hard disk by shutting down the virtual machine that is using it. Then, in Hyper-V Manager, right click on the virtual machine and choose the Settings command from the shortcut menu. Now, select the virtual hard disk that you want to compact, and click the Edit button, shown in Figure 4. This will cause Windows to launch the Edit Virtual Hard Disk Wizard.
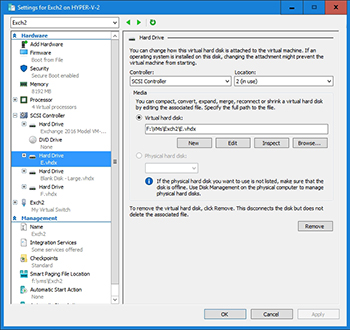 [Click on image for larger view.] Figure 4. Select the virtual hard disk and click Edit.
Click Next to bypass the wizard's Welcome screen. You will then be prompted to choose the action that you want to perform. Choose the Compact option, and click Next, followed by Finish. The virtual hard disk will be compacted, as shown in Figure 5.
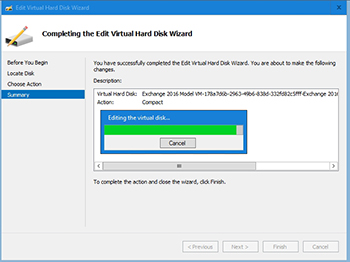 [Click on image for larger view.] Figure 5. The virtual hard disk is being compacted.
To give you a more concrete example, take a virtual hard disk E: in Figure 6. The disk is about 790MB in size.
 [Click on image for larger view.] Figure 6. The E: disk is about 790MB in size.
I logged into the VM, erased some files, and then compacted the disk. As you can see in Figure 7, the disk's size was shrunk to 364MB.
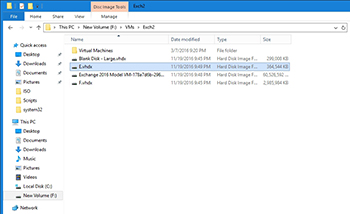 [Click on image for larger view.] Figure 7. The disk has been shrunk to 364MB.
As you can see, Hyper-V can waste a considerable amount of physical storage space. You can reclaim some of this storage by deleting unwanted virtual hard disks, and by compacting dynamically expanding disks.
About the Author
Brien Posey is a 22-time Microsoft MVP with decades of IT experience. As a freelance writer, Posey has written thousands of articles and contributed to several dozen books on a wide variety of IT topics. Prior to going freelance, Posey was a CIO for a national chain of hospitals and health care facilities. He has also served as a network administrator for some of the country's largest insurance companies and for the Department of Defense at Fort Knox. In addition to his continued work in IT, Posey has spent the last several years actively training as a commercial scientist-astronaut candidate in preparation to fly on a mission to study polar mesospheric clouds from space. You can follow his spaceflight training on his Web site.