How To Navigate the Windows Registry Like a File System
With the help of PowerShell cmdlets, navigating a registry is made a lot simpler.
As a child of the '80s, I grew up working with the DOS operating system. For those who might not be familiar with DOS, it was an acronym for Disk Operating System. The OS could fit onto a single floppy disk and was roughly equivalent to a command-line version of the Windows File Explorer. The funny thing about DOS is that many of the original DOS commands from the 1980s work in PowerShell even today.
Of course just because you can do something doesn't mean that you should. Several years ago I wrote an article in which I demonstrated a procedure in PowerShell and along the way, I used one of the old DOS commands. The command that I used was DIR, which was short for Directory. It was the command used to display the contents of a folder.
Shortly after the article was published, I received an E-mail message from someone who wanted to tell me that all of the old DOS commands now had modern PowerShell equivalents and that I should be using PowerShell cmdlets, not DOS commands. The PowerShell equivalent to the DIR command for example, is Get-ChildItem.
Following that E-mail, I made a conscious effort to learn the PowerShell cmdlets that are modern versions of the old DOS commands used for file and folder management. In doing so, I discovered something really interesting. These commands can be used to navigate and manage the file system, but they can also be used to navigate and manage the Windows registry.
Now before I jump right in and show you some examples, I need to keep the lawyers happy by mentioning that modifying the registry can be dangerous. Making an incorrect registry modification can destroy your operating system and / or your applications. As a best practice, you should therefore make a full system backup prior to performing any sort of registry modification.
So with that said, let's take a look at how you can use the same command set to work with both the file system and the Windows registry. We will start with the Get-ChildItem cmdlet. When used by itself, this cmdlet displays the contents of the current file system folder. However, you can append the -Path parameter and then specify either a file system path or a registry path.
To see how this works, take a look at Figure 1. In this figure, I started out by entering the Get-ChildItem cmdlet by itself. This caused PowerShell to display the contents of the C: drive. Next, I typed Get-ChildItem again, but this time I appended the -Path parameter and I used C:\Drivers as the path. This resulted in the contents of the C:\Drivers folder being displayed.
 [Click on image for larger view.] Figure 1. The Get-ChildItem cmdlet does the same thing as the DIR command.
Now, let's use the Get-ChildItem cmdlet to navigate the registry. If I type Get-ChildItem -Path HKCU: then Windows shows me the contents of the HKEY Current User registry hive. You can see what this looks like in Figure 2.
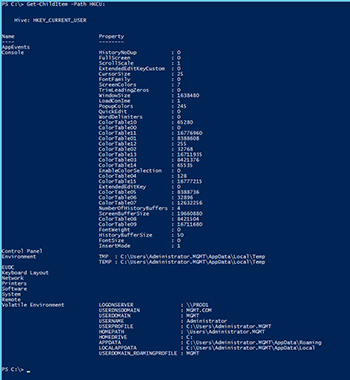 [Click on image for larger view.] Figure 2. The Get-ChildItem cmdlet can be used to display the registry contents.
In order for this command to work, you must use the -Path parameter, and you must append a colon to the end of the registry hive. Otherwise, PowerShell will produce an error.
So what if we want to go deeper into the registry tree? Doing so actually works the same way as going deeper into the file system. If you look back at Figure 1, you will notice that the Drivers folder within the file system contains a sub-folder named NVIDIA. If I wanted to access this folder, I could simply append the folder to the path. Instead of typing Get-ChildItem -Path C:\Drivers, I would type Get-ChildItem -Path C:\Drivers\NVIDIA You can see an example of this in Figure 3.
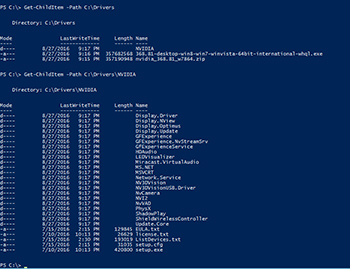 [Click on image for larger view.] Figure 3. You can navigate the folder structure by appending sub folder names to the cmdlet.
Navigating the registry works in exactly the same way. We append the container that we want to examine. Suppose for example, that I wanted to look at HKCU\Software instead of HKCU. I could accomplish this by using the following command:
Get-ChildItem -Path HKCU:\Software
Notice that the colon still appears immediately after HKCU. What if we instead want to look at HKCU\Software\Microsoft? In that case, the command becomes:
Get-ChildItem -Path HKCU:\Software\Microsoft
You can see an example of this in Figure 4.
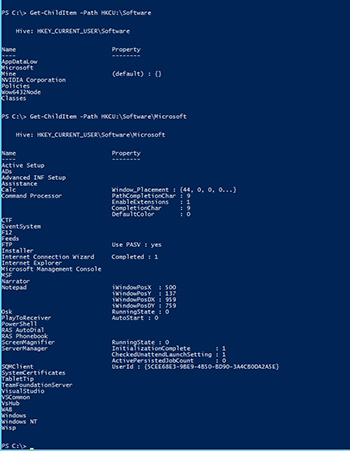 [Click on image for larger view.] Figure 4. You can navigate the registry tree as if it were a file system.
One thing to keep in mind is that although I have used Get-ChildItem for demonstration purposes, it is far from being the only cmdlet that can interact with both the file system and the registry. Other cmdlets such as Copy-Item, New-item, and Remove-Item can also be used.
About the Author
Brien Posey is a 22-time Microsoft MVP with decades of IT experience. As a freelance writer, Posey has written thousands of articles and contributed to several dozen books on a wide variety of IT topics. Prior to going freelance, Posey was a CIO for a national chain of hospitals and health care facilities. He has also served as a network administrator for some of the country's largest insurance companies and for the Department of Defense at Fort Knox. In addition to his continued work in IT, Posey has spent the last several years actively training as a commercial scientist-astronaut candidate in preparation to fly on a mission to study polar mesospheric clouds from space. You can follow his spaceflight training on his Web site.