In-Depth
A Tale of 2 Container Deployments
Microsoft's foray into containers will offer two deployment options -- Windows and Hyper-V. This is an exploration of both.
Among the various new features Microsoft is bringing to Windows Server 2016, few have resulted in as much confusion as containers -- and understandably so. Not only are containers new to Windows, but Microsoft and other key IT providers see them as the future of Web-scale applications.
A particularly befuddling aspect of Microsoft's new containers is that the company is offering two primary ways of implementing them: either through Windows or Hyper-V. Furthermore, administrators can manage containers using Docker or Windows PowerShell.
Because containers are so new to the Windows platform, it's important to understand the basics of working with Windows Server containers and how technologies such as Hyper-V, Windows PowerShell and Docker come into play.
Windows Server vs. Hyper-V
Windows Server 2016, due out later this year, will allow for the creation of Hyper-V containers and Windows Server containers. Both container types accomplish the same basic thing, but do so in different ways. Each container type is designed to allow administrators to virtualize individual applications in a way that isolates applications and services from one another. Each container (and its corresponding applications) has an isolated view of resources such as the OS, the registry and the file system. The application within the container provides the illusion that the application has been installed on top of a clean Windows Server deployment. The containerized applications are oblivious to other applications that exist outside of the container.
Windows Server containers and Hyper-V containers both provide application isolation and are very similar to one another from a management standpoint (although you do have to jump through a few extra hoops to get Hyper-V containers up and running). The difference between the two is that Hyper-V containers provide kernel-level isolation. Windows Server containers isolate processes and namespaces, but the containers share a common kernel with the host OS and with each other. Hyper-V containers use hardware-level virtualization, so each container has its own dedicated kernel that isn't shared with other containers or with the host OS.
Windows Server Containers
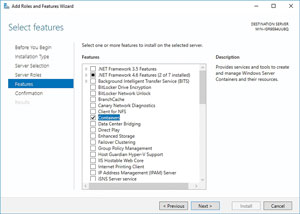
If you want to use Windows Server containers (rather than Hyper-V containers), it's easy to prepare them for Windows. In fact, containers can be deployed as a Windows Server feature, as shown in Figure 1.
 [Click on image for larger view.]
Figure 1. Windows Server containers can be deployed as a Windows Server feature.
Although the container installation process couldn't be easier, containers cannot be managed through the Windows Server GUI. As such, you'll have to use either Windows PowerShell or Docker. It's worth noting that although I'm going to be demonstrating some management techniques for Windows Server containers, Hyper-V container management works similarly. Microsoft has gone so far as to state that "Hyper-V containers will provide the same level of integration and management with Docker as Windows Server containers."
Currently, administrators must choose whether to use Windows PowerShell or Docker for container management. Microsoft has indicated that Windows PowerShell- and Docker-based management tools will be able to be used side by side in the future, but for right now administrators will have to pick one management tool or the other.
Working with Container Images
Just as a virtual machine image is used to create virtual machines, a container image is used to create containers. A container image and a virtual machine image actually have a lot in common. Both contain an OS and may contain other items such as applications. Of course not every virtual machine image contains applications, but the whole point of creating a container is to virtualize an application, so container images will generally contain an application and any application dependencies that might exist.
Before describing how to create an image, it's important to understand there are two different types of images used by containers. The first type is a base OS image. A base OS image includes the core OS components that are required by an application. You can get the base OS image from Microsoft.The other type of image is a container image. A container image is an image that has been created by an administrator from a base image.
The first thing you'll need to do is install the available base images. Although these images are provided by Microsoft, they're not made available within Windows by default. As previously noted, you can use either Windows PowerShell or Docker for container management. For the purposes of this article I'll be using Windows PowerShell.
Before you install the base images, you must begin by installing the package provider. This doesn't actually install the images. Rather, it gives Windows a way of finding out which images are available. To install the package provider, open an elevated Windows PowerShell window and enter the following command:
Install-PackageProvider ContainerProvider –Force
It only takes a few seconds to install the package provider. Once the installation process completes, you can use the provider to determine which base images are available. To do so, enter the Find-ContainerImage cmdlet (see Figure 2).
 [Click on image for larger view.]
Figure 2. The package provider allows you to see which base images are available.
The next step in the process is to install a base image. To do so, you'll need to pick a container image and then use the Install-ContainerImage cmdlet. In the previous figure, for example, you saw that there was a Nano Server image available and a Server Core image available. I could install the Server Core image by using the following command:
Install-ContainerImage –Name WindowsServerCore –Version 10.0.10586.0
There are a few things you need to know about this command. First, the name and version number must match the information that's returned by the Find-ContainerImage cmdlet. Second, the Microsoft documentation mentions an issue that prevents the Windows Server Core image from working with PowerShell remoting, but this issue appears to have been resolved. Finally, the command causes the specified image to be downloaded from Microsoft using BITS. The amount of time that this takes to complete varies depending on the speed of your Internet connection. In my lab environment it took roughly 20 minutes to download and install the Windows Server Core base image. If you want to confirm the image has been successfully added, you can do so by using the Get-ContainerImage cmdlet.
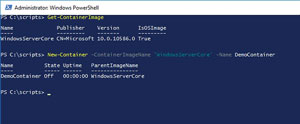
Base images are used in the creation of containers (although you can also create a container from a container image). In doing so, Windows establishes a dependency between the base image and any container created from it. The container essentially becomes a child of the container image from which it was created. You can easily view this dependency when you create a container. To create a container from the WindowsServerCore base image, use the following command:New-Container –ContainerImageName 'WindowsServerCore' –Name DemoContainerThis command creates a brand new container named DemoContainer (see Figure 3).
 [Click on image for larger view.]
Figure 3. The newly created container.
So now that the container has been created, what can you do with it? The first thing you'll want to do is start your container. To do so, use the following command:
Start-Container
DemoContainer
Normally, the next thing you'd do is use Windows PowerShell Remoting to establish a session with the container so that you can begin configuring the container. Doing so might involve using commands like these:
$container = Get-Container –Name DemoContainer Enter-PSSession –ContainerID $container.id –RunAsAdministrator
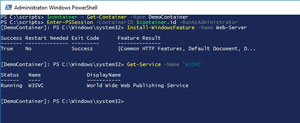
After establishing a remote session, you can begin installing applications and services into the container. In Figure 4, for example, I've established a remote session into my container and installed IIS.
 [Click on image for larger view.]
Figure 4. Establishing a remote session into the container and installing IIS.
Hyper-V Containers
Hyper-V containers are generally the preferred container type because they provide a greater degree of isolation than what's possible using Windows Server containers.
In order to use Windows Server containers, you'll need to download a configuration script from Microsoft. For now this script can be found here. It is possible, however, that Microsoft could use a different URL after the Windows Server release.
For the purposes of this article, I'm assuming the script has been saved to a folder on the server named C:\Scripts and that the server has been configured to use an appropriate Windows PowerShell execution policy. To start using the Hyper-V containers, open an elevated Windows PowerShell window and run the following commands:
C:
Cd\
Cd Scripts
./Install-ContainerHost.ps1
Hyper-V Containers.ps1 –HyperV
It's worth noting this process can take a significant amount of time to complete. In my lab environment the deployment process took roughly two hours to finish.
Current Issues
Microsoft hasn't exactly made a secret of the fact that containers are a work in progress and there's still a significant amount of work to be done prior to the release of Windows Server 2016. Microsoft has even gone so far as to post a Work in Progress page that lists many of the current issues.
The one issue I've encountered and thus far haven't been able to find a solution to is that of IP addressing. If a container is running on Hyper-V, it behaves much like a virtual machine. The container is connected to a virtual network adapter, which is in turn connected to a virtual switch. Networking can be configured at the time the container is created or the administrator can configure networking later by using cmdlets such as Add-ContainerNetworkAdapter and Connect-ContainerNetworkAdapter.
The problem I've encountered is there doesn't currently seem to be any network support for Windows Server containers. Functionally, a Windows Server container is identical to a Hyper-V container. Both container types support exactly the same set of Windows PowerShell cmdlets. However, networking doesn't seem to work for Windows Server containers because it's impossible to associate a virtual NIC with a container unless Hyper-V has been installed. If an administrator were to go through the trouble of installing Hyper-V, then they would presumably use Hyper-V containers instead of Windows Server containers.
Initially, I assumed a Windows Server container would inherit the IP address of the container host. Upon closer inspection, however, Windows Server containers (at least as they're configured here) have no network adapter and no IP address.
It's entirely possible there's a workaround that will allow a Windows Server container to function on a network. As it stands right now, however, the Microsoft documentation focuses solely on Hyper-V with regard to network access for containers and I've been unable to find a workaround myself.
Benefits and Challenges
Containers are an excellent tool for isolating applications from one another. Even so, containers do add an additional layer of complexity and present new management challenges. This will be especially true for administrators with no previous experience with container solutions such as Docker. The best resource that I've found for getting help with container creation and management through Windows PowerShell is a TechNet article that lists all of the available cmdlets.
About the Author
Brien Posey is a 22-time Microsoft MVP with decades of IT experience. As a freelance writer, Posey has written thousands of articles and contributed to several dozen books on a wide variety of IT topics. Prior to going freelance, Posey was a CIO for a national chain of hospitals and health care facilities. He has also served as a network administrator for some of the country's largest insurance companies and for the Department of Defense at Fort Knox. In addition to his continued work in IT, Posey has spent the last several years actively training as a commercial scientist-astronaut candidate in preparation to fly on a mission to study polar mesospheric clouds from space. You can follow his spaceflight training on his Web site.