Windows Server How-To
How To Classify Data in Windows Server 2012 R2
Create custom classification rules using this step-by-step guide.
A Windows file server can contain a huge variety of data. Some of this data is understandably more sensitive than other data. Traditionally we have grouped data into folders according to its purpose and level of sensitivity. The problem with this method is that file data can be moved from one folder to another. Fortunately, Windows Server makes it possible to apply classifications directly to a file in an effort to identify the file's purpose, sensitivity or whatever else.
For the sake of demonstration, let's pretend that I have a file server containing a folder named Invoices and that all of the data within the Invoices folder should be marked as sensitive. To accomplish this task, I would open the File Server Resource Manager (which is available through the Server Manager's Tools menu) and choose the Classification Properties option. Next, I would click on the Create Local Property link, which you can see in Figure 1.
 [Click on image for larger view.] Figure 1. Click on Create Local Property.
Now we need to enter a name for the new property. It is also a good idea to enter a description. If you look at Figure 2, you can see that we also have the option of setting a property type. The property type is set to Yes / No by default, but other choices are available such as Number or String.
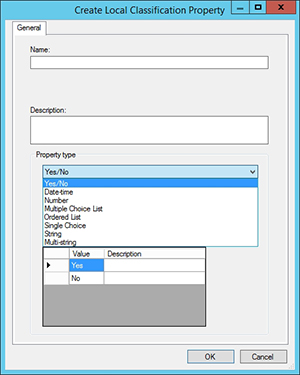 [Click on image for larger view.] Figure 2. Choose a property type.
For the sake of this demonstration, I am going to call this property Sensitive and I am going to set the property type to Yes / No. In other words, we are asking the question, "Is the data sensitive, yes or no"? Figure 3 shows that the Sensitive property has been added to the list of classification properties.
 [Click on image for larger view.] Figure 3. The Sensitive property has been added to the list of classification properties.
So now the next step is to create a classification rule. To do so, click on the Classification Rules container and then click the Create Classification Rule link, shown in Figure 4.
 [Click on image for larger view.] Figure 4. Click on the Create Classification Rule link.
Windows will now display the Create Classification Rule dialog box. The first thing that you will have to do is to assign a name to the rule that you are creating. I will call this rule Sensitive Data. While you are on the dialog box's General tab, you should enter a description for the rule and make sure that the rule is enabled.
Now, select the dialog box's Scope tab. Here you will need to select the types of files that the rule should apply to. You will also need to click on the Add button and add the folders that the rule should analyze. You can see what this looks like in Figure 5.
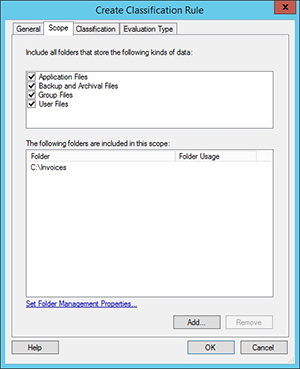 [Click on image for larger view.] Figure 5. You must specify the path and file types.
Now, go to the Classification tab. You will need to choose a classification method. If you are trying to classify the contents of a folder then you can use Folder Classification, but there are other, more granular methods available. Next, choose a property to evaluate and specify a value, as shown in Figure 6. Click OK to complete the process.
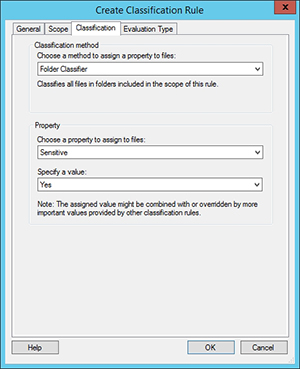 [Click on image for larger view.] Figure 6. We are classifying all files within the specified folder as Sensitive.
You should now see your classification rule listed, as shown in Figure 7. If you look at the Actions pane, you can see that you have the ability to run the rule now or to set up a schedule for the rule.
 [Click on image for larger view.] Figure 7. The newly created classification rule is displayed.
When the classification rule runs, Windows provides you with a nice report, which you can see in Figure 8.
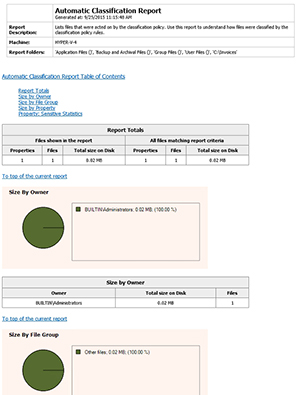 [Click on image for larger view.] Figure 8. Windows provides a classification report.
To see the effect that the classification rule had on the file system, right click on a file that should have been classified and choose the Properties command from the shortcut menu. When the file's properties sheet appears, go to the Classification tab. As you can see in Figure 9, this particular invoice has been classified as Sensitive. The properties sheet also gives you the ability to manually reclassify the file if necessary.
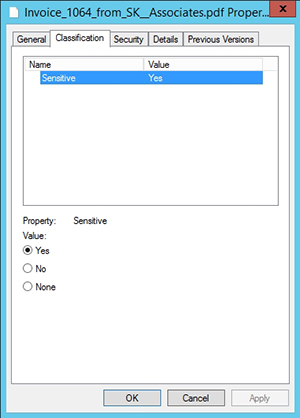 [Click on image for larger view.] Figure 9. The file has been classified as Sensitive.
About the Author
Brien Posey is a 22-time Microsoft MVP with decades of IT experience. As a freelance writer, Posey has written thousands of articles and contributed to several dozen books on a wide variety of IT topics. Prior to going freelance, Posey was a CIO for a national chain of hospitals and health care facilities. He has also served as a network administrator for some of the country's largest insurance companies and for the Department of Defense at Fort Knox. In addition to his continued work in IT, Posey has spent the last several years actively training as a commercial scientist-astronaut candidate in preparation to fly on a mission to study polar mesospheric clouds from space. You can follow his spaceflight training on his Web site.