Windows Server How-To
How To Move a Hyper-V Virtual Machine to New Hardware
While the process won't take too much time, it's a bit more complicated than it should be.
Whether you have been using Hyper-V since the days of
Windows Server 2008 or you are new to Hyper-V, the day will eventually come when
your current hardware platform will be inadequate for handling your VM workload.
So what can you do when that time comes? What is the easiest way of moving
virtual machines to more capable hardware?
When it comes to hardware migrations, there is good news
and there is bad news. The bad news is that there is no such thing as a
one-size-fits-all migration strategy. The good news is that Microsoft gives you
several different options for moving virtual machines. Each of these options has
its advantages and disadvantages.
A Word About CPU Architecture
One of the most important things that you need to know
about VM migrations is that Hyper-V virtual machines try to use advanced CPU
features. As such, migrating a VM from one hardware platform to another can fail
if the CPUs are too different. For example, I once tried migrating a VM from a
server with a six-core CPU to a server with an eight-core CPU, only to find that
the migration failed due to differences in the CPU architecture.
Fortunately, there is a workaround to this problem. You can temporarily disable
Hyper-V’s use of advanced CPU features and then reenable support for advanced
CPU features once the migration is complete.
To toggle advanced CPU on and off, open the Hyper-V
Manager, right click on the VM that you want to migrate, and choose the Settings
command from the shortcut menu. When the Settings dialog box appears, navigate
through the console tree to Processor| Compatibility. As you can see in
Figure 1, there is a checkbox that
you can select when you need to migrate the VM to a server that is equipped with
a different processor version. Don’t forget to deselect this checkbox after the
migration is complete.
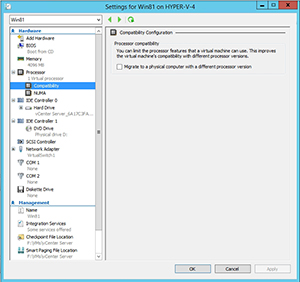 [Click on image for larger view.] Figure
1. You may need to enable processor compatibility prior to moving a VM.
[Click on image for larger view.] Figure
1. You may need to enable processor compatibility prior to moving a VM.
Networking Considerations
Migrating a Hyper-V virtual machine to a new host can
also be problematic if the new host uses a different virtual network
configuration. Remember, Hyper-V VMs connect to the network through a virtual
switch. Ideally, you should create a Hyper-V virtual switch on the new host
prior to migrating any Hyper-V VMs. This virtual switch should use exactly the
same name as the virtual switch that the VM is currently using. If such a
virtual switch does not exist on the new host then the VM will lose network
connectivity until you manually reassociate it with a new virtual switch.
Virtual Machine Migration Options
As previously mentioned, there are a number of different
ways to move a Hyper-V VM from one host to another. Here are some of the more
common migration methods.
Backup and
restore: One method involves using backup and restore. This method is
probably the most tedious of the commonly used migration methods, but the nice
thing about using the backup and restore method is that the original copy of the
VM is left intact. You could conceivably back up the VM, shut it down, and then
restore the backup on the new host. If anything goes
wrong, you can easily power up the original copy of the VM.
The biggest disadvantage to this method is that it
requires the VM to be taken offline during the migration process. As such, this
method might not be suitable for some virtual machines.
Live migration:
Another technique that you may be able to use is Hyper-V live migration. Live
migration moves a running virtual machine from one host to another. Live
migration is most often used to move virtual machines among hosts within a
cluster, but under the right circumstances you can live migrate a VM from one
cluster to another. However, doing so means removing the VM as a clustered
resource and then performing a shared nothing live migration. The VM must then
be defined as a clustered resource within the destination cluster.
Replication:
One last method that you can use involves using the Hyper-V replication feature.
In my experience, this method is often the least problematic. The basic idea is
to enable replication for a virtual machine and then replicate a VM to a
different cluster. When it comes time to perform the migration, you can shut
down the virtual machine and then perform a planned failover. Unfortunately,
this method does involve a little bit of down time, but the required down time
is usually minimal.
About the Author
Brien Posey is a 22-time Microsoft MVP with decades of IT experience. As a freelance writer, Posey has written thousands of articles and contributed to several dozen books on a wide variety of IT topics. Prior to going freelance, Posey was a CIO for a national chain of hospitals and health care facilities. He has also served as a network administrator for some of the country's largest insurance companies and for the Department of Defense at Fort Knox. In addition to his continued work in IT, Posey has spent the last several years actively training as a commercial scientist-astronaut candidate in preparation to fly on a mission to study polar mesospheric clouds from space. You can follow his spaceflight training on his Web site.