Posey's Tips & Tricks
How To Reclaim Your Privacy from Windows 10, Part 2
These are the top four privacy settings to check in your Windows device to make sure Microsoft doesn't collect any data you don't want it to.
In Part 1 of this series, I explained how exploring the Microsoft Privacy Dashboard is a great first step to reclaiming your online privacy. However, there are also some things you can do within the Windows operating system itself.
This is by no means a comprehensive list, but here are some of the steps I consider to be the most effective.
1. Turn Off Your Advertising ID
Most of the privacy-related configuration options in Windows 10 are accessible by going to Settings and clicking on Privacy. The privacy settings are divided across a series of tabs, with the General tab being displayed by default.
This tab, which you can see in Figure 1, gives you the option to disable your PC's advertising ID. It also lets you hide your language list and gives you the option to prevent Windows from tracking application launches or displaying suggested content within the Settings app.
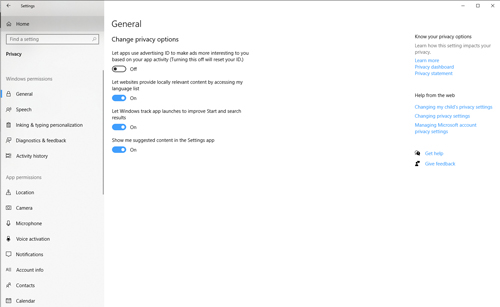 [Click on image for larger view.] Figure 1: The most important thing to do on the General tab is disable your advertising ID.
2. Turn Off Timeline
Once you have turned off the advertising ID, I recommend turning off Timeline. If you are not familiar with Windows Timeline, it's an activity tracker that lets you see exactly what you were doing on your PC at a previous point in time.
Timeline is designed to be a convenience feature because it makes it easy to go back to something you were working on earlier. At the same time, Timeline works by logging practically everything you do. Furthermore, the Timeline is often synchronized across devices, meaning what you do on one PC might be visible from another.
I recommend disabling Timeline unless you have a compelling reason to use it. I explained how to disable Timeline in an earlier column here.
3. Check Your Camera and Microphone
I also recommend taking a few minutes to look at the settings related to the camera and microphone. After all, we have all heard stories of rogue applications using devices they shouldn't.
Windows gives you granular control over which applications are allowed to use these devices. All you have to do is click on the Camera and Microphone tabs, respectively, and then choose which applications you want to allow to use these them, as shown in Figure 2.
 [Click on image for larger view.] Figure 2: Windows lets you control which applications are allowed to use the camera and microphone.
Even if you are not overly concerned about the camera or microphone being used to spy on you, it may still be worthwhile to look at their permissions. You might be surprised by which applications are allowed to use these devices by default.
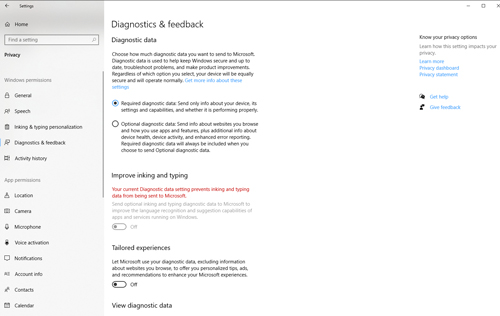
4. Check Your Diagnostics
Once you have examined the camera and microphone, I recommend turning your attention to diagnostic data. Microsoft collects diagnostic data from Windows PCs to keep them functioning properly. Unfortunately, you can't opt out of sending diagnostic data to Microsoft. You can, however, place some limits on the types of data Microsoft is able to collect from your PC. To do so, select the Settings app's Diagnostic and Feedback tab.
By default, Windows sends both required and optional diagnostic data to Microsoft. This optional diagnostic data includes information about the Web sites you visit, how you use your apps, which Windows features you use and more. You can limit the types of data that are sent to Microsoft by setting the Diagnostic Data option to Required Diagnostic Data, as shown in Figure 3.
 [Click on image for larger view.] Figure 3: You can make it so Windows only sends Microsoft the diagnostic data that is absolutely required.
You will notice in the figure above that there is yet another setting -- Tailored Experiences -- that, when enabled, gives Microsoft permission to use your data to send you targeted ads. It's a good idea to turn this setting off.
If you discover that your PC has been sending optional diagnostic data to Microsoft, there is a way to delete it. Scroll to the bottom of the screen and click the Delete button. As you can see in Figure 4, Microsoft not only allows you to delete the diagnostic data it has collected, you can also use the Diagnostic Data Viewer to see exactly what data has been collected.
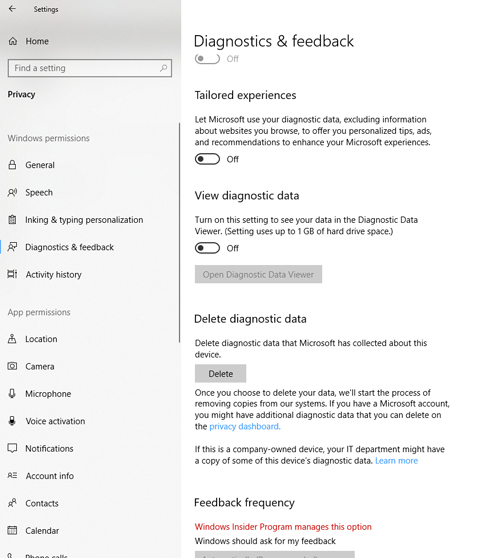 [Click on image for larger view.] Figure 4: Microsoft gives you the option to delete the diagnostic data it has collected.
As I said at the beginning, this is by no means an all-inclusive list of things that you can do to regain your privacy. Even so, the steps I mentioned above and in Part 1 will go a long way toward helping you keep your online activities a bit more private than they probably are right now.
About the Author
Brien Posey is a 22-time Microsoft MVP with decades of IT experience. As a freelance writer, Posey has written thousands of articles and contributed to several dozen books on a wide variety of IT topics. Prior to going freelance, Posey was a CIO for a national chain of hospitals and health care facilities. He has also served as a network administrator for some of the country's largest insurance companies and for the Department of Defense at Fort Knox. In addition to his continued work in IT, Posey has spent the last several years actively training as a commercial scientist-astronaut candidate in preparation to fly on a mission to study polar mesospheric clouds from space. You can follow his spaceflight training on his Web site.