Posey's Tips & Tricks
How To Create a Windows Deployment Image, Part 2
In the first installment in this series, I showed you how to install the software that is required for creating a custom Windows deployment image, as well as how to create a deployment share. Now it's time to add your Windows installation files to that deployment share.
To add the operating system files to the deployment share, expand the Deployment Shares container, followed by the container corresponding to the deployment share that you created. You should see a container called Operating Systems. Right-click on the Operating Systems container and choose the New Folder command from the shortcut menu. When prompted, enter a folder name that corresponds to the Windows installation that you will be adding. In my case, I will call the folder Windows 10 Enterprise X64.
Now, right-click on the folder that you just created and choose the Import Operating System command from the shortcut menu, as shown in Figure 1. When prompted, provide the path to the operating system files that you want to include in the deployment image.
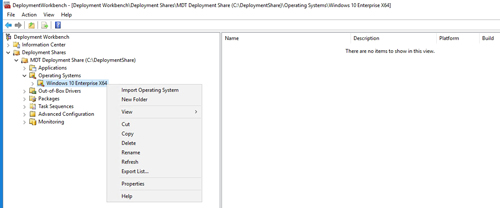 [Click on image for larger view.] Figure 1: Right-click on your operating system folder and select the Import Operating System command from the shortcut menu.
When the Import Operating System Wizard launches, choose the Full Set of Source Files option. From there, click Next and then provide a path to the folder containing your operating system files. You can complete the wizard by using the default values on the remaining screens. When the process completes, you should see the Windows operating system listed within the console, as shown in Figure 2.
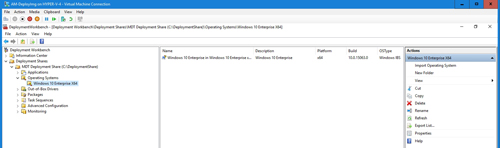 [Click on image for larger view.] Figure 2: The Windows operating system has been added to the deployment share.
In a real-world environment, the next step in the process would be to create folders for application binaries. This allows you to automatically install applications as a part of the custom Windows deployment. Once all of the binaries are in place, you can move on to the next step, which is creating a task sequence.
To create a task sequence, right-click on the Task Sequences folder and choose the New Folder option from the shortcut menu. For the purposes of this column, I am going to call this folder Windows 10. Once the folder has been created, right-click on it and choose the New Task Sequence command from the shortcut menu. This will start the New Task Sequence wizard.
The wizard's initial screen requires you to enter a task sequence ID and a task sequence name. You can use any values you want as long as they are unique.
Click Next, and you will be asked to choose the task sequence template that you want to use. Choose the Standard Client Task Sequence option and click Next.
Now you will be taken to the Select OS screen. Choose the operating system that you added to the deployment share earlier and click Next. You can complete the wizard by providing a product key (which is optional), the name of your organization and an administrative password.
When you finish creating the task sequence, you can modify the sequence to meet your own unique deployment needs. You can do so by right-clicking on the sequence and choosing the Properties command, as shown in Figure 3.
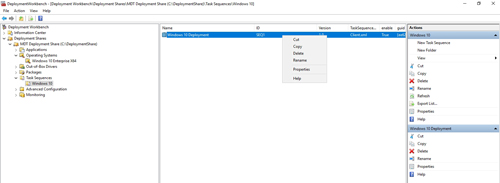 [Click on image for larger view.] Figure 3: Right-click on the task sequence and choose the Properties command.
You don't actually have to modify anything in the task sequence if you don't want to, but most organizations will make modifications so as to customize the way that Windows is installed. As you can see in Figure 4, for example, the dialog box's Task Sequences tab includes an option to install applications. There is a huge variety of customizations that you can make, and I would encourage you to spend some time exploring these options.
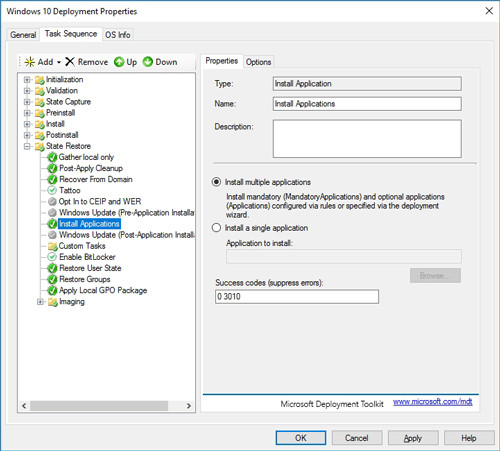 [Click on image for larger view.] Figure 4: You can automatically install applications as a part of the Windows deployment process.
Once you have finished making any modifications to the task sequence, the next step in the process is to create a reference image. To do so, right-click on the deployment share and select the Update Deployment Share option from the shortcut menu. You can see this option in Figure 5. Upon doing so, Windows will launch the Update Deployment Share Wizard. Be sure to choose the option to completely regenerate the boot images.
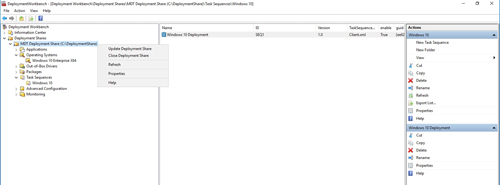 [Click on image for larger view.] Figure 5: Right-click on the deployment share and choose the Update Deployment Share option.
Once the rebuild process completes, your custom ISO will be available for use. You can find the ISO file in the C:\DeploymentShare\Boot folder. In my case, the ISO file is named LiteTouchPE_x64.iso, as shown in Figure 6. This is a bootable ISO file that you can use to install Windows.
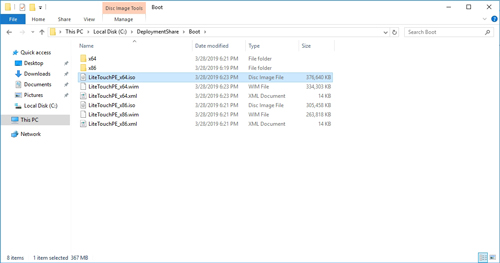 [Click on image for larger view.] Figure 6: We have generated a custom ISO file.
One thing that you will notice about the ISO file is that it is much smaller than a typical Windows 10 ISO file. The reason for this is that when you install Windows from the custom ISO file, the installer reaches out to the deployment share to download any required binaries.
About the Author
Brien Posey is a 22-time Microsoft MVP with decades of IT experience. As a freelance writer, Posey has written thousands of articles and contributed to several dozen books on a wide variety of IT topics. Prior to going freelance, Posey was a CIO for a national chain of hospitals and health care facilities. He has also served as a network administrator for some of the country's largest insurance companies and for the Department of Defense at Fort Knox. In addition to his continued work in IT, Posey has spent the last several years actively training as a commercial scientist-astronaut candidate in preparation to fly on a mission to study polar mesospheric clouds from space. You can follow his spaceflight training on his Web site.