Posey's Tips & Tricks
How To Enable Guest Access for Office 365
While it's possible to give outside users access to certain content in your organization's Office 365 environment, the process of setting them up requires a few extra steps.
Office 365 provides a guest access feature that you can use to grant content access to contractors, partners or others who need access to certain content.
However, the process of setting up a guest user works differently from that of setting up a normal, licensed user from within your organization.
If you look at Figure 1, you can see that the Microsoft 365 Admin Center contains a Guest Users screen. You will also notice, however, that this screen does not contain an option to create a guest user. In fact, the only things that you can do are search for a user or delete a user.
 [Click on image for larger view.] Figure 1: The Guest Users screen does not provide an option for creating guest users.
Being that the Guest Users screen doesn't give you a way to create a guest user, you will need to either delve into PowerShell or perform the task within Azure Active Directory. I have always been a big fan of PowerShell, but unless you need to create a large number of guest users, it is usually going to be easier to use the GUI. So let's take a look at how this works.
To create a guest user, expand the Admin Centers container and then click on Azure Active Directory. When the Azure Active Directory Admin Center opens, click on the Users container. If you look at Figure 2, you can see that just to the right of the New User option, there is an option to create a new guest user.
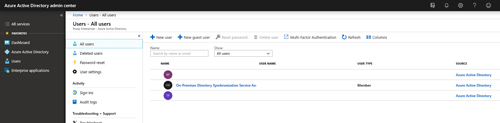 [Click on image for larger view.] Figure 2: Click on New Guest User.
Creating a guest user account isn't like creating a normal user account. Rather than providing the account details and clicking a Create button, you will instead need to send an invitation to the user. You can do this by entering the guest user's e-mail address and an invitation message, and then clicking the Invite button. You can see what this looks like in Figure 3.
 [Click on image for larger view.] Figure 3: Setting up a guest user account involves sending the user an invitation.
After a few minutes, the specified user will receive an e-mail invitation that looks something like the one shown in Figure 4. The recipient will need to click the Get Started button and accept the terms of use.
 [Click on image for larger view.] Figure 4: This is what the e-mail invitation looks like.
When the guest user completes the registration process, they are logged into Office 365. As you can see in Figure 5, however, there are no applications initially available to the user. This is because unlike a standard user, external users do not automatically get access to applications.
 [Click on image for larger view.] Figure 5: The guest user will not initially have access to anything.
If you go back to the Guest Users screen, you will see the newly created guest user listed (you may have to refresh the screen). As previously noted, you can't do much from this screen. You can, however, click on the user to see a few extra details, as shown in Figure 6.
 [Click on image for larger view.] Figure 6: The user is listed on the Guest Users screen.
The way that you grant an external user access to data is to add the user to a group that has access to the data. Let's suppose, for example, that for whatever reason, I need to add an external user to a Planner plan named January 2019. To do so, I would go to the Groups folder within the Microsoft 365 Admin Center, click on the January 2019 group, and then edit the Membership list, as shown in Figure 7.
 [Click on image for larger view.] Figure 7: I am modifying the group membership for the January 2019 plan.
After clicking the Edit button, click on Add Members and then select the external user that you wish to add. Click Save to complete the process,
If I now go back to the guest user's session, refresh the display and then click on Groups, I am able to see the January 2019 group, as shown in Figure 8.
 [Click on image for larger view.] Figure 8: The January 2018 group is now displayed.
Granting access in this way does not provide the external user with blanket access to the Planner app. However, another group member is now able to e-mail the external user a link to the January 2019 plan. The external user can use this link to access the plan within the Planner app.
Keep in mind that I am only using the Planner app as an example. You can use somewhat similar techniques to provide access to a variety of Office 365 content.
About the Author
Brien Posey is a 22-time Microsoft MVP with decades of IT experience. As a freelance writer, Posey has written thousands of articles and contributed to several dozen books on a wide variety of IT topics. Prior to going freelance, Posey was a CIO for a national chain of hospitals and health care facilities. He has also served as a network administrator for some of the country's largest insurance companies and for the Department of Defense at Fort Knox. In addition to his continued work in IT, Posey has spent the last several years actively training as a commercial scientist-astronaut candidate in preparation to fly on a mission to study polar mesospheric clouds from space. You can follow his spaceflight training on his Web site.