Posey's Tips & Tricks
Making the New Copilot Key More Useful
Here's how to unlock more options for Microsoft's latest keyboard addition.
I recently wrote a blog post in which I explained that Microsoft is going to be adding a new Copilot key to PC keyboards, and why I believe that this announcement is far more significant than it might at first seem. Since writing that particular post, I managed to get my hands on one of the new Surface Laptop 6 for Business devices, which to the best of my knowledge is the first PC to be released with the Copilot key (though the new Surface Pro device also has the Copilot key, if you opt for the Type Cover).
For those who might be curious, the new Copilot key contains the Copilot logo and sits just to the right of the Alt key and to the left of the cursor keys. In order to make space on the keyboard for the Copilot key, Microsoft piggybacked the Copilot key onto the key that opens shortcut menus. For the sake of comparison, you can see the keyboard on a Surface Laptop Studio 2 device in Figure 1 and the Surface Laptop 6 keyboard in Figure 2.
 [Click on image for larger view.] Figure 1. This is the keyboard on a Surface Laptop Studio 2 device.
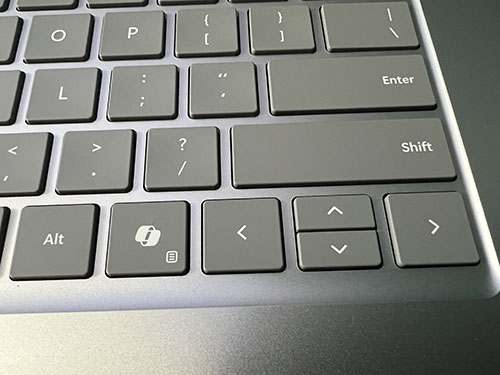 [Click on image for larger view.] Figure 2. This is the keyboard on a Surface Laptop 6 device.
So what does the Copilot key actually do? To find out, I booted my Surface Laptop 6 device using a default configuration. I did not modify any of the settings, nor did I install any software aside from a screen capture tool that I needed in order to document the process. When I pressed the Copilot key the computer launched Windows 11 Copilot, as shown in Figure 3.
 [Click on image for larger view.] Figure 3. This is what happened when I pressed the Copilot key for the first time.
As I created the screen capture shown above, I found another difference between the Surface Laptop Studio 2 keyboard and the Surface Laptop 6 keyboard. The Surface Laptop 6 keyboard initially appeared to be missing the Print Screen key, which is something that I use all the time. Upon closer inspection however, I discovered that Microsoft had simply replaced the button's text with an icon. Hence, you can still access the Print Screen function from the F8 key, as with other Surface devices.
The next thing that I was curious about was whether the Copilot key could be remapped to work with Microsoft 365 Copilot -- or if I even needed to remap the key. As such, I installed Microsoft 365 onto the device, opened Microsoft Word, and pressed the Copilot key. As before, Windows opened the Windows 11 Copilot, not the Microsoft 365 Copilot.
Although the Copilot key does exactly what it is designed to do, I wanted to change its behavior. I use Microsoft 365 Copilot on a regular basis, but I almost never use Windows 11 Copilot. Thankfully, there is a way to change the Copilot key's behavior.
Microsoft has long provided a set of free tools that are collectively known as the PowerToys. One of the utilities that is included within the PowerToys is the Keyboard Mapper. The Keyboard Mapper allows you to control what the individual keys on the keyboard do.
To remap the Copilot key so that it works with Microsoft 365 Copilot, install the Microsoft PowerToys, open the PowerToys and then select the Keyboard Manager tab. Set the Enable Keyboard Manager switch to On, as shown in Figure 4, and then click the Remap a Shortcuts option.
 [Click on image for larger view.] Figure 4. Enable the Keyboard Manager and click on the Remap Shortcuts option.
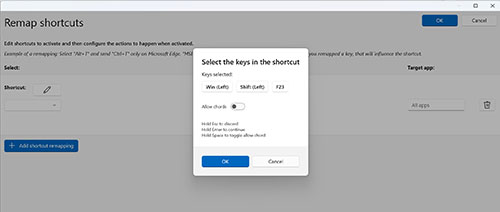
When the Remap Shortcuts screen appears, click on the pencil icon. When you do, The Keyboard Manager will prompt you for the shortcut that you want to remap. Press the Copilot key and Windows will display a shortcut of Win (Left) Shift (Left) F23. You can see what this looks like in Figure 5.
 [Click on image for larger view.] Figure 5. Press the Copilot key and then click OK.
Click OK and then click on the pencil icon found in the Action section. When prompted to select the keys in the shortcut, press Alt+I, as shown in Figure 6, and then click OK.
 [Click on image for larger view.] Figure 6. Press Alt+I and click OK.
Click OK one more time and then open one of the Microsoft Office apps (such as Word, Excel or PowerPoint). Now, when you press the Copilot key, Windows will launch Microsoft 365 Copilot within the Office application, as shown in Figure 7.
 [Click on image for larger view.] Figure 7. This is what now happens when I press the Copilot key.
About the Author
Brien Posey is a 22-time Microsoft MVP with decades of IT experience. As a freelance writer, Posey has written thousands of articles and contributed to several dozen books on a wide variety of IT topics. Prior to going freelance, Posey was a CIO for a national chain of hospitals and health care facilities. He has also served as a network administrator for some of the country's largest insurance companies and for the Department of Defense at Fort Knox. In addition to his continued work in IT, Posey has spent the last several years actively training as a commercial scientist-astronaut candidate in preparation to fly on a mission to study polar mesospheric clouds from space. You can follow his spaceflight training on his Web site.