Posey's Tips & Tricks
Using Office 365 To Get a Handle on Spam
While Office 365 does a good job at blocking most incoming spam e-mails, improvements can be made by users to increase its efficiency.
One thing that has long impressed me about Office 365 is how well its spam filtering seems to work. Like you, I get lots of spam every day. Office 365 manages to move most of this spam to my Junk Mail folder, but on most days there is a little bit of spam that makes it through the filter. Fortunately, Office 365 contains tools that you can use to tune its spam filtering capabilities.
I recommend getting started by going into the Office 365 Security and Compliance Center, expanding the Reports container and clicking on the Dashboard. The dashboard displays a number of different charts, including a Spam Detection chart, which you can see in Figure 1.
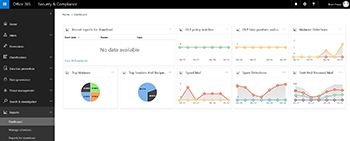 [Click on image for larger view.] Figure 1. The Reports Dashboard contains a Spam Detections chart.
Although it is difficult to show in a screen capture, one of the really great things about this chart is that it is interactive. Hovering your mouse over the chart causes a floating window to be displayed that provides a spam filtering summary. This summary information is based on a specific period of time. For example, if you hover the mouse pointer over last Friday's date, then you will see the total number of spams received last Friday, as well as the methods that were used to identify those messages as spam. You can see for instance, the number of messages that were filtered based on content and the number of messages filtered by IP address, among other things.
If you click on the Spam Detections chart, you will be taken into the Spam Detections Report. This report not only shows you how many spams were identified as such by the various filtering methods, it even lets you see a summary of the messages that were identified as spam. You can see an example of this in Figure 2.
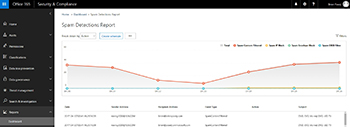 [Click on image for larger view.] Figure 2. You can see more detail about recent spam filtering.
The reason why this report is so beneficial is that it allows you to gauge the effectiveness of your spam filtering efforts. By using this report, and the contents of your Inbox, you can get a feel for the types of messages that are and are not being identified as spam. You can also see which filtering mechanisms are doing the most to control spam.
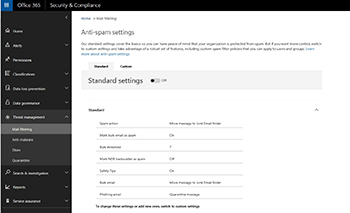
With this information in hand, expand the Security and Compliance Center's Threat Management container, and then click on the Mail Filtering tab. This is where you can go to configure the antispam settings for Office 365.
As you can see in Figure 3, Office 365 includes some standard anti-spam settings. These settings do things like set the spam confidence threshold level, and control whether bulk e-mail is treated as spam. As you will notice in the figure however, the standard settings are set to Off. The reason for this, is that spam control can be made to be much more effective through the use of custom settings.
 [Click on image for larger view.] Figure 3. Office 365 uses a collection of standard settings to control spam.
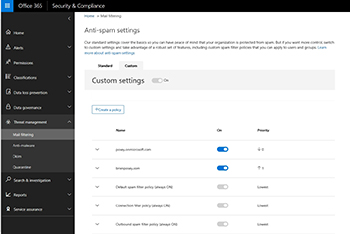
The custom settings are based around the use of policies. Office 365 allows you to create multiple anti-spam policies, and then arrange those policies in a hierarchical manner, so as to control the policy priority. Higher priority policies are processed first. You can see the Custom Settings screen in Figure 4.
 [Click on image for larger view.] Figure 4. The Custom Settings screen lets you combine multiple anti-spam policies.
Spam filter policies can be designed to filter spam in a variety of different ways. You can configure the use of allow lists, block lists, and of course you can make decisions based on the message contents. You can see some of the options that Office 365 makes available to you in Figure 5. Keep in mind that this screen capture only shows some of the available filtering criteria.
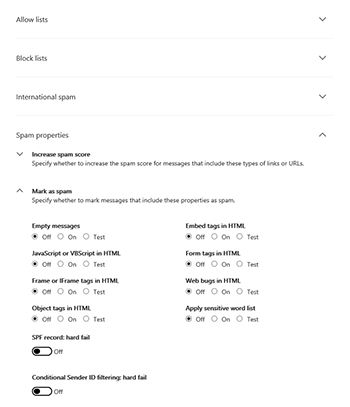 [Click on image for larger view.] Figure 5. You can filter spam based on a number of different criteria.
As you look through the available filtering options, you should consider the types of messages that are already being flagged as spam, and focus on those messages that are making it through the spam filter. By focusing your efforts around the actual messages that the organization is receiving, you should be able to greatly reduce the amount of spam that you receive. Best of all, you can use the Spam Detections chart to track your progress.
About the Author
Brien Posey is a 22-time Microsoft MVP with decades of IT experience. As a freelance writer, Posey has written thousands of articles and contributed to several dozen books on a wide variety of IT topics. Prior to going freelance, Posey was a CIO for a national chain of hospitals and health care facilities. He has also served as a network administrator for some of the country's largest insurance companies and for the Department of Defense at Fort Knox. In addition to his continued work in IT, Posey has spent the last several years actively training as a commercial scientist-astronaut candidate in preparation to fly on a mission to study polar mesospheric clouds from space. You can follow his spaceflight training on his Web site.