In-Depth
Syncing Azure Active Directory with Windows Server Domains
Brien walks through the steps necessary for authenticating users on-premises and in the cloud with Microsoft's Windows Azure Active Directory.
As companies move more and more applications and services to the cloud, it becomes increasingly important to authenticate users in a way that allows their identities to be recognized both on-premises and in the cloud. Historically global identity management has been a tall order, but the new Microsoft Windows Azure Active Directory (WAAD) can make the process a lot easier.
WAAD is a service Microsoft made generally available in April that provides cloud-based identity management (see "Cloud Identity," July 2013). It's essentially a cloud-based version of Active Directory. WAAD can function as a standalone directory, or you can synchronize an existing on-premises Active Directory with WAAD. Doing so makes it possible to establish user identities that are valid on-premises or in the cloud.
Initial Setup
Before you can begin using WAAD, you'll have to do a little bit of planning and some setup work. There are several different ways that WAAD can be configured. For the purposes of this article, I'll configure a synchronization link between an on-premises Active Directory forest and WAAD. In the real world, you might also choose to implement single sign-on (SSO), which provides automated authentication to all applications tied to Active Directory. If you decide to use SSO, it should be planned for prior to establishing directory synchronization.
You'll need a server that can facilitate the directory-synchronization process. The directory- synchronization server must reside on-premises and must be running a 64-bit edition of either Windows Server 2008 R2 SP1 or Windows Server 2012. Additionally, this server must run the Microsoft .NET Framework 3.5 SP1 or 4. The server must also have Windows PowerShell installed, and it must be joined to an Active Directory domain. Finally, your directory-synchronization server can't be a domain controller.
It's also worth noting that your on-premises Active Directory domain must be running a forest functional level of Windows Server 2003 or higher.
The directory-synchronization technique I'll demonstrate assumes your Active Directory database contains fewer than 50,000 objects. Microsoft does support directory synchronizations in environments with more than 50,000 objects, but the requirements change considerably and an instance of a SQL Server database is required. Furthermore, if your Active Directory contains 50,000 objects or more, then you must contact Microsoft to increase your license count. Otherwise, the synchronization process will fail.
Assuming that your Active Directory contains fewer than 50,000 objects, your directory-synchronization server will need at least 4GB of RAM, 70GB or more of free hard disk space, and a CPU running at least 1.6GHz.
Synchronization Setup
The first step in establishing directory synchronization between your on-premises Active Directory and WAAD is to create a new WAAD instance. Doing so is simple. Just log in to the Windows Azure portal and click on the Active Directory tab. If a Default Directory exists then you can use it. Otherwise, click the "Create your directory" link and follow the prompts.
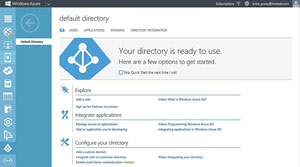
If you look at Figure 1, you'll notice an arrow icon in the column next to the Default Directory. Clicking on this icon takes you to a screen that you can use to configure the Default Directory. The "Configure your directory" section contains an option to integrate with an on-premises directory. Click this option.
 [Click on image for larger view.]
Figure 1. Choose the option to integrate with an on-premises directory.
[Click on image for larger view.]
Figure 1. Choose the option to integrate with an on-premises directory.
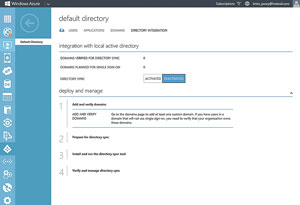
At this point, you'll see the screen in Figure 2, which explains the four steps involved in establishing directory synchronization.
 [Click on image for larger view.]
Figure 2. There are four main steps to directory synchronization.
[Click on image for larger view.]
Figure 2. There are four main steps to directory synchronization.
Add and Verify a Domain
The first step in the process is to add and verify a domain. The most important thing you need to know about this process is that you must own the domain name you'll be synchronizing. In fact, Microsoft even makes you verify domain ownership.
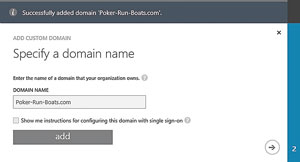
You can add your domain to Windows Azure by clicking on the Domains tab, then clicking on the Add a Custom Domain link. Enter your domain name and click Add. To demonstrate this, I added the domain Poker-Run-Boats.com (Figure 3). Notice the arrow icon in the lower-right corner of the window. You must click this icon after adding a domain.
 [Click on image for larger view.]
Figure 3. You must add your domain to Windows Azure.
[Click on image for larger view.]
Figure 3. You must add your domain to Windows Azure.
Doing so takes you to a screen that asks you to verify domain ownership. This process involves adding a record to your domain's DNS server. After adding the record, click the Verify button. The domain probably won't verify right away. It takes time for changes to DNS records to take effect.
Prepare for Directory Synchronization
Once you've added and verified your domain, the next step is to prepare for the directory synchronization. Microsoft recommends you install and run the Microsoft Deployment Readiness Tool (the tool is available at bit.ly/14joIkw, and requires an Office 365 user ID to sign in for access). In order to do that, you'll need to download and install a few prerequisite components on your directory-synchronization server. The components you'll need are:
Once you've installed the prerequisite components, you can run the Microsoft Deployment Readiness Tool. The tool is designed for Office 365 deployments, but also works for Windows Azure.
Activating Directory Synchronization
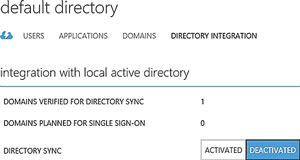
After you've verified the health of your Active Directory, you'll need to activate directory synchronization on the Windows Azure side, by selecting the Activated option (Figure 4).
 [Click on image for larger view.]
Figure 4. You must set the Directory Sync option to Activated.
[Click on image for larger view.]
Figure 4. You must set the Directory Sync option to Activated.
Earlier I noted the need for an on-premises directory synchronization server. So far that server is really nothing more than a domain member server, but now it's time to change that by installing the WAAD Directory Sync tool.
Before initiating that process, it's important to know you must have local rights to the server when installing the directory-synchronization tool. (You can download the WAAD Directory Sync tool.
When the download completes, launch the wizard and then click Next to bypass the wizard's Welcome screen. At this point, you'll see a screen asking you to accept the license agreement for the tool. Choose the I Accept option and click Next. Verify the installation path and click Next once more. The WAAD Sync Setup tool will now be installed. Although the installation process might appear not to be doing anything, it really is. The tool usually takes 10 to 15 minutes to install.
What Went Wrong?
Although the WAAD Sync Setup Wizard is relatively simple, the installation process failed the first couple of times that I tried it. After some digging, I found two issues that resulted in failure.
The first issue was my server clocks were set incorrectly. Just prior to writing this article I had deployed a new Hyper-V host server in my lab. I hurried through the setup process because I needed to get the server online quickly. In my haste, I accidentally set the clocks to AM instead of PM. It was a simple mistake, but Active Directory is time-sensitive due to its reliance on Kerberos.
Fixing the clocks didn't correct the problem. I continued with my troubleshooting efforts by checking the server's application log. An error indicated my account was not a member of the Synchronization Engine FIMSyncAdmins group. I was able to correct this problem by uninstalling the WAAD Directory Sync tool via the Control Panel. After doing so, I rebooted the server (which caused the permissions to be applied), and then reattempted the installation. This time the installation was successful.
Configuration Process
Although the WAAD Sync Setup Wizard is designed to install the WAAD Directory Sync tool, it's also designed to help you configure the synchronization process. Begin the process by clicking the wizard's Next button when installation completes.
At this point, you'll see a message indicating that although installation has completed, synchronization must be configured. Make sure the "Start Configuration Wizard now" check box is selected, and click Finish.
Windows will now launch the WAAD Sync Tool Configuration Wizard. Click Next to bypass the wizard's Welcome screen. You'll be prompted to enter the credentials for Windows Azure. After doing so, click Next.
The next thing the wizard will ask you for is the credentials for your on-premises Active Directory. Enter those credentials and click Next.
The following screen is only of relevance to those of you who have Exchange Server installed. If Exchange is installed, you can select the Enable Exchange Hybrid Deployment checkbox, which will allow you to build a hybrid Exchange Server deployment. If you don't have Exchange Server then you don't have to worry about this prompt. Just click Next.
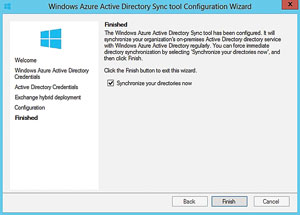
The configuration process is now complete. When the process finishes, click Next. Verify that the "Synchronize your directories now" checkbox is selected on the wizard's final screen (see Figure 5), and click Finish.
 [Click on image for larger view.]
Figure 5. Make sure the "Synchronize your directories now" check box is selected.
[Click on image for larger view.]
Figure 5. Make sure the "Synchronize your directories now" check box is selected.
Finally, you should verify that the directory synchronization was successful. To do so, log into Windows Azure and click on the Directories tab. Then click the arrow icon located next to the listing for your directory. Select the Users tab at the top of the following screen. You should see a listing for the synchronized user accounts.
As you can see, there's nothing overly complicated about setting up directory synchronization between an on-premises Active Directory and Windows Azure. Even so, Microsoft recommends that you not take this process lightly. Establishing directory synchronization should be considered a semi-permanent operation. Furthermore, if you're planning to use SSO, you should plan for that before establishing directory synchronization.
About the Author
Brien Posey is a 22-time Microsoft MVP with decades of IT experience. As a freelance writer, Posey has written thousands of articles and contributed to several dozen books on a wide variety of IT topics. Prior to going freelance, Posey was a CIO for a national chain of hospitals and health care facilities. He has also served as a network administrator for some of the country's largest insurance companies and for the Department of Defense at Fort Knox. In addition to his continued work in IT, Posey has spent the last several years actively training as a commercial scientist-astronaut candidate in preparation to fly on a mission to study polar mesospheric clouds from space. You can follow his spaceflight training on his Web site.