Posey's Tips & Tricks
Backing Up a Windows 11 PC
While third-party tools are usually the way to go, let's take a look how to back up your Windows system using the baked in resources.
As IT pros, there is a natural tendency for us to focus on enterprise backups. However, desktop backups also have their place. Even if the Windows machines that your users work on don't contain any data that needs to be protected, we all have our own personal devices, which often times contain pictures, videos, documents and other types of data that we don’t want to lose. Thankfully, it’s relatively easy to back up a Windows 11 PC.
When it comes to backing up a Windows 11 PC, I strongly recommend using a third-party backup solution. Third-party backup products usually offer better capabilities than those that are natively integrated into Windows. Additionally, many of the enterprise backup vendors offer a free “community edition” of their products, intended for rsonal use. For the purpose of this post however, I want to show you how to back up Windows 11 using only the native tools that are baked into the operating system. You probably won’t want to use the native tools as a permanent backup solution, but they will work in a pinch.
To get started, right click on the Start button and choose the Run option from the shortcut menu. Now, enter the Control command at the Run prompt. This will cause Windows to open the legacy Control Panel.
When the Control Panel opens, click on System and Security, and then click on File History. This will take you to a screen that shows you whether or not the File History feature is turned on. You can see what this looks like in Figure 1.
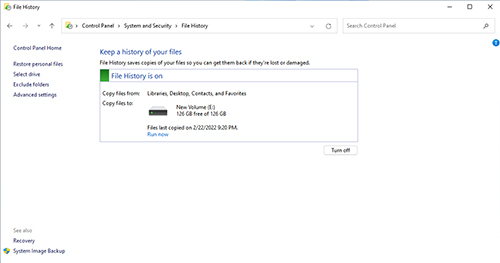 [Click on image for larger view.] Figure 1. The File History feature is currently enabled on my PC.
For those who might not be familiar with File History, it's a native Windows feature that automatically retains previous versions of a file. It is similar to a backup tool in that it will allow you to perform a point in time recovery of a file (assuming that the file resides in a protected location). Unlike a true backup however, file history can’t be used to recover the system following a disk failure. Not only does File History not back up the full system, the File History backups are usually stored on the same disk as the data. As such, if the disk fails then you will lose the live data, plus any file history that may exist. Fortunately, File History is not your only option for backing up Windows 11.
If you look back at the previous screen capture, you will notice that there is a System Image Backup link located in the lower, left corner of the screen. Go ahead and click this link.
At this point, Windows will open the Backup and Restore window. As you can see in Figure 2, Backup and Restore is a leftover from the days of Windows 7. This is one of the reasons why I recommend using a third-party backup application if possible.
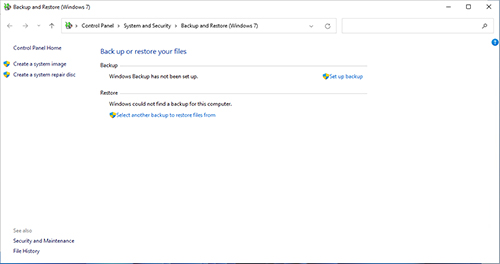 [Click on image for larger view.] Figure 2. Backup and Restore is a Windows 7 leftover.
Now, click on the Set Up Backup link. Windows will take a moment to analyze your system and will then ask you where you want to save your backup. By default, Windows Backup will look for a hard disk to use as a backup target (you should use an external disk and Windows will not allow you to use the C: disk as a backup target). However, you also have the option of writing backups to a network share, as shown in Figure 3.
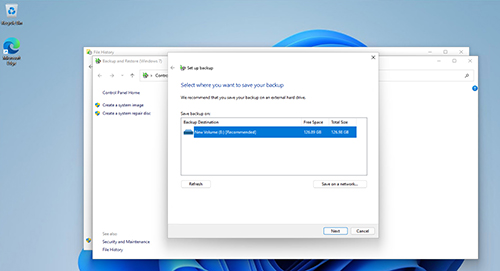 [Click on image for larger view.] Figure 3. Choose where you want to back up your files.
Click Next and you will see a screen asking you to what you want to backup. You can let Windows choose what gets backed up, or you can choose yourself. I recommend manually choosing the locations to backup. Otherwise, Windows will only back up the libraries, desktop, and default folders.
Once you have decided what to back up, click Next and you will be taken to a screen that allows you to review your settings. One thing that is worth paying attention to on this screen is the backup schedule option. By default, Windows will create a backup on Sunday nights at 7:00 PM. That schedule might not be frequent enough to protect newly created data. Likewise, you have to consider if your system will even be powered on at that time. As a best practice, I recommend clicking the Change Schedule link and setting up a backup schedule that fully addresses your needs rather than accepting the default schedule. When you are done, click the Save Settings and Run Backup button to create your first backup.
About the Author
Brien Posey is a 22-time Microsoft MVP with decades of IT experience. As a freelance writer, Posey has written thousands of articles and contributed to several dozen books on a wide variety of IT topics. Prior to going freelance, Posey was a CIO for a national chain of hospitals and health care facilities. He has also served as a network administrator for some of the country's largest insurance companies and for the Department of Defense at Fort Knox. In addition to his continued work in IT, Posey has spent the last several years actively training as a commercial scientist-astronaut candidate in preparation to fly on a mission to study polar mesospheric clouds from space. You can follow his spaceflight training on his Web site.