Posey's Tips & Tricks
5 Steps To Fix Windows Indexing Problems
The Windows indexing feature doesn't always deliver the correct results of a file search. Here are five troubleshooting steps you can take whenever Windows indexing acts up.
Without a doubt, one of the Windows features that I use most often is indexing. It seems that I am constantly looking for various files, and I count on indexing to help me find what I am looking for.
Every once in a while, though, the indexing feature just doesn't deliver the expected results when you search for a file. Fortunately, there are several things you can do to make sure that you are getting the results that you need.
#1: Check Network Location Is Being Indexed
If you are having trouble locating data on a network drive, first make sure that the network location is being indexed. To do so, open File Explorer (in Windows 10), right-click on the mapped network drive that you need to index, then select the Properties command from the resulting shortcut menu.
When you do, Windows will display the mapped drive's properties sheet. Make sure that the Allow Files on this Drive to Have Contents Indexed checkbox is selected. You can find this checkbox on the General tab, as shown in Figure 1.
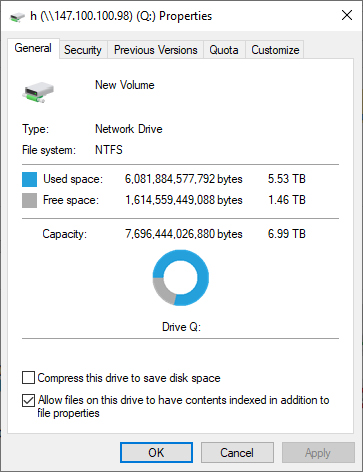 Figure 1: Make sure that the mapped network drive is being indexed.
#2: Check Search Options for Network Drive
Assuming that the mapped network drive is being indexed and Windows has had sufficient time to complete the indexing process, the next step is to check the search options for the network drive. To do so, double-click on the mapped network drive in File Explorer. Next, select File Explorer's View tab, then click on the Options icon and choose the Change Folder and Search Options menu option, shown in Figure 2.
 [Click on image for larger view.] Figure 2: Click on Options and select Change Folder and Search options.
At this point, Windows will open the Folder Options dialog box. Select the Search tab, and you will see several checkboxes related to the search process, as shown in Figure 3.
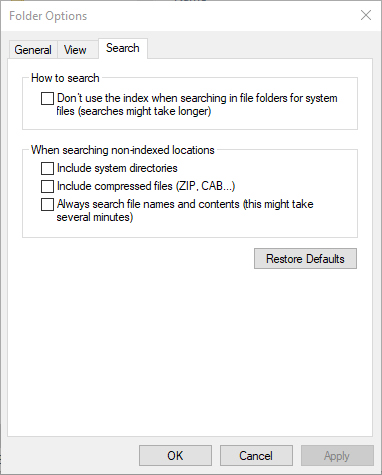 Figure 3: The Search tab includes checkboxes that you can use to customize the search behavior.
As you can see in the figure above, the first checkbox actually disables indexing, so this checkbox should not be selected. The next three checkboxes control what is indexed. You can choose to include system directories (system folders), compressed archives (such as .ZIP files) and file contents.
#3: Check Server-Side Indexing
It is worth noting that the settings that I just described pertain to client-side indexing. Windows Server can also perform its own indexing at the server side. When server-side indexing is enabled for a data volume, then Windows 10 clients should be able to search the share's contents through a mapped network drive, regardless of whether or not the client itself has indexed the server's contents.
If you want to check the server-side indexing, simply log onto the server's desktop, right-click on the volume that you want to check and choose the Properties command from the shortcut menu. When you do, Windows will display the volume's properties sheet. As you can see in Figure 4, the properties sheet's General tab contains a checkbox that you can select to have the files indexed.
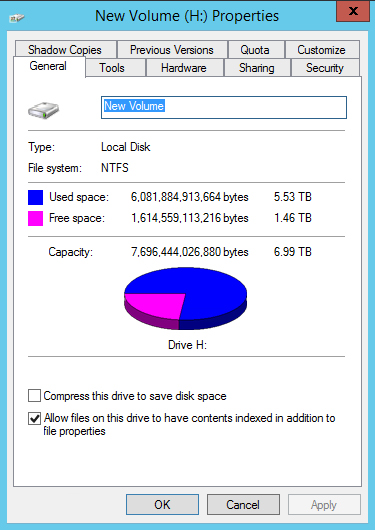 Figure 4: File indexing can be enabled at the server side.
#4: Check Windows Search Status
Whether indexing is being performed at the server level or the client level, the Windows Search service needs to be running in order for the index to function. You can check the Windows Search service's status by opening the Service Control Manager by entering Services.msc at the Run prompt. The Windows Search service should display a status of Running, as shown in Figure 5.
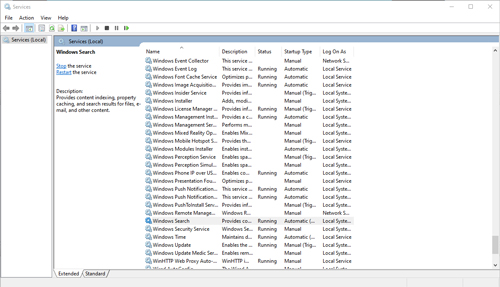 [Click on image for larger view.] Figure 5: The Windows Search service should be running.
#5: Check Settings
If you have tried all of the above but indexing still isn't working properly, there is one more thing that you can do. Go to Settings on the Windows 10 desktop, then click on Search, followed by Searching Windows. As you can see in Figure 6 below, this screen shows you how many items have been indexed and what indexing model is being used. It's also a good idea to make sure that no important folders (such as Documents) have been excluded.
 [Click on image for larger view.] Figure 6: You can control several index related options through Settings.
If you scroll to the bottom of the screen shown in Figure 6, there's a link that you can click to run the indexing troubleshooter. The troubleshooter can automatically resolve many indexing-related problems.
About the Author
Brien Posey is a 22-time Microsoft MVP with decades of IT experience. As a freelance writer, Posey has written thousands of articles and contributed to several dozen books on a wide variety of IT topics. Prior to going freelance, Posey was a CIO for a national chain of hospitals and health care facilities. He has also served as a network administrator for some of the country's largest insurance companies and for the Department of Defense at Fort Knox. In addition to his continued work in IT, Posey has spent the last several years actively training as a commercial scientist-astronaut candidate in preparation to fly on a mission to study polar mesospheric clouds from space. You can follow his spaceflight training on his Web site.