Posey's Tips & Tricks
Nested Virtualization in Windows 10 Hyper-V
To test the Windows 10X emulator, Brien needed to figure out how to configure Hyper-V to run on a Windows 10 virtual machine. Here's how he made it work.
Windows Server has long included support for nested virtualization through Hyper-V. Although I have used nested Hyper-V several times, I've never considered whether it is possible to do nested virtualization in Windows 10 Hyper-V. I guess I never really had a good use case for it.
That changed earlier this month, however, when Microsoft released its emulator for the Windows 10X operating system. If you aren't familiar with Windows 10X, it's a new version of Windows 10 that will eventually be released for use on multiscreen Surface devices -- specifically, the Surface Neo and Surface Duo. I talk more about my first impressions of the Windows 10X emulator in this column. For now, though, I'll discuss how I prepared my system for Windows 10X using nested virtualization.
Although the Windows 10X emulator depends on Hyper-V, it requires Windows Insider Preview build 10.0.19555 or later. Even though I wanted to experiment with Windows 10X, I did not want to run the risk of installing a preview build onto one of my production machines, and I didn't have any spare hardware. Normally, I would just install Windows to a virtual machine (VM), but the requirement for Hyper-V complicated things a bit.
My only option in this case was to see if I could make nested Hyper-V work with Windows 10. Actually, that's not quite true -- there is an additional twist.
Whenever I have run nested Hyper-V on Windows Server, I have ended up with Windows Server running inside of Windows Server, inside of Windows Server. In other words, the parent Windows Server operating system is running Hyper-V. A Hyper-V VM is also running Windows Server and has nested virtualization enabled, allowing me to run Hyper-V inside of that VM. The VMs that I have run on my virtualized Hyper-V server have also historically run Windows Server.
Because I don't have any spare hardware at the moment, I needed to make nested virtualization work across differing OSes. My parent OS in this case is Windows Server, but I needed to configure Hyper-V to run on a Windows 10 VM. Going in, I wasn't even sure that this configuration would work.
Nested virtualization was first introduced in Windows Server 2016 and in the Windows 10 Anniversary Update. As such, you need to be running Windows Server 2016 or higher and the Windows 10 Anniversary Update or higher. The parent OS that I am using for the examples in this column is Windows Server 2019. It's also worth noting that nested virtualization is only supported on Intel processors. The server that I am using is equipped with two Intel Xeon processors.
The first step in the process is to create the Hyper-V VM that will act as a Windows 10 host. Upon doing so, shut the VM down, then check the VM version. The VM must be Hyper-V Configuration Version 8.0 or higher. You can find the configuration version number in the Hyper-V Manager. As an alternative, you can use PowerShell, as shown in Figure 1. If the configuration version is too low, then you can fix the problem by using the Update-VMVersion cmdlet followed by the VM name.
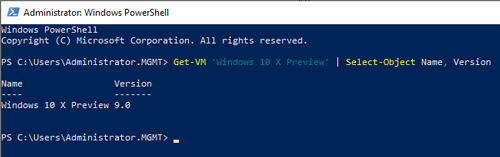 [Click on image for larger view.] Figure 1: This is how you check the VM version number.
Now, with the VM still powered off, you will need to use the Set-VMProcessor cmdlet to enable nested virtualization for the VM. The required parameters include VMName and ExposeVirtualizationExtensions (which must be set to $True). Figure 2 shows how this cmdlet works.
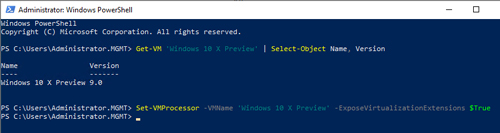 [Click on image for larger view.] Figure 2: This is how you enabled nested virtualization for a VM.
At this point, you should boot the Windows 10 VM and log into it. Next, open the Windows 10 Control Panel and click on Programs, followed by Turn Windows Features On or Off. Now, select Hyper-V from the list of Windows 10 features, as shown in Figure 3, and click OK. Windows 10 will now install Hyper-V and prompt you to reboot the VM.
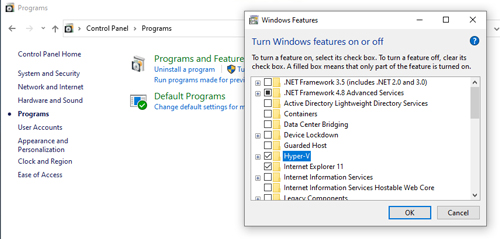 [Click on image for larger view.] Figure 3: Select the Hyper-V option and click OK.
Once Windows 10 reboots, you should be able to access the Hyper-V Manager and create VMs inside of the Windows 10 VM, as shown in Figure 4.
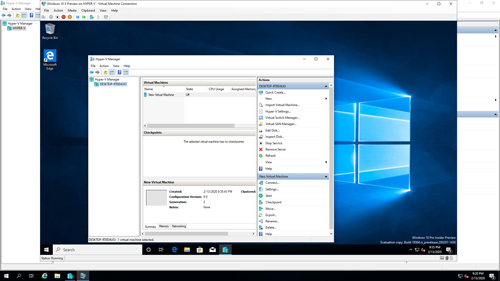 [Click on image for larger view.] Figure 4: Hyper-V is running on a Windows 10 VM.
About the Author
Brien Posey is a 22-time Microsoft MVP with decades of IT experience. As a freelance writer, Posey has written thousands of articles and contributed to several dozen books on a wide variety of IT topics. Prior to going freelance, Posey was a CIO for a national chain of hospitals and health care facilities. He has also served as a network administrator for some of the country's largest insurance companies and for the Department of Defense at Fort Knox. In addition to his continued work in IT, Posey has spent the last several years actively training as a commercial scientist-astronaut candidate in preparation to fly on a mission to study polar mesospheric clouds from space. You can follow his spaceflight training on his Web site.