Posey's Tips & Tricks
Populating a SharePoint Document Library by E-Mail, Part 2
Now that you've created a shared mailbox and a SharePoint team site, Brien walks you through the steps of mail-enabling a document library using Microsoft's Power Automate tool in Office 365.
In Part 1 of this series, I showed you how to create a shared mailbox and a SharePoint document library. Now I want to show you how to place e-mail attachments into the SharePoint document library.
Unfortunately, SharePoint Online does not contain a mechanism for mail-enabling a document library. That being the case, we are going to have to put yet another Office 365 component to work. That component is Power Automate.
If you're not familiar with Power Automate (previously called "Microsoft Flow"), it's an orchestration engine for Office 365. It allows you to perform automated actions in response to a particular event. In this case, the event is receiving an e-mail in a designated mailbox, and the action is going to be copying the attachment into a SharePoint document library.
Microsoft provides numerous templates for Power Automate and there are additional templates that are available for a fee. The template that we'll be using is one of the free templates that is included with Office 365.
Before I get too far into this discussion, I need to point out that Power Automate does not perform events in real-time. In the case of the free template that we will be using, automations are performed every 15 minutes.
To get started, open Power Automate and click on Templates. You can see what the Templates screen looks like in Figure 1.
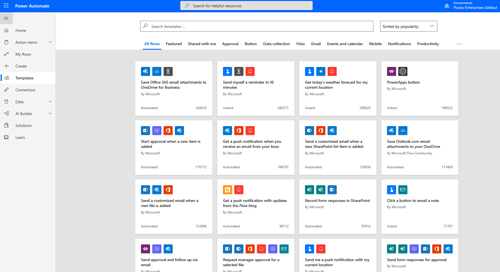 [Click on image for larger view.] Figure 1: Power Automate is based on the use of templates.
Because there are so many templates baked into Power Automate, you may want to use the search box to locate the template that we will be using. The name of the template is "Create a File in SharePoint When New Email Arrives in the Shared Mailbox." You can see the template in Figure 2.
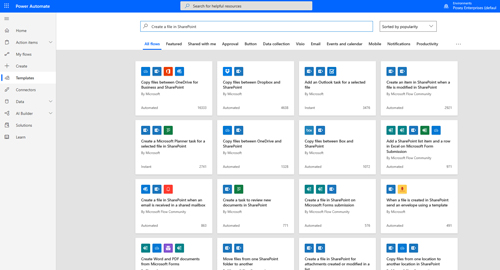 [Click on image for larger view.] Figure 2: Click on the template named "Create a File in SharePoint When New an Email is Received in a Shared Mailbox."
Click on the template, and you will see a screen like the one shown in Figure 3. This screen provides a brief description of what the template does, and it also verifies that Power Automate is able to connect to the required resources. Once you have reviewed this information, click Continue.
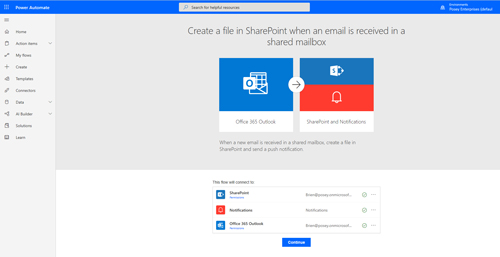 [Click on image for larger view.] Figure 3: Click Continue to begin creating the automated workflow.
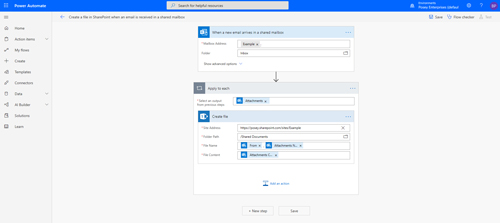
At this point, you will be taken to the screen shown in Figure 4. All you have to do now is fill in the blanks. In the top box, for example, you would specify the shared mailbox that you want to monitor and the folder (typically Inbox) that you want to monitor.
 [Click on image for larger view.] Figure 4: This is what the empty template looks like.
In the second box, you need to set the Site Address to the URL of your SharePoint team site. The folder path should reflect the name of your document library. This setting can be a bit finicky, so I recommend clicking on the folder icon and selecting the folder name from the drop-down list rather than typing it manually. I also recommend leaving the File Name and File Content fields set to their default values.
I typically like to delete the Send Me a Mobile Notification section, but you can certainly use it if you wish. You can see what the finished flow looks like in Figure 5. Now click Save and select the My Flows tab. You should verify that the new flow has been created.
 [Click on image for larger view.] Figure 5: This is a completed flow.
The last step in the process is to test the new flow. This is an easy process -- just send an e-mail with an attachment to the shared mailbox that you created, as shown in Figure 6. Keep in mind that the attachment must be a file type that is supported by SharePoint.
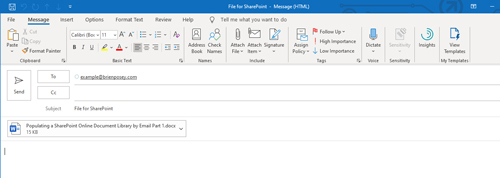 [Click on image for larger view.] Figure 6: Send an e-mail with an attachment to the shared mailbox.
Now there is nothing to do but wait. It can take up to 15 minutes for the flow that you created in Power Automate to engage. Eventually, though, you should see the e-mail attachment show up in your SharePoint document library, as shown in Figure 7.
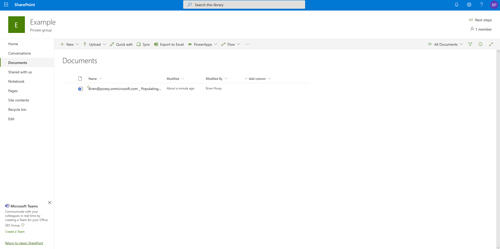 [Click on image for larger view.] Figure 7: The e-mail attachment has been added to the SharePoint document library.
Keep in mind that I have only demonstrated the basics. In a production environment you would definitely want to set up filtering so that Power Automate will only act on messages from specific users. Otherwise, an attacker could send e-mails with malicious attachments to your shared mailbox and have those malicious files added to SharePoint.
About the Author
Brien Posey is a 22-time Microsoft MVP with decades of IT experience. As a freelance writer, Posey has written thousands of articles and contributed to several dozen books on a wide variety of IT topics. Prior to going freelance, Posey was a CIO for a national chain of hospitals and health care facilities. He has also served as a network administrator for some of the country's largest insurance companies and for the Department of Defense at Fort Knox. In addition to his continued work in IT, Posey has spent the last several years actively training as a commercial scientist-astronaut candidate in preparation to fly on a mission to study polar mesospheric clouds from space. You can follow his spaceflight training on his Web site.