Posey's Tips & Tricks
How To Use PowerShell To Uninstall an Application
The Control Panel has long been Microsoft's workhorse for deleting unwanted apps. But while this method works fine most of the time, it's not exactly scalable.
| HIGHLIGHTS |
•PowerShell can be a more scalable solution than using the Control Panel to uninstall applications, especially when dealing with multiple machines.
• To remove an application using PowerShell, you first need to obtain a list of installed applications on the machine using the command "Get-WmiObject -Class Win32_Product | Select-Object -Property Name."
• After identifying the application you want to uninstall from the generated list, you can create a variable and map it to the application, and then use the variable to call the Uninstall method, e.g., "$MyApp = Get-WmiObject -Class Win32_Product | Where-Object{$_.Name -eq 'Free Tools'}" and "$MyApp.Uninstall()." |
|
For what seems like forever, Microsoft has given us an option within the Control Panel to uninstall unwanted applications. But while using the Control Panel to uninstall an application works fine (most of the time), the process isn't exactly scalable.
If you need to remove a certain application from a collection of PCs, then it is likely going to be easier done using PowerShell. Let me show you how it's done.
In the interest of keeping things simple, I'm going to show you how to use PowerShell to remove an application from a single PC. However, this technique can easily be adapted for multiple machines.
The first thing that you need to do is get a list of the applications that are installed on the machine. The command for doing so is:
Get-WmiObject -Class Win32_Product | Select-Object -Property Name
After several seconds, this command will produce a list of most of the applications that are installed on the PC. You can see an example of this in Figure 1.
 [Click on image for larger view.] Figure 1: You can use PowerShell to get a list of the applications that are installed on a PC.
Once you have generated a list of the applications that are installed on the PC, the next order of business is to locate the listing for the application that you want to uninstall. You will need to find the application's exact name as displayed within PowerShell. (I will be the first to admit that the list that PowerShell generates can be a bit overwhelming, even on a PC that has a minimal number of applications installed. I am going to talk about some ways to narrow down the list in a separate column.)
Once you know the application's name, removing the application is a relatively straightforward process. You will need to create a variable and map it to the application that you want to remove. From there, you can direct an uninstall instruction to the variable. Here is how the process works.
Let's suppose that you wanted to remove an application called Free Tools. As previously mentioned, the first step in making this happen is to map a variable to the application. Here is the command that you would use to map a variable to the Free Tools application.
$MyApp = Get-WmiObject -Class Win32_Product | Where-Object{$_.Name -eq "Free Tools"}
Now you can uninstall the application by calling the Uninstall method. Here is the command:
$MyApp.Uninstall()
The technique that I just showed you is the generally accepted way of removing applications from a Windows desktop using PowerShell. Sometimes, however, you will find that there are applications listed in the Windows Control Panel that are not listed when you run the Get-WmiObject cmdlet. In those situations, you will have to use a different approach.
If you look at Figure 2, you can see that the first application listed within Control Panel is called Free Tools Launcher.
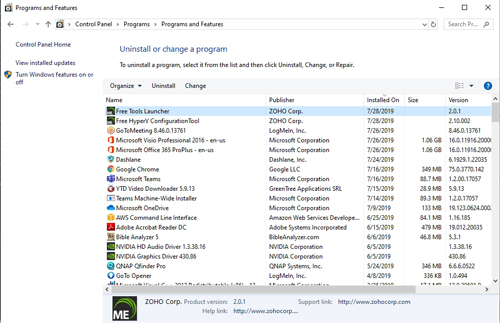 [Click on image for larger view.] Figure 2: My computer contains an application called Free Tools Launcher.
If you look at Figure 3, however, you can see that PowerShell seems to know nothing of this application.
 [Click on image for larger view.] Figure 3: PowerShell cannot find any applications with the word "Free" in their names.
The workaround for this problem is to use the Get-Package cmdlet. If I wanted to find the application named Free Tools Launcher, for example, I would use the following command:
Get-Package -Provider Programs -IncludeWindowsInstaller -Name "Free Tools Launcher"
As you can see, PowerShell is able to locate the Free Tools Launcher in this way. In fact, if you want PowerShell to display all of the various programs listed within the Control Panel, you can simply replace the program name with an asterisk.
The last step in the process is to uninstall the package. For this, Microsoft conveniently provides a cmdlet called Uninstall-Package. Most of the time, you can probably get away with specifying the -Name parameter, followed by the package name. In some cases, though, the Uninstall-Package cmdlet can be a bit finicky, and you may need to experiment with some of its other parameters. You can find the documentation for this cmdlet here.
About the Author
Brien Posey is a 22-time Microsoft MVP with decades of IT experience. As a freelance writer, Posey has written thousands of articles and contributed to several dozen books on a wide variety of IT topics. Prior to going freelance, Posey was a CIO for a national chain of hospitals and health care facilities. He has also served as a network administrator for some of the country's largest insurance companies and for the Department of Defense at Fort Knox. In addition to his continued work in IT, Posey has spent the last several years actively training as a commercial scientist-astronaut candidate in preparation to fly on a mission to study polar mesospheric clouds from space. You can follow his spaceflight training on his Web site.