Posey's Tips & Tricks
How To Use Windows 10 Timeline (While Protecting Your Privacy)
The new feature is incredibly handy for power users, but could cause some stress if you don't like the thought of all of your activities being logged.
One of the new Windows 10 features that I am still getting used to, but love so far, is Timeline. The Timeline feature is currently in preview (this article is based on Windows 10 Build 17074.RS), but should make its way into general availability before too long.
The Timeline feature is as cool as it is powerful. It allows you to go back in time and work on something that you were working on previously. It can also help you to start a task on one device, and switch devices midstream without missing a beat.
Before I show you what the Timeline feature looks like and how to use it, I want to point out upfront that although the Timeline feature offers tremendous potential for improving your productivity, it also has the potential to compromise your privacy.
I will explain the privacy ramifications by using an example that we are all familiar with: the Web browser. As everyone knows, your Web browser keeps a history of all the Web sites that you visit. Of course, we are also all familiar with the idea of deleting this browsing history as a way of preventing others from seeing which Web sites we have visited recently.
As problematic as a browser's history can potentially be, the browser history really only paints a partial view of how someone has been using their computer. The browser history will show recently visited Web sites, but it will not show recently used files, documents or applications.
The Windows Timeline is different. Think of it as a history list that tracks everything that you do on your PC. Admittedly, the Timeline's history is not 100 percent comprehensive, but it does store far more historical data than your browser does.
So with that said, the easiest way to access the Windows Timeline is to press the Window key + Tab. I wish that I could show you what the resulting screen looks like for me, but unfortunately my screen capture software does not seem to be able to access Timeline view. Here's a screenshot from Microsoft, though:
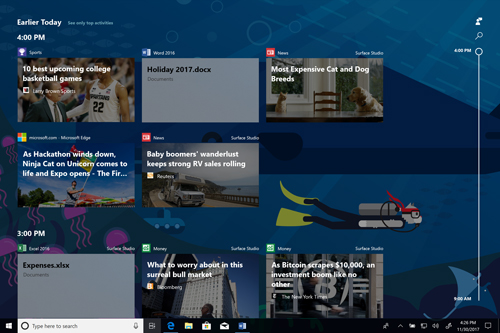 [Click on image for larger view.] Source: Microsoft
The Timeline screen displays a series of index card-like tiles that show a preview of various applications that have been used recently. A scroll bar along the right side of the screen allows you to scroll through your recent usage history.
As I looked at the usage history on my own computer, I was somewhat surprised by its contents. The top of the screen showed the windows that are currently open, including Microsoft Word (which I am using to write this article) and Outlook.
Scrolling down a little bit caused the Timeline to display several browser windows that I had open earlier today while completing an online astrophysics class. From there, the Timeline view jumped to the next day, the day before that, and so on.
There were a few things about Timeline that caught my attention. For starters, the list of today's activities seemed somewhat lacking. I have been on my computer all day long, and have definitely used more browser windows than what was shown by the Timeline. That's when I noticed that the Timeline contains a hyperlink that you can click to view all of the day's activities. Upon doing so, the Timeline went from showing about a dozen of today's activities to showing 198 activities!
The activities listed consisted mostly of browser windows and Office documents. I even noticed a few instances of the Microsoft Solitaire Collection listed on the Timeline. However, third-party applications were missing from the list, as were documents that I had opened in Notepad and Office documents that I had not saved. Hence, you won't be able to use Timeline to go back in time and get a document that you forgot to save (at least not yet).
What About Privacy?
With the Timeline feature gathering so much information, it is only a matter of time before something shows up in your Timeline that you would prefer to keep private. When that happens, you can get rid of the item by right-clicking on it and selecting the Remove command from the shortcut menu.
If you would prefer that Windows 10 not track your activities, you can disable the Timeline. To do so, go to Settings and then click on Privacy, followed by Activity History. As you can see in the image below, you can use this screen to clear your activity history and to disable the collection of activity information.
 [Click on image for larger view.] You can disable the collection of activity history data.
Timeline is still being offered as a release preview, and is still a little bit glitchy. Over time, though, I expect the Timeline to become one of the more heavily used features in Windows 10, especially for those who use multiple Windows devices.
About the Author
Brien Posey is a 22-time Microsoft MVP with decades of IT experience. As a freelance writer, Posey has written thousands of articles and contributed to several dozen books on a wide variety of IT topics. Prior to going freelance, Posey was a CIO for a national chain of hospitals and health care facilities. He has also served as a network administrator for some of the country's largest insurance companies and for the Department of Defense at Fort Knox. In addition to his continued work in IT, Posey has spent the last several years actively training as a commercial scientist-astronaut candidate in preparation to fly on a mission to study polar mesospheric clouds from space. You can follow his spaceflight training on his Web site.